Applying paint to a new wall before the plaster has fully cured is the primary cause of decorative failure in domestic renovations. Learning how to paint fresh plaster correctly is the only way to avoid the high-stakes mistake of paint peeling away in large, costly sheets. You’ve likely felt the urge to rush the process to see your vision come to life, yet the fear of a botched finish is a valid concern for any pragmatic homeowner. We agree that waiting for weeks for a surface to dry feels like an inefficient use of your time.
This expert guide provides the technical precision needed to ensure a permanent, high-quality bond. You’ll gain the knowledge required to manage moisture levels and apply a flawless mist coat that won’t crack or flake. We’ll also examine modern decor alternatives, such as direct-to-wall printing, that offer a seamless, high-resolution finish without the traditional mess of wallpaper or the long wait times of conventional painting.
Key Takeaways
- Identify the critical colour change indicators to ensure your substrate is chemically ready for application, avoiding the common pitfalls of trapped moisture.
- Master the technical requirements of how to paint fresh plaster by mixing a precision mist coat to create a permanent bond with the porous surface.
- Adopt professional cutting-in and layering techniques to transition from the initial foundation to a flawless, high-resolution decorative finish.
- Explore Wall & Ink’s direct-to-wall UV printing as a modern, “no wallpaper, no mess” solution that eliminates the need for traditional priming or prep.
Understanding the Science of Fresh Plaster and Porosity
Fresh plaster is a chemically active, highly porous substrate that requires a technical approach rather than a standard decorative one. Unlike aged surfaces, new plaster is a “raw” material that hasn’t yet reached chemical equilibrium. It acts as a thirsty, alkaline sponge. To master how to paint fresh plaster, you must first respect the underlying chemistry. Raw plaster is characterised by high suction, meaning it will instantly draw moisture out of any liquid applied to it. If you apply standard emulsion directly to this surface, the plaster pulls the water out so quickly that the paint cannot form a proper mechanical bond. Instead of curing, the paint simply dries on the surface as a brittle, unattached film.
The curing process itself relies on carbonation. As the plaster dries, it absorbs carbon dioxide from the atmosphere to convert calcium hydroxide into calcium carbonate. This chemical transition increases the structural integrity of the wall but also releases moisture. Curing typically takes four weeks for a standard skim coat, though thicker applications require longer. Understanding the Science of Fresh Plaster is essential because applying paint too early traps moisture behind the film. This leads to internal pressure that eventually forces the paint away from the substrate.
Why Fresh Plaster is Different from Older Walls
The primary difference between new and aged plaster lies in the pH level. Fresh plaster is highly alkaline, often registering a pH level of 12.0 or higher. Over several months, as carbonation completes, the surface neutralises to a pH of approximately 7.0 or 8.0. High alkalinity can chemically attack the pigments and binders in certain paints, leading to colour fading or “burning.”
- Efflorescence: This occurs when moisture evaporates from the plaster, carrying soluble salts to the surface. These salts crystallise into white, powdery deposits that ruin the finish.
- Texture: A modern multi-finish skim is polished to a glass-like smoothness. This differs significantly from traditional browning or grey coats, which are coarse and provide a more natural “key” for heavy coatings.
- Density: High-density plasters have lower porosity but can still suffer from extreme suction if the surface is over-trowelled during application.
The Consequences of Rushing the Process
Impatience is the most common cause of failure when learning how to paint fresh plaster. One immediate result is “flashing,” where the wall exhibits inconsistent patches of dull and shiny paint. This happens because the porous plaster absorbs the paint binder unevenly, leaving some areas starved of resin. In more severe cases, the paint will peel away in large, rubbery sheets. This occurs because the paint film has effectively “floated” on a layer of moisture or salt rather than gripping the plaster fibres.
Adhesion failure represents the primary risk of decorating damp plaster, leading to a total breakdown of the paint film. When this happens, the only solution is a complete strip-back to the bare substrate, which doubles the labour and material costs of the project.
Timing and Drying: When is Plaster Actually Ready for Paint?
Patience is a technical requirement when learning how to paint fresh plaster. Applying a finish to a wall that hasn’t fully cured is the primary cause of paint failure, leading to peeling, bubbling, and efflorescence. In the UK, a standard skim coat typically requires 7 to 14 days to dry, but this timeline fluctuates based on the specific environmental conditions of your property. Rushing this stage traps moisture behind the paint film, which eventually forces its way out, destroying your finish.
Visual Cues: From Dark Pink to Uniform Matt Pale
The most reliable indicator of readiness is a total colour transition. Wet plaster appears as a deep, dark “plum” or terracotta shade. As moisture evaporates, the surface shifts to a uniform, pale, dusty pink. You must avoid painting if any dark patches remain, particularly in corners or near skirting boards where airflow is restricted. Watch for “hot spots” where the plaster appears white and chalky almost immediately; this suggests the substrate absorbed moisture too quickly, potentially compromising the bond. Using Professional Painting Techniques ensures these variations don’t ruin your final aesthetic.
Environmental Factors Influencing Drying Times
British weather dictates your schedule. A room plastered in July might be ready in 6 days, while the same space in January could take 21 days. Whilst it’s tempting to blast the central heating to speed things up, this often backfires. Rapid temperature spikes cause the surface to “case harden,” trapping moisture behind a dry crust which eventually leads to hairline cracks. It’s vital to distinguish between “set” time and “dry” time. Plaster sets hard within 2 to 4 hours, but it remains chemically active and saturated for weeks. For those seeking a high-resolution finish without the wait, direct-to-wall printing offers a modern alternative once the substrate is stable.
Avoid using industrial dehumidifiers during the first 48 hours. These machines strip moisture so aggressively that the plaster shrinks and pulls away from the background, resulting in structural failure. Instead, rely on natural ventilation through cracked windows. Use this checklist to confirm your walls are ready:
- Uniformity: The colour is a consistent light pink with no dark “shadows” or damp patches.
- The Touch Test: The wall feels room temperature, not cold or damp to the palm of your hand.
- The Sweat Test: Tape a 30cm square of clear plastic to the wall for 24 hours. If condensation appears behind it, the plaster is still “breathing” moisture.
- Surface Texture: The wall looks matt and dusty rather than shiny or slick.
Following these steps ensures your base is technically sound before you move on to the mist coat stage. Knowing how to paint fresh plaster starts with respecting the chemistry of the material. Only when the moisture content has dropped to a safe level can you guarantee the long-term durability of your decor.
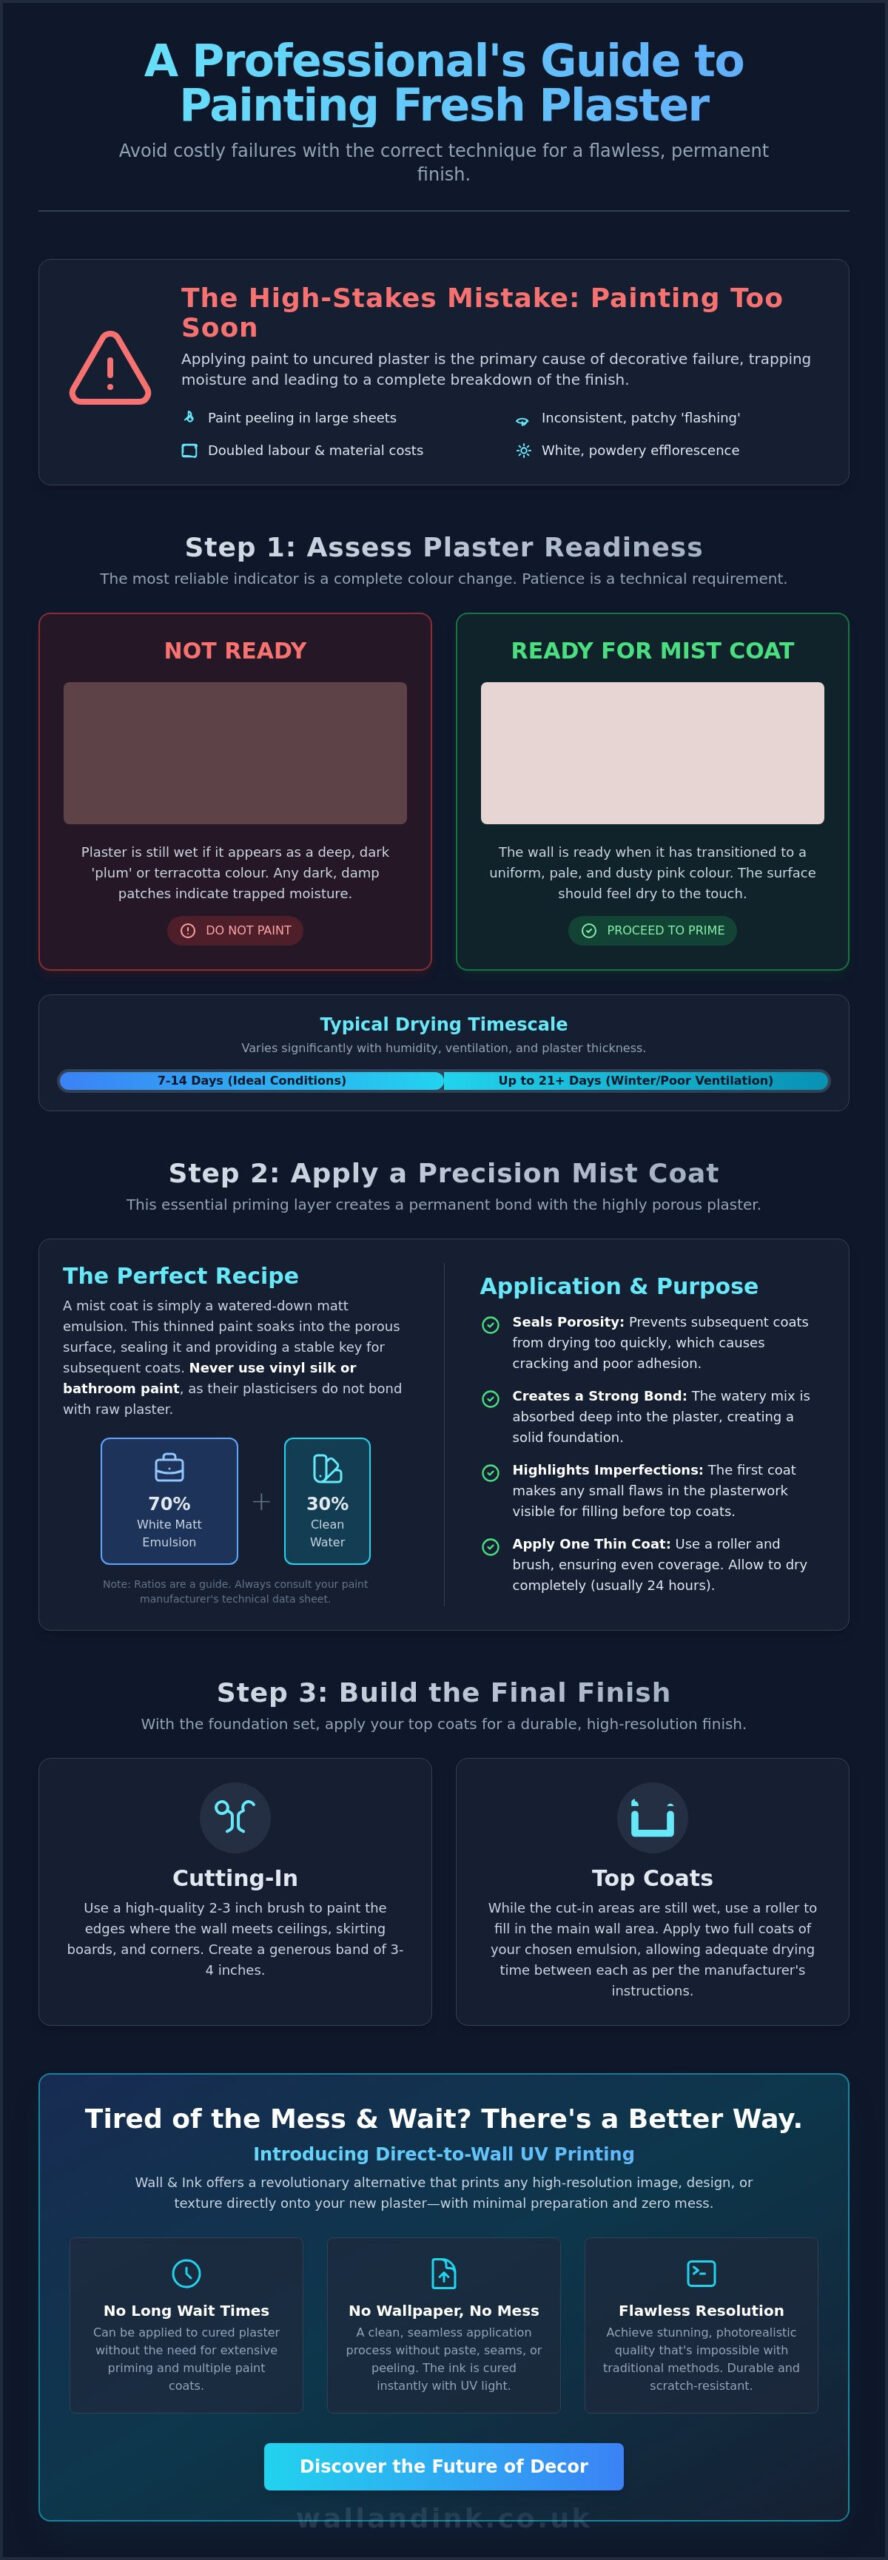
Mastering the Mist Coat: The Essential Foundation
Fresh plaster is an incredibly thirsty substrate. If you apply full-strength emulsion directly to a new wall, the dry plaster will suck the moisture out of the paint too rapidly. This prevents the paint from forming a mechanical bond with the surface, leading to cracking and eventual peeling. A mist coat acts as a sacrificial, watered-down primer designed specifically to penetrate the pores of the plaster. It creates a stable, unified surface for your topcoats to grip onto. When learning how to paint fresh plaster, this step is the most critical for long-term durability.
The standard mixing ratio for a mist coat is typically 70/30 or 80/20 paint to water. You should only use a cheap, non-vinyl contract matt for this layer. Avoid vinyl, silk, or gloss paints at all costs. These products contain plastic resins that create a waterproof film. Because fresh plaster continues to breathe and release moisture for several weeks, a vinyl film will trap that moisture, causing the paint to bubble and flake away. Contract matt is breathable, allowing the wall to finish drying whilst providing a solid foundation.
Step-by-Step: Mixing and Applying the Mist Coat
Consistency is the primary factor in a successful mist coat. Aim for the thickness of single cream. It must be fluid enough to be absorbed deep into the plaster but thick enough to leave a visible pigment layer. Use a large bucket for mixing and stir thoroughly to ensure the water is fully integrated. For application, a medium-pile roller is significantly more efficient than a brush for large areas. It provides a more uniform finish and reduces the risk of visible brush marks.
- Manage Drips: Because the mixture is thin, runs and drips are common. Keep a damp cloth ready and back-roll over any drips immediately.
- Work Quickly: Plaster absorbs liquid fast. Work in manageable sections to maintain a wet edge.
- Check Absorption: If the paint disappears instantly and leaves a dusty residue, your mix might be too thin.
Why Primers and Sealers Aren’t Always the Answer
Many retailers push expensive “new plaster” primers that can cost upwards of £40 per tin. In most residential scenarios, a standard £20 tub of contract matt is technically superior because it allows for better breathability. Specialist alkali-resisting primers are only required if the plaster is exceptionally alkaline or “hot,” which is a specific condition usually identified by professional decorators during the drying phase. Following a professional guide on Mastering the Mist Coat ensures you don’t overspend on unnecessary chemicals.
One of the most frequent trade mistakes is using PVA glue as a sealer before painting. Never apply PVA to a wall you intend to paint. PVA creates a smooth, non-porous plastic skin that paint cannot adhere to. Once the topcoat dries and shrinks, it will simply pull the PVA off the wall, resulting in total finish failure. Stick to the proven mist coat method to ensure you know how to paint fresh plaster with industrial precision and a professional finish.
Professional Painting Techniques and Avoiding Failure
Once the mist coat has successfully sealed the substrate, the focus shifts from absorption management to technical precision. Achieving a seamless finish when you learn how to paint fresh plaster depends on maintaining a wet edge during the application of decorative layers. Professional decorators utilise a technique known as “cutting in” where the edges, corners, and skirting lines are painted with a 2-inch synthetic brush before the main wall areas are rolled. To avoid the “picture framing” effect, where the border looks different from the rolled centre, work in small sections to ensure the brushed paint hasn’t dried before the roller meets it.
Industrial-grade results require a methodical approach to surface texture. Sanding between every coat is a non-negotiable step for high-end finishes. Use a fine 180-grit or 240-grit sandpaper to lightly de-nib the surface once the first topcoat is dry. This process removes microscopic imperfections and dust particles that settle in the wet film. For commercial spaces, such as high-traffic office corridors or retail units, the choice of material is driven by durability and scrub-resistance ratings. Whilst a residential bedroom might only require a standard breathable emulsion, a commercial environment necessitates high-performance acrylic eggshell to withstand constant physical contact.
While the technical focus here is on fresh plaster, many homeowners look to achieve the same level of precision on other surfaces. To see how these professional standards translate to cabinetry and kitchen renovations, discover Higher Impact Painting and their guide to high-impact interior transformations.
Topcoat Application for a Durable Finish
Selecting the right sheen level is the final step in the technical brief. Matt finishes are the industry standard for hiding minor plastering imperfections because they absorb light. Silk finishes offer washability but highlight every trowel mark, making them less popular in modern specifications. For a balance of durability and aesthetics, eggshell provides a sophisticated low-sheen finish. Professionals always apply two full-strength topcoats after the mist coat. Allow a minimum of four hours between layers to ensure the paint film has cured enough to accept the next application without dragging. This multi-layered approach ensures the depth of colour and mechanical strength required for a long-lasting result.
Troubleshooting Common Plaster Painting Issues
Even with careful preparation, physical failures can occur if the environment isn’t controlled. “Crazing” or spider-web cracking typically happens when the topcoat dries too quickly or is applied over a mist coat that hasn’t fully cured. If you notice bubbling, it usually indicates trapped moisture or “efflorescence” salts pushing through the surface. These pockets of air or salt disrupt the bond between the paint and the plaster. Sanding back to the substrate is the only fix for major peeling. To avoid the complexities of traditional decorating and the risks of substrate failure, consider a direct-to-wall printing solution that eliminates the need for multiple paint layers and wallpaper.
The Modern Alternative: Direct-to-Wall Printing on New Plaster
Learning how to paint fresh plaster is a rite of passage for many homeowners and site managers, yet the traditional process is notoriously slow. You wait for the plaster to dry, apply a mist coat, and then wait again for topcoats. Wall & Ink provides a modern alternative that eliminates the mess. Our proprietary UV printing technology applies high-resolution graphics directly onto your new walls. It’s a “no wallpaper, no mess” solution that delivers industrial-grade precision in both residential and commercial settings.
The technical advantage lies in the bonding process. Traditional paint requires a porous surface to be sealed with a primer or mist coat to prevent the plaster from sucking the moisture out of the paint too quickly. Our UV inks operate differently. They bond with the fresh plaster substrate and cure instantly under ultraviolet light. This creates a finish that’s exceptionally durable and resistant to scratches or fading. You bypass the need for multi-day painting and drying cycles, moving from a bare wall to a finished masterpiece in hours rather than weeks.
Why Direct-to-Wall Printing Surpasses Traditional Murals
Traditional murals usually involve vinyl wraps or wallpaper, both of which are prone to failure. In many UK properties, fluctuating humidity causes wallpaper edges to peel or vinyl to bubble. Direct-to-wall printing removes these vulnerabilities entirely. Because the ink is applied directly to the surface, there’s no adhesive to fail and no layer to delaminate. The precision of UV ink allows for 1200dpi resolution on porous surfaces like fresh plaster, brick, or even concrete. It integrates seamlessly with your room’s architectural features, flowing around sockets and into corners without the drips or uneven lines associated with a “hand-painted” mess.
Transforming Your Space with Wall & Ink
Our process is designed for pragmatic decision-makers who value efficiency. Every project begins with a bespoke design consultation to ensure the artwork fits your dimensions perfectly. We provide a digital visualisation of the design on your specific wall before a single drop of ink is applied. This eliminates guesswork and ensures the final result matches your vision exactly. Whether you’re looking to brand a commercial lobby or add a unique feature to a residential bedroom, the speed of execution is unmatched. A large-scale mural that would take a decorator days to complete is finished by our technicians in a single session, leaving your space clean and ready for immediate use.
Elevate Your New Walls with Modern Precision
Mastering the finish on new surfaces requires patience and technical precision. You’ve now learned that successful results depend on waiting for the plaster to reach a uniform light pink shade and applying a correctly thinned mist coat to manage high porosity. While understanding how to paint fresh plaster is a vital skill for any renovation, traditional methods often involve multiple coats and significant downtime. Failing to account for the substrate’s moisture levels can lead to paint failure within weeks.
If you’re looking for a more efficient path to a high-impact finish, Wall & Ink provides a modern solution. Our direct-to-wall printing service bypasses the risks of peeling or bubbling associated with traditional decorating. We use high-resolution UV ink technology to apply designs directly onto any substrate, including fresh plaster, ensuring a durable finish that stands the test of time. We offer a no wallpaper, no mess guarantee, providing industrial-grade precision delivered by our specialist UK-wide team.
Get a bespoke quote for your wall printing project from £120/m²
Your walls are a blank canvas; choose the method that ensures they stay flawless for years to come. Once your finish is perfectly cured, you can complete the look by exploring custom picture frames online to display your art without damaging your new investment.
Frequently Asked Questions
Can you paint on plaster that is still pink?
No, you shouldn’t paint on plaster while it’s still pink. Pink sections indicate that moisture is still present within the material, which will prevent paint from adhering. You must wait for the entire surface to turn a uniform, pale grey or white. This transition typically takes between 4 and 14 days depending on the depth of the plaster and the room’s ventilation.
How many mist coats do I need on new plaster?
One thorough mist coat is usually sufficient for most domestic projects. This initial layer acts as a primer, soaking into the porous surface to provide a keyed base for the topcoat. When learning how to paint fresh plaster on particularly “thirsty” or uneven surfaces, a second mist coat ensures the final colour doesn’t appear patchy or soak in too quickly.
What happens if I don’t use a mist coat?
The paint will fail to bond and eventually peel off in large sheets. New plaster is exceptionally absorbent and will instantly suck the moisture out of undiluted paint. This prevents the paint from curing into a durable film, leaving it sitting loosely on the surface. Without a mist coat, your finish will likely flake within 6 to 12 months.
Is it better to use a brush or a roller for the first coat on new plaster?
A medium-pile roller is the superior choice for applying the mist coat to large areas. It provides a more uniform distribution of the diluted paint, ensuring the porous substrate is sealed evenly. Use a high-quality synthetic brush only for cutting in around the perimeter and corners where the roller cannot reach, maintaining a seamless and professional finish.
Can I use a dehumidifier to speed up plaster drying for painting?
Don’t use a dehumidifier or direct heaters during the first 48 hours of the drying process. Forcing the moisture out too quickly causes the plaster to shrink rapidly, leading to hairline cracks or “blowing” where the plaster separates from the wall. Natural ventilation through open windows is the safest method to ensure the structural integrity of the finish.
How can I tell if my plaster is dry enough to paint?
The plaster is ready when it’s a consistent, light colour with no dark or damp patches. Any visible dark spots mean the moisture content is likely above 10 percent, which is too high for painting. For technical precision, use a moisture meter to confirm the reading is below 5 percent before you start the process of how to paint fresh plaster.
Why is my paint peeling off my new plaster walls?
Peeling is almost always caused by a lack of adhesion between the paint and the substrate. This occurs if you skip the mist coat or if you apply paint to plaster that hasn’t fully cured. Without a diluted 70/30 water-to-paint ratio to penetrate the surface, the paint dries as a separate, brittle layer that cannot withstand minor temperature or humidity changes.
What is the best paint to use for a mist coat?
A standard, non-vinyl matt emulsion is the most effective choice for a mist coat. Avoid using “silk” or “durable” paints for this stage because they contain high levels of polymer that prevent the mixture from soaking into the wall. A simple contract matt diluted with 30 percent water creates the ideal consistency to seal the fresh plaster effectively.