What if your bespoke wall mural arrives, only for you to realise that the most striking detail is permanently hidden behind a structural pillar or a heavy desk? It’s a common concern for pragmatic project managers and homeowners alike. Investing in large-scale graphics involves a significant commitment, and the fear of a scale mismatch or colour distortion under natural light is entirely justified. A professional digital mockup for wall mural applications is the industrial solution to these variables, acting as a technical bridge between a creative concept and a physical surface.
We understand that you need more than just a vague visual; you require a precise preview that incorporates your actual furniture and fixtures. This article outlines how our digital mockup process eliminates the guesswork, providing you with the confidence to sign off on a design that fits your unique architectural space. You’ll discover the technical steps we take to ensure spatial harmony and learn how a realistic visualisation prepares your project for a flawless print execution.
Key Takeaways
- Learn why a bespoke digital mockup for wall mural projects is superior to generic templates, providing a high-fidelity visualisation tailored to your specific architectural features.
- Understand the technical workflow used to correct lens distortion and perspective, ensuring your design is perfectly aligned with the physical reality of your wall.
- Discover how to eliminate design anxiety by visualising your mural alongside existing furniture, fixtures, and natural lighting before any ink is applied.
- Master the simple steps to prepare your space for baseline photography to ensure the most accurate technical representation possible.
- See how virtual pixels are converted into durable, scratch-resistant UV ink during the final transition from digital approval to physical wall printing.
What is a Digital Mockup for a Wall Mural?
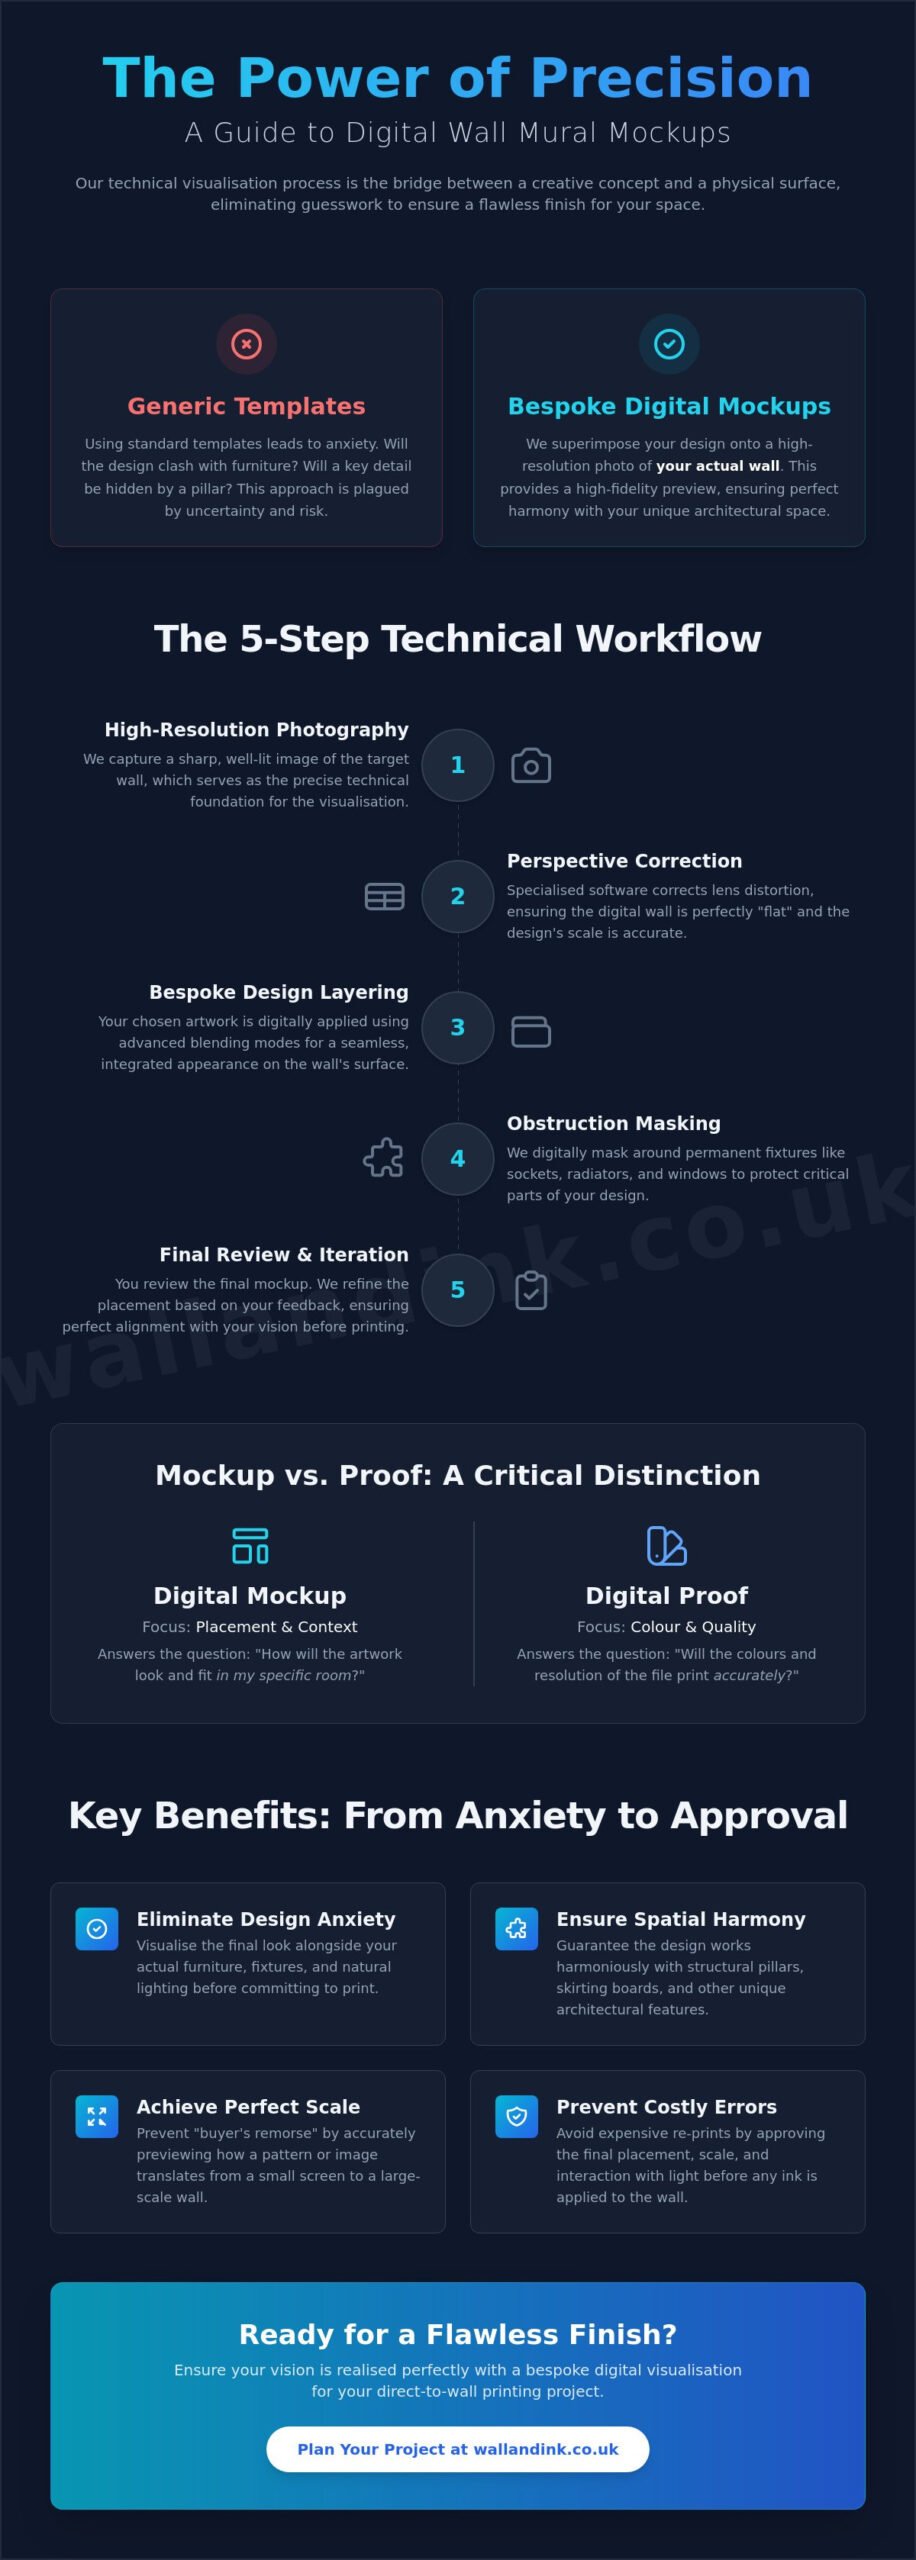
A digital mockup isn’t a mere decorative sketch. In the context of specialist wall printing, a digital mockup for wall mural applications is a high-fidelity technical visualisation that superimposes your chosen artwork onto a high-resolution photograph of your specific physical wall. This isn’t a generic template found on standard design platforms; it’s a bespoke architectural visualisation that respects the unique dimensions and obstructions of your space. By using actual photography of the target surface, we ensure that the artwork responds to the physical environment rather than existing in a vacuum.
This process serves as a vital stage in the direct-to-wall printing journey. It introduces the concept of “spatial proofing,” which is the practice of ensuring a design works harmoniously with the room’s geometry. We don’t just look at the art; we look at how the art interacts with skirting boards, light switches, and structural pillars. This industrial approach to visualisation eliminates the guesswork that often plagues traditional mural installations, providing a reliable blueprint for the final execution.
The Difference Between a Mockup and a Proof
It’s vital to distinguish between these two technical documents to ensure project clarity. A digital proof is a file-centric check; it verifies colour accuracy, resolution, and technical print specifications. In contrast, a digital mockup for wall mural projects focuses on the relationship between the artwork and the physical room. While the proof ensures the ink will look right, the mockup ensures the placement is correct. Both are essential components of our quality control process, preventing errors that could lead to costly re-prints. To understand the broader context of this technology, one can explore the history of the digital mockup across various engineering and design sectors.
Why Visualisation is Critical for Large-Scale Art
Scaling a design from a computer monitor to a four-metre wall introduces significant psychological and aesthetic shifts. A pattern that feels subtle on a screen can become overwhelming when it dominates a room. Professional mockups prevent “buyer’s remorse” by setting realistic expectations of how the scale will feel in person. They also allow us to assess how the design interacts with natural light sources. Seeing how shadows fall across the digital render helps us adjust the artwork’s brightness or contrast before the UV printer begins its work, ensuring the final result is both durable and visually balanced.
The Technical Process of Creating a Professional Visualisation
Creating a high-fidelity visualisation requires a methodical, five-step technical workflow. Unlike basic photo overlays that ignore the physics of a room, a professional digital mockup for wall mural projects accounts for the three-dimensional reality of your environment. This process transforms a simple image into a reliable technical blueprint.
- Capturing high-resolution baseline photography: We start with a sharp, well-lit image of the target surface. This photo serves as the technical foundation for all subsequent data layers.
- Correcting perspective and lens distortion: Every camera lens introduces slight warping. We use specialised software to ensure the wall appears perfectly “flat” in the digital space, removing any optical curvature that could skew the design’s scale.
- Layering the bespoke design: The artwork is applied digitally using advanced blending modes. This ensures the art looks integrated into the wall’s surface rather than appearing as a floating overlay.
- Incorporating physical obstructions: We digitally mask around permanent fixtures such as windows, radiators, and electrical sockets. This ensures no critical part of your design is obscured or awkwardly cut.
- Final review and iteration: We refine the placement based on your feedback, ensuring the final result aligns perfectly with your operational requirements.
Accounting for Room Perspective and Scaling
Precision is the hallmark of industrial wall printing. We use vanishing points within the software to ensure the art sits naturally within the room’s depth. By using a physical reference measurement, such as the height of a door frame, we calibrate the digital scale to match the physical reality. This allows us to calculate the exact square footage required for the direct-to-wall printing process. Research into the Benefits of Digital Mockups: Overcoming Design Anxiety suggests that this level of spatial accuracy is essential for bridging the gap between digital concepts and physical environments. It’s about ensuring the art is “seated” correctly in its future home.
Simulating Lighting and Surface Texture
A wall isn’t just a flat plane; it’s a substrate with specific characteristics. Our mockups mimic the way UV ink interacts with different surfaces, whether it’s smooth plaster or textured brick. We apply shadow layers to replicate the ambient behaviour of light in your specific room. This three-dimensional simulation shows you how the mural will look at different times of day, ensuring the colours remain vibrant and legible. This technical foresight prevents the common industry failure of designs looking “washed out” once they’re actually printed on a non-standard surface.
Benefits of Digital Mockups: Overcoming Design Anxiety
Large-scale environmental graphics represent a significant capital expenditure. The anxiety associated with permanent wall printing usually stems from a lack of visual certainty. A professional digital mockup for wall mural projects serves as a risk-mitigation tool that replaces intuition with technical verification. By integrating the design into a photographic baseline, we eliminate the danger of clashing with existing colour palettes or architectural finishes. This methodical approach ensures that every branding element is positioned with surgical precision, avoiding accidental obscuration by doorways or fixed furniture.
In commercial settings, these visualisations are indispensable for securing stakeholder approval. Decision-makers often struggle to translate a flat PDF design into a physical environment. Providing a “real-life” preview streamlines the sign-off process and ensures everyone is aligned before the machinery arrives on-site. This efficiency reduces project waste and prevents the logistical nightmare of a design that doesn’t fit the room’s operational reality. It’s about delivering a predictable outcome in an industry where guesswork is a liability.
Spatial Harmony and Furniture Placement
A mural doesn’t exist in isolation. It must coexist with desks, shelving, and customer seating. Mockups allow us to decide if a piece of furniture needs to be repositioned to highlight a specific design focal point. In busy retail or hospitality environments, this spatial planning is critical. We use the digital preview to “frame” the art around structural features like pillars or windows, ensuring the composition feels intentional rather than accidental. This level of architectural integration is what distinguishes professional wall printing from generic wall coverings.
Confidence in Colour and Detail
One of the most frequent concerns involves colour translation. Clients often ask if the vibrant blue on their phone will look the same on a four-metre plaster wall. Mockups address this by simulating how the design reacts to the room’s specific lighting conditions. This phase also allows us to test multiple iterations without incurring any physical costs. You can compare different finishes, such as matte or gloss, to see which best handles the ambient light of your space. This iterative process ensures the final output is technically sound and aesthetically perfect before the first drop of ink is deployed.
How to Prepare Your Space for an Accurate Mockup
The technical integrity of a digital mockup for wall mural applications is directly proportional to the quality of the baseline data provided. To ensure your visualisation is a reliable blueprint rather than a mere approximation, you must provide a clean, high-resolution photographic foundation. This allows our software to accurately map the design to the physical properties of your substrate.
- Clear the area: Remove temporary clutter, furniture, or wall hangings. The more of the wall surface that is visible, the more accurately we can simulate the final print.
- Prioritise natural lighting: Take your baseline photos during the day. Avoid using a camera flash, as this creates artificial “hot spots” and glare that distort the wall’s true colour and texture.
- Maintain a dead-centre angle: Stand directly opposite the wall to minimise perspective distortion. Photos taken from a sharp side angle, known as “keystoning,” require digital correction that can compromise scale accuracy.
- Include a reference point: Capture a standard architectural feature like a door frame or a light switch within the frame. This provides a physical anchor for scale comparison.
- Maximise resolution: Use the highest quality setting on your camera or smartphone. High-resolution images allow us to see fine surface details, such as the grain of the plaster or the mortar lines in brickwork.
Photography Tips for the Best Visualisation
Achieving a professional-grade result requires capturing the entire vertical and horizontal span of the wall. Ensure the frame includes the junction where the wall meets the floor and the ceiling. If the room is narrow or unusually shaped, take multiple shots from different positions. This allows us to select the angle that best represents the spatial flow of the room. Remember that we are creating a technical model; the clearer the input, the more precise the output.
Providing the Right Measurements
Industrial precision requires measurements in millimetres. When you request a wall printing consultation, providing exact dimensions is the first step toward a successful installation. Measure the total width and height, but don’t forget to document “voids” such as windows, built-in cupboards, or permanent fixtures. We also require information regarding the wall material. Whether the surface is bare plaster, brick, or painted wood, this data helps us adjust the digital mockup to mimic how the UV ink will interact with that specific substrate. This level of detail ensures that your bespoke design fits perfectly within its unique architectural environment.
From Digital Mockup to Physical Wall Printing
Once the digital mockup for wall mural is approved, the project transitions from a virtual simulation to a physical reality. We convert the approved technical layout into a high-resolution print file calibrated specifically for our direct-to-wall machinery. This isn’t a simple copy-and-paste operation; it’s a technical translation that ensures every pixel corresponds to a precise coordinate on your wall. The result is a mural that mirrors the digital render with absolute fidelity, only with the added vibrancy of physical pigments.
The transition from virtual pixels to durable UV ink represents a significant shift in quality compared to legacy methods. Traditional wallpaper often suffers from visible seams, peeling edges, and adhesive failures over time. Our process eliminates these issues by applying the design directly to the substrate. The UV ink is scratch-resistant and bonds instantly to the surface, creating a finish that is as permanent as the wall itself. You don’t have to worry about the “lifting” common with vinyl decals or the bubbling associated with paper installations.
The Precision of UV Printing Technology
Our equipment offers mechanical superiority that manual application simply cannot match. The printer interprets the coordinates from the digital mockup for wall mural to ensure perfect alignment with your room’s architectural features. Because the ink is cured instantly by integrated UV light, the wall is touch-dry and ready for use as soon as the print head finishes its final pass. There’s no waiting for glue to dry and no lingering chemical odours to dissipate, making it ideal for high-traffic commercial or educational environments.
Why Choose Wall & Ink for Your Mural Project
We operate as specialists with national UK coverage, bringing industrial-grade technology to professional, retail, and private environments. Our commitment to radical transparency means you receive clear pricing and a methodical, step-by-step process from the initial consultation to the final execution. We don’t hide costs behind complex consultation requirements; instead, we lead with honesty and technical expertise. Our goal is to provide a service designed for pragmatic decision-makers who value efficiency and high-quality results. Contact Wall & Ink for a bespoke digital mockup today to see how we can transform your space with precision and durability.
Secure Your Vision with Technical Precision
The transition from a creative concept to a permanent architectural feature requires a methodical approach. By utilising a professional digital mockup for wall mural applications, you eliminate the variables that often lead to project delays or aesthetic inconsistencies. You’ve seen how spatial proofing protects your branding and how high-resolution photography ensures every detail aligns with your room’s unique geometry. This process is not just about visualisation; it’s about establishing a technical blueprint for success.
Our direct-to-wall UV printing technology provides a durable, seamless finish that traditional wallpaper cannot achieve. With national UK service coverage and bespoke design consultations included, we handle the complexities of installation so you don’t have to. We provide the expertise needed to transform virtual pixels into scratch-resistant, vibrant reality on any substrate. It’s time to replace guesswork with industrial-grade certainty.
Book your mural consultation and digital visualisation today and take the first step towards a flawless wall transformation. We look forward to bringing your unique architectural space to life with precision and reliability.
Frequently Asked Questions
How much does a digital mockup for a wall mural cost?
The investment for a digital visualisation is typically integrated into our comprehensive project proposal. We maintain a policy of radical transparency regarding our costs, which are calculated based on the square footage and technical complexity of the target surface. By incorporating the mockup into the initial consultation phase, we ensure you have a clear understanding of the financial requirements before any physical work begins on your property.
Do I need a professional photographer to take the base photo?
A professional photographer is not required to capture the baseline image. Most modern smartphones provide sufficient resolution for our technical team to work with. We provide a clear set of instructions to ensure you capture the correct perspective and lighting. This data allows our software to create a precise digital mockup for wall mural projects without the need for expensive site visits.
Can a mockup show how the mural will look on a textured brick wall?
Our visualisation software is designed to simulate the interaction between UV ink and various substrates. Whether your wall is smooth plaster or heavily textured brick, the mockup will replicate how the design sits within the physical grain of the surface. This technical foresight prevents the design from looking like a flat overlay and ensures it appears integrated into the building’s architecture.
How long does the digital visualisation process take?
The standard turnaround for a professional visualisation is approximately 48 to 72 hours from the moment we receive your site photographs and measurements. This methodical window allows our specialists to correct lens distortion and accurately mask around fixtures. We prioritise efficiency to ensure your project moves swiftly from the digital approval stage to the final on-site print execution.
What happens if I want to change the design after seeing the mockup?
Iterative adjustments are a standard part of our design workflow. If the initial mockup reveals that a branding element is obscured by furniture or that the scale feels overwhelming, we can reposition the artwork instantly. This stage is specifically designed to eliminate guesswork, allowing you to sign off on the final design with total confidence in the physical outcome.
Is the colour in the mockup 100% accurate to the final print?
We utilise colour-calibrated workflows to ensure the highest possible level of accuracy between the digital render and the final print. However, because digital screens emit light (RGB) and UV printers use physical pigments (CMYK), slight variations can occur. For projects with strict branding requirements, we can provide physical print samples on your specific substrate to verify colour fidelity before the full-scale installation.
Can you create a mockup for an exterior wall mural?
We frequently create mockups for exterior wall printing to help clients visualise large-scale graphics in an outdoor context. This process accounts for environmental variables such as natural light and surrounding structures. Providing a digital mockup for wall mural projects on exterior surfaces ensures the artwork complements the building’s facade and remains legible from a distance in various weather conditions.
Do I need to provide my own artwork for the mockup?
You can provide your own high-resolution files, or you can collaborate with our team to develop a bespoke design. If you provide the artwork, we will conduct a technical review to ensure the resolution is sufficient for large-scale printing. Our role is to ensure that your vision, whether self-sourced or created by us, is perfectly adapted to the unique geometry of your wall.