
What if the single biggest threat to your bespoke wall mural isn’t the ink or the design, but the invisible moisture trapped within your new plaster? It’s a common dilemma for property owners who are eager to see their vision come to life but fear ruining a significant investment by acting too soon. You’ve likely spent weeks planning your space, and the urge to finish the project is strong. However, understanding exactly how long for plaster to dry before wall printing is the difference between a permanent masterpiece and a costly technical failure.
We agree that waiting for a renovation to cure can feel like an unnecessary delay, especially when the wall appears uniform in colour. This guide eliminates the guesswork by providing precise timelines and technical requirements for preparing fresh plaster for high-resolution UV printing. You’ll gain the confidence that your print will remain pristine for years. We will detail the specific moisture levels required, the impact of UK environmental variables, and the essential preparation steps that ensure our industrial-grade UV inks bond perfectly with your substrate.
Key Takeaways
- Learn the technical distinction between surface dryness and deep-tissue curing to determine exactly how long for plaster to dry before wall printing.
- Identify how UK environmental variables, such as humidity and airflow, dictate the precise timeline for achieving a stable, print-ready substrate.
- Understand the mechanical bonding process of UV inks and why they require a more thoroughly cured surface than traditional breathable emulsion paints.
- Utilise a step-by-step verification checklist, including the moisture patch test, to ensure your wall is ready for high-resolution digital art.
- Discover why professional-grade wall printing offers a more durable and efficient alternative to traditional wallpaper or vinyl decals in new builds.
The Essential Timeline: How Long Does Plaster Take to Dry?
Plastering is a foundational trade, but for high-resolution UV printing, the chemical state of the substrate dictates the final result. To understand the requirements, one must consider what plaster is; it’s a gypsum-based material that relies on a specific crystallisation process to harden. While traditional decorators often apply a “mist coat” of breathable emulsion to slightly damp walls, our technical process is different. Direct-to-wall printing involves UV-cured inks that form a durable, non-porous bond. This means the substrate must be entirely stable before we begin.
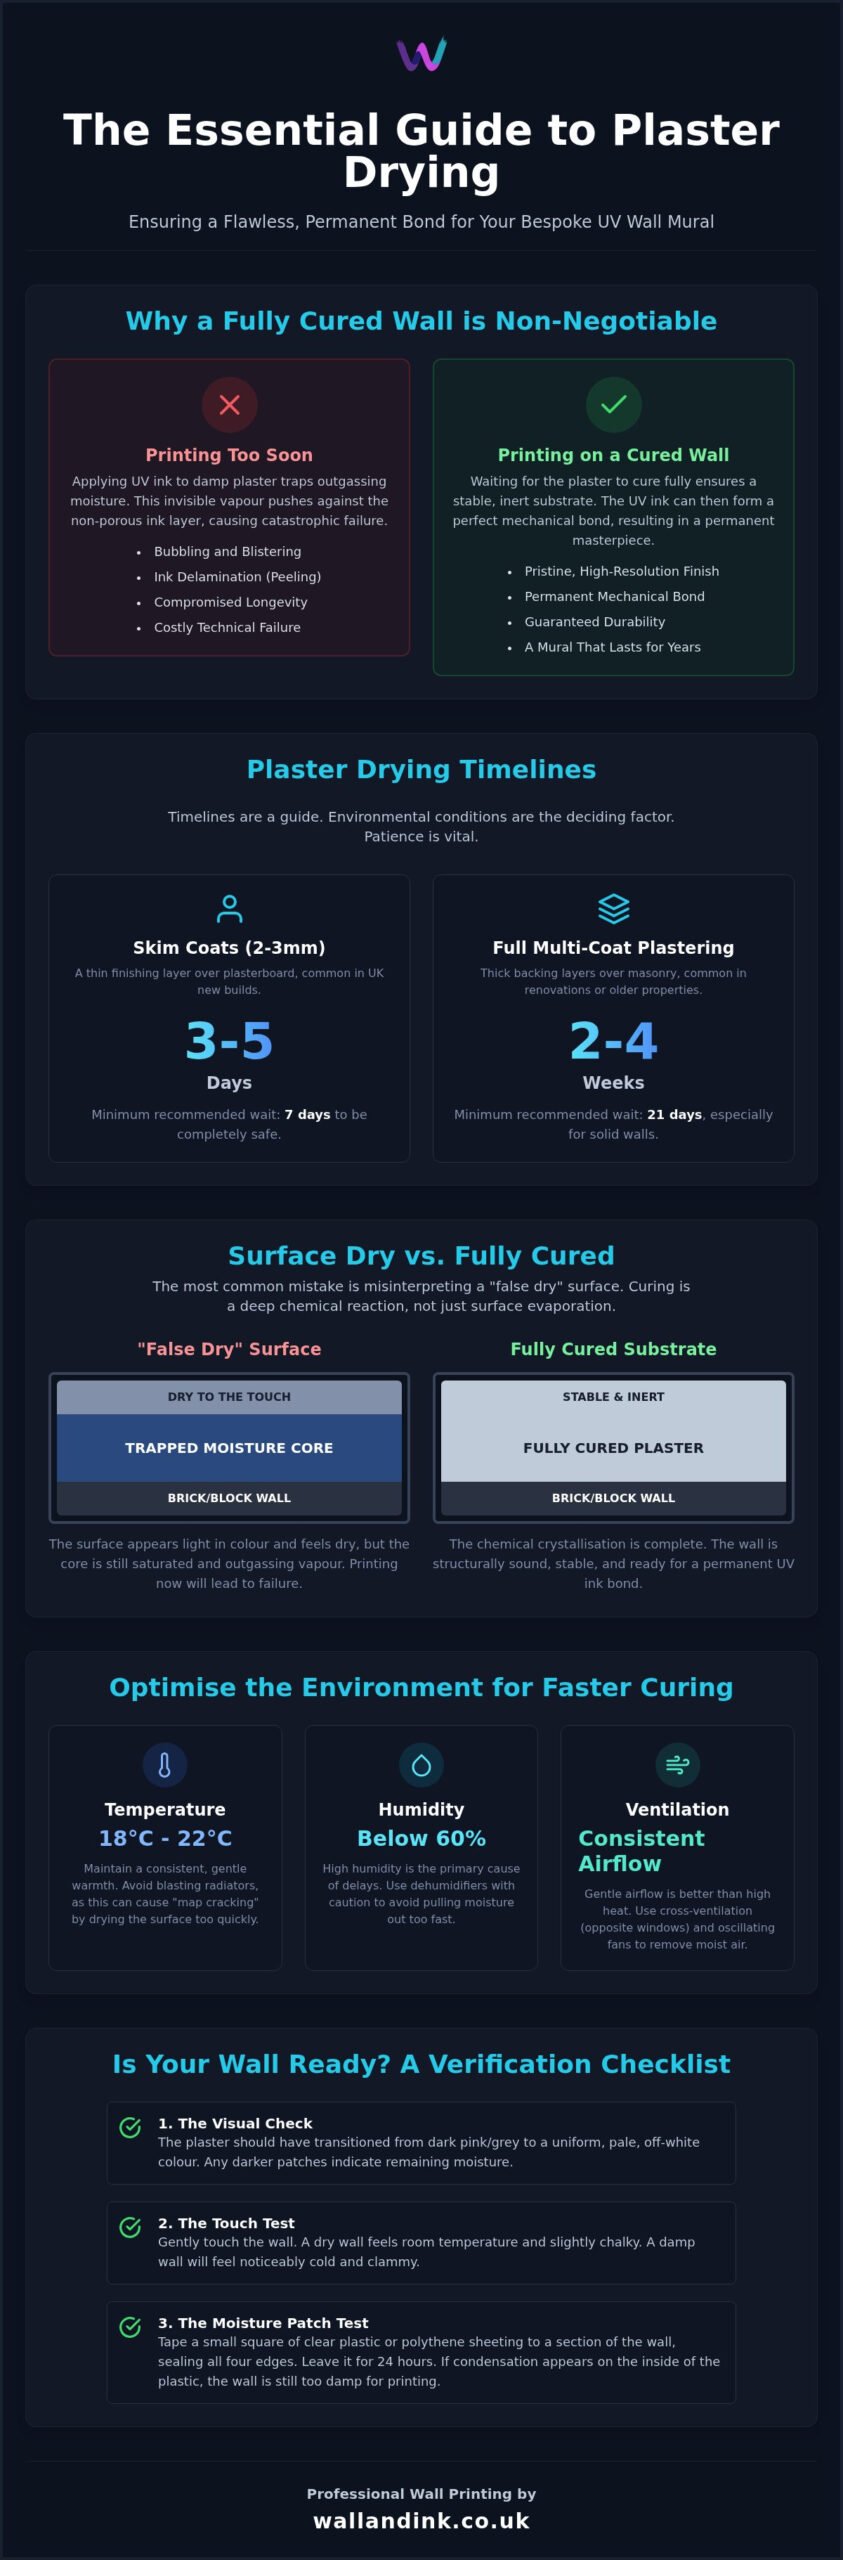
A primary concern for any project manager is how long for plaster to dry before wall printing can safely commence. In the UK, the visual transition from a deep pink to a uniform, pale off-white is the first indicator of readiness. However, visual cues alone aren’t enough for industrial-grade applications. We work to a baseline timeline that accounts for the depth of the material and the specific substrate used:
- Skim coats (2-3mm): 3 to 5 days under standard conditions.
- Full multi-coat plastering: 2 to 4 weeks, depending on the thickness of the backing layers.
Drying Times for Skim Coats vs. Full Plastering
A thin 2-3mm skim coat applied over existing plasterboard dries significantly faster than a full application. Modern UK new-builds typically use this method, allowing for a shorter waiting window. Conversely, older properties often require backing plasters like browning or bonding to level uneven masonry. These materials retain moisture for several weeks. If you’ve had a solid wall replastered from the brickwork up, patience is vital. Printing too early on these thick substrates is a common mistake that compromises the longevity of the mural. We recommend a minimum seven-day window for skimmed board and at least 21 days for solid walls.
Surface Dry vs. Fully Cured: Why It Matters
It’s easy to fall for the “false dry” phenomenon. This happens when the surface looks light and feels dry to the touch, but the core remains saturated. Curing isn’t just about evaporation; it’s a chemical reaction that hardens the gypsum structure. If we apply UV ink to a surface that is still outgassing moisture, that vapour becomes trapped. This leads to delamination or bubbling as the moisture tries to escape. We ensure the plaster is fully cured to guarantee that our mechanical bonding process creates a permanent, high-resolution finish that won’t peel or degrade over time.
Environmental Variables that Influence Plaster Curing Speed
Environmental conditions in the UK are rarely ideal for rapid curing, particularly during the autumn and winter months. Cold, damp air lacks the capacity to absorb moisture from the wall, which significantly extends how long for plaster to dry before wall printing can safely begin. Unlike traditional painting, which might tolerate slight atmospheric moisture, our high-resolution UV printing requires a stable environment to ensure the ink bonds correctly to the substrate. High humidity is the primary cause of delayed projects, as it prevents the evaporation necessary for the gypsum to reach its final structural state.
The Role of Temperature and Humidity
Relative humidity should ideally remain below 60% for a successful print application. If the room is too damp, the plaster will remain in a semi-saturated state, regardless of how long it has been since application. We recommend maintaining a consistent temperature between 18°C and 22°C. This range provides enough warmth to encourage evaporation without being aggressive enough to damage the material. While dehumidifiers are useful for removing bulk moisture from the air, they should be used with caution. If they are too powerful or placed too close to the wall, they can pull moisture out too quickly, leading to surface tension and cracks. A controlled, steady reduction in moisture is always preferable to a forced one.
Ventilation Strategies for Faster Drying
Consistent airflow is more effective than high heat for curing plaster. We advocate for “cross-ventilation,” which involves opening windows in opposing corners of the room to create a natural draft. This process replaces moisture-laden air with fresh, drier air from outside. Many property owners make the mistake of turning radiators to their maximum setting, but this often leads to “map cracking” where the surface dries and shrinks while the core remains wet. Using oscillating fans to move air across the surface is a far superior method. It’s also vital to understand that plaster is a hygroscopic material, meaning it actively absorbs water molecules from the surrounding atmosphere if the room isn’t properly ventilated. To verify your wall is ready, you must ensure the room’s micro-climate has stabilised. If you’re unsure about your site’s readiness, the team at Wall & Ink can provide guidance on preparing your space for a commercial or residential mural.
Wall Printing vs. Traditional Painting: The Technical Difference
Traditional decorating relies on the porous nature of gypsum. A mist coat is essentially a sacrificial layer that saturates the plaster to prevent the final topcoat from drying too quickly and peeling. Wall printing operates on a different mechanical principle. Our advanced UV printers use ultraviolet light to cure the ink instantly during the printing pass. Instead of soaking deep into the substrate, the ink forms a high-strength bond with the surface layer. This distinction is exactly why understanding how long for plaster to dry before wall printing is more about chemical stability than mere thirst.
If moisture is still trapped, the plaster will “outgas” as it continues to cure. This vapour pressure builds up behind the cured ink layer, leading to delamination. Unlike emulsion paint, which remains breathable and allows moisture to pass through, UV murals create a durable, sealed finish. This is why the substrate must be verified as dry before we begin. Applying a high-resolution image to a damp wall is a recipe for technical failure, as the escaping moisture will eventually force the ink to bubble or flake away.
How UV Ink Interacts with Gypsum Substrates
The precision of our machinery requires a non-shifting surface. Fresh plaster is naturally porous, but as it dries, the gypsum crystals lock together to form a rigid structure. We target this state of peak stability. If the plaster is still in its active drying phase, the microscopic movement of the substrate can compromise image clarity. By waiting for a full cure, we ensure every pixel of your high-resolution mural is placed with industrial precision. The UV curing process turns the ink from a liquid to a solid in milliseconds, meaning the art is touch-dry and durable the moment the printer finishes its pass.
Why Traditional Mist Coats Are Not Always Necessary
One of the primary benefits of our process is the elimination of traditional decorating hassles. You don’t need to spend days applying multiple mist coats or dealing with the mess of rollers and splashes. We often use specialised primers or direct-to-substrate adhesion methods that provide a superior finish without the need for traditional paint prep. Whilst contract matt paint is designed to be breathable on new builds, our UV-cured art is built for longevity. This “clean” advantage means no multiple coats and no drying time between layers. It’s a modern solution that respects your renovation timeline whilst delivering a result that traditional paint simply cannot match in terms of detail or durability.
How to Verify Your Wall is Ready for UV Printing
While the calendar provides a baseline, physical verification is the only way to confirm readiness. Relying solely on a general estimate of how long for plaster to dry before wall printing can be risky. You must use objective tests to ensure the substrate has reached the 12% moisture content threshold required for technical stability. If the internal moisture is too high, the ink will not bond correctly, regardless of how the surface appears. We recommend a methodical approach to assessment before our team arrives on site.
The Visual and Tactile Readiness Test
Visual inspection is your first line of defence. The plaster should have transitioned from a deep, patchy pink to a uniform, pale off-white or light grey across the entire surface. If you notice darker shades in the corners or near the skirting, moisture is still present. Tactile checks are equally revealing. Press your palm against various sections of the wall; it should feel room temperature. If a specific area feels noticeably colder than the rest, it indicates deep-seated moisture that hasn’t yet evaporated. Run a clean, dry cloth over the wall to check for efflorescence, which appears as white, powdery salt deposits. These salts are a byproduct of the drying process and must be brushed away to prevent bonding issues.
If you’re unsure about the state of your renovation, the “patch test” is a reliable DIY method. Tape a 30cm square of clear plastic sheeting to the wall using masking tape, sealing all four edges. Leave it for 24 hours. If condensation appears on the inside of the plastic or the plaster looks darker when the patch is removed, the wall isn’t ready. This simple test prevents the premature application of digital art onto a damp substrate.
Technical Preparation Checklist
For a professional-grade result, the surface texture must be flawless. Our UV printers operate with millimetre precision, meaning any physical imperfections in the plaster will be visible in the final art. The wall must be flat-skimmed and polished to a high standard. Use the following checklist to prepare the space:
- Complete all snagging: Ensure small holes, scratches, or trowel marks are filled with a fine-surface filler and sanded flat.
- Remove “fat” and splashes: Use a scraper to remove plaster splashes or ridges from skirting boards, corners, and adjacent surfaces.
- Ensure a dust-free environment: Vacuum the room thoroughly and wipe the wall with a tack cloth to remove airborne particles that could settle on the wet ink.
- Clear the floor: The wall printing machine requires a level, clear path for its tracks to move smoothly across the workspace.
To ensure your project meets our technical standards and results in a durable, high-resolution finish, book a consultation with Wall & Ink to discuss your specific site preparation requirements.
Transforming Your Space with Wall & Ink
Wall & Ink operates as the UK specialist for direct-to-wall digital art, bridging the gap between traditional construction and modern interior design. We understand that a renovation is a significant investment. Our service is built to respect that. We provide a streamlined process that integrates perfectly with your project schedule. Once you’ve established how long for plaster to dry before wall printing based on your specific site conditions, our team steps in to provide the final, high-impact finish. We bring industrial-grade reliability to residential, commercial, and educational spaces nationwide.
From Digital Visualisation to On-Site Execution
Our methodology begins with a comprehensive digital visualisation. We don’t just guess at the fit; we scale your bespoke design to the exact millimetre of your wall dimensions. This mock-up phase allows you to see the finished result before a single drop of ink is applied. The on-site process is equally precise. Most murals are completed in a single working day, minimising disruption to your home or business. Because we use advanced UV printers, the process is inherently cleaner than legacy methods. There are no messy adhesives, no wallpaper seams to peel, and no multiple coats of paint to manage.
Why Choose Wall Printing for Your New Project?
The mechanical superiority of UV-cured ink ensures your mural remains a permanent feature. These inks are fade-resistant and highly durable against scratches, outperforming traditional decorative finishes in high-traffic areas. Whilst we specialise in plaster, our technology is capable of printing on almost any substrate, including wood, glass, and exposed brick. This versatility allows property owners to maintain a cohesive aesthetic across different surfaces. We eliminate the traditional hassles of wall decor, replacing them with a high-tech, efficient solution. If your walls are currently curing, it’s the ideal time to start the design journey. Organise your design consultation with Wall & Ink today to explore the possibilities for your newly plastered space.
Secure a Permanent Finish for Your Modern Interior
Achieving a flawless mural starts with technical patience. While the visual shift from pink to white is an encouraging sign, the chemical stability of the gypsum determines the longevity of the final print. We’ve established that the answer to how long for plaster to dry before wall printing depends on your specific substrate and the UK’s ambient humidity. By ensuring a moisture content of 12% or less, you eliminate the risk of delamination and guarantee that our UV-cured inks bond perfectly to the surface.
Wall & Ink brings industrial-grade precision to your project with our national UK service coverage. We include bespoke design visualisations to help you see the final result before the first drop of ink touches the wall. Our direct-to-wall UV technology is a modern, clean alternative to traditional wallpaper that delivers high-resolution durability without the traditional renovation mess. View our commercial and residential wall printing gallery to find inspiration for your next project. Your newly plastered walls are the perfect canvas for a bespoke digital masterpiece.
Frequently Asked Questions
Can you print on plaster that is only 24 hours old?
No, you cannot print on plaster that is only 24 hours old. Even a standard 2mm skim coat requires a minimum of three to five days to reach the necessary moisture threshold for our machinery. Printing too early traps water vapour beneath the UV-cured ink layer. This leads to bubbling and a total failure of the bond. Patience is the only way to ensure the industrial precision of the final mural remains intact.
What happens if you print on damp plaster?
Printing on damp plaster causes delamination. As the moisture within the gypsum eventually tries to escape, it creates vapour pressure behind the non-porous UV ink. This pressure forces the ink to bubble or peel away from the substrate. It is a costly mistake that ruins the high-resolution finish. Ensuring you know exactly how long for plaster to dry before wall printing prevents this mechanical failure and protects your investment.
Do I need to sand the plaster before the wall printer arrives?
Yes, the surface must be perfectly flat and smooth. Our wall printing machinery operates with millimetre precision, so any trowel marks or ridges will be highlighted by the ink. We recommend a light sanding to remove imperfections followed by a thorough dust removal using a tack cloth. A polished finish is the ideal substrate for achieving the sharp, high-definition results our clients expect from bespoke digital art.
Is a mist coat required before wall printing?
A traditional mist coat is generally not required for our process. Unlike emulsion paint which needs a sacrificial layer to manage suction, our UV inks use specific adhesion methods or specialised primers. We bypass the messy painting process to print directly onto the cured plaster. This saves time and eliminates the risk of uneven paint layers interfering with the print head’s path during the application pass.
How can I make my plaster dry faster in a cold room?
Use a combination of gentle heat and consistent airflow to aid evaporation. Keep the room between 18°C and 22°C whilst ensuring cross-ventilation by cracking windows. Avoid turning radiators to their maximum setting, as this causes the surface to shrink and crack while the core stays wet. Oscillating fans are highly effective at moving moisture-laden air away from the wall without the risks associated with aggressive dehumidification.
Will the wall printer work on textured or “bumpy” plaster?
The wall printer can accommodate minor textures, but a flat, skimmed surface is best for high-resolution clarity. Significant bumps or deep textures can interfere with the print head’s sensors and distort the image. For the best results in residential or commercial spaces, the plaster should be finished to a high standard. We assess every wall during the initial consultation to ensure the substrate is technically suitable for printing.
How do I know if my plaster is fully cured or just surface dry?
Use the visual transition from pink to a uniform pale off-white as your first indicator. Beyond this, check for cold spots by hand; damp plaster feels noticeably colder than the surrounding room. To be certain, perform a 24-hour plastic patch test. If condensation appears behind the plastic, the core is still wet. This verification is vital for determining how long for plaster to dry before wall printing begins.
Can UV ink be removed if I want to change the design later?
Yes, UV-cured ink can be removed or changed easily. Because the ink bonds to the surface rather than soaking deep into the plaster, it can be sanded back to the original substrate. Alternatively, you can apply a high-quality primer and paint over the mural if you wish to return the wall to a plain finish. This flexibility makes it a practical solution for retail spaces or schools that require updated graphics.