
The success of a high-definition UV mural is decided long before the printer starts its first pass. Many project managers and homeowners rightly fear that inadequate wall preparation for printing will lead to peeling, bubbling, or premature fading. It’s a common concern: is the fresh plaster truly dry enough, or will residual moisture compromise the ink’s bond? You shouldn’t have to guess whether old wallpaper needs removing or if a substrate is compatible with advanced UV technology. We understand that you value industrial precision and the elimination of traditional decorating hassles.
This article outlines the exact technical steps required to prepare any surface for a flawless, durable finish. You’ll gain a clear understanding of the professional “print-ready” standard, ensuring your specific wall material, whether it’s brick, wood, or glass, is perfectly primed for mechanical adhesion. We provide a methodical breakdown of surface profiling and moisture verification to ensure your investment remains pristine for years. From substrate assessment to final cleaning, we’re moving away from guesswork and toward a streamlined, expert-led approach to wall transformation that saves time and guarantees results.
Key Takeaways
- Understand why a structurally sound and chemically neutral surface is vital for high-definition UV ink adhesion and long-term durability.
- Learn the specific technical standards for wall preparation for printing, including the “Level 5 Finish” required for premium interior results.
- Discover how to assess different substrates, from the drying times of fresh plaster to the stability tests required for existing wallpaper.
- Identify the essential site requirements, such as the two-metre clearance for the rail system and proximity to a standard power supply.
- Explore how a professional surface survey and digital visualisation remove the guesswork from your project’s preparation phase.
Why wall preparation is the foundation of UV printing success
The success of a direct-to-wall project depends entirely on the integrity of the substrate. While traditional decorating methods often rely on adhesives to bridge gaps, high-resolution UV printing requires a surface that meets a specific technical threshold. We define a “print-ready” wall as one that is structurally sound, chemically neutral, and physically flat. Achieving this standard ensures the machinery operates within its designed tolerances, delivering the industrial precision that sets this method apart from legacy alternatives.
It’s vital to contrast this process with traditional wallpaper installation. Wallpaper is a forgiving medium that a decorator can stretch or trim to hide minor wall defects. In contrast, a wall printer is a piece of advanced digital printing technology that follows a fixed rail system with millimetre accuracy. If the wall isn’t flat, the focal distance between the print head and the surface fluctuates. This variation can lead to a loss of sharpness. Proper wall preparation for printing isn’t just about aesthetics; it’s a mechanical requirement for high-definition results.
The science of UV ink adhesion
The curing process is where the technical superiority of UV printing becomes clear. As the print head moves, ultraviolet lamps instantly harden the ink, turning liquid droplets into a durable, solid film. For this bond to be permanent, the ink must “bite” into the surface at a microscopic level. Surface tension and porosity are the key factors here. A surface that is too slick or contaminated with oils won’t allow for proper adhesion. On dark or non-white substrates, we utilise a white underprint. This specialised base layer acts as a primer, ensuring the final colours are vivid and unaffected by the wall’s original pigment.
Common risks of poor preparation
Ignoring the “print-ready” standard introduces significant risks to the final outcome. Dust is a major concern. Microscopic particles can interfere with the high-precision print heads, causing ink deflection that results in ghosting or banding across the mural. Chemical issues are equally disruptive. If a wall contains hidden moisture or residual oils, you risk ink delamination. This is where the cured layer fails to bond, leading to premature peeling. Getting the wall preparation for printing right the first time is a pragmatic choice. It eliminates the hassle of remedial work and ensures the 78% reduction in material waste compared to vinyl alternatives is actually realised.
The technical standards for a print-ready surface
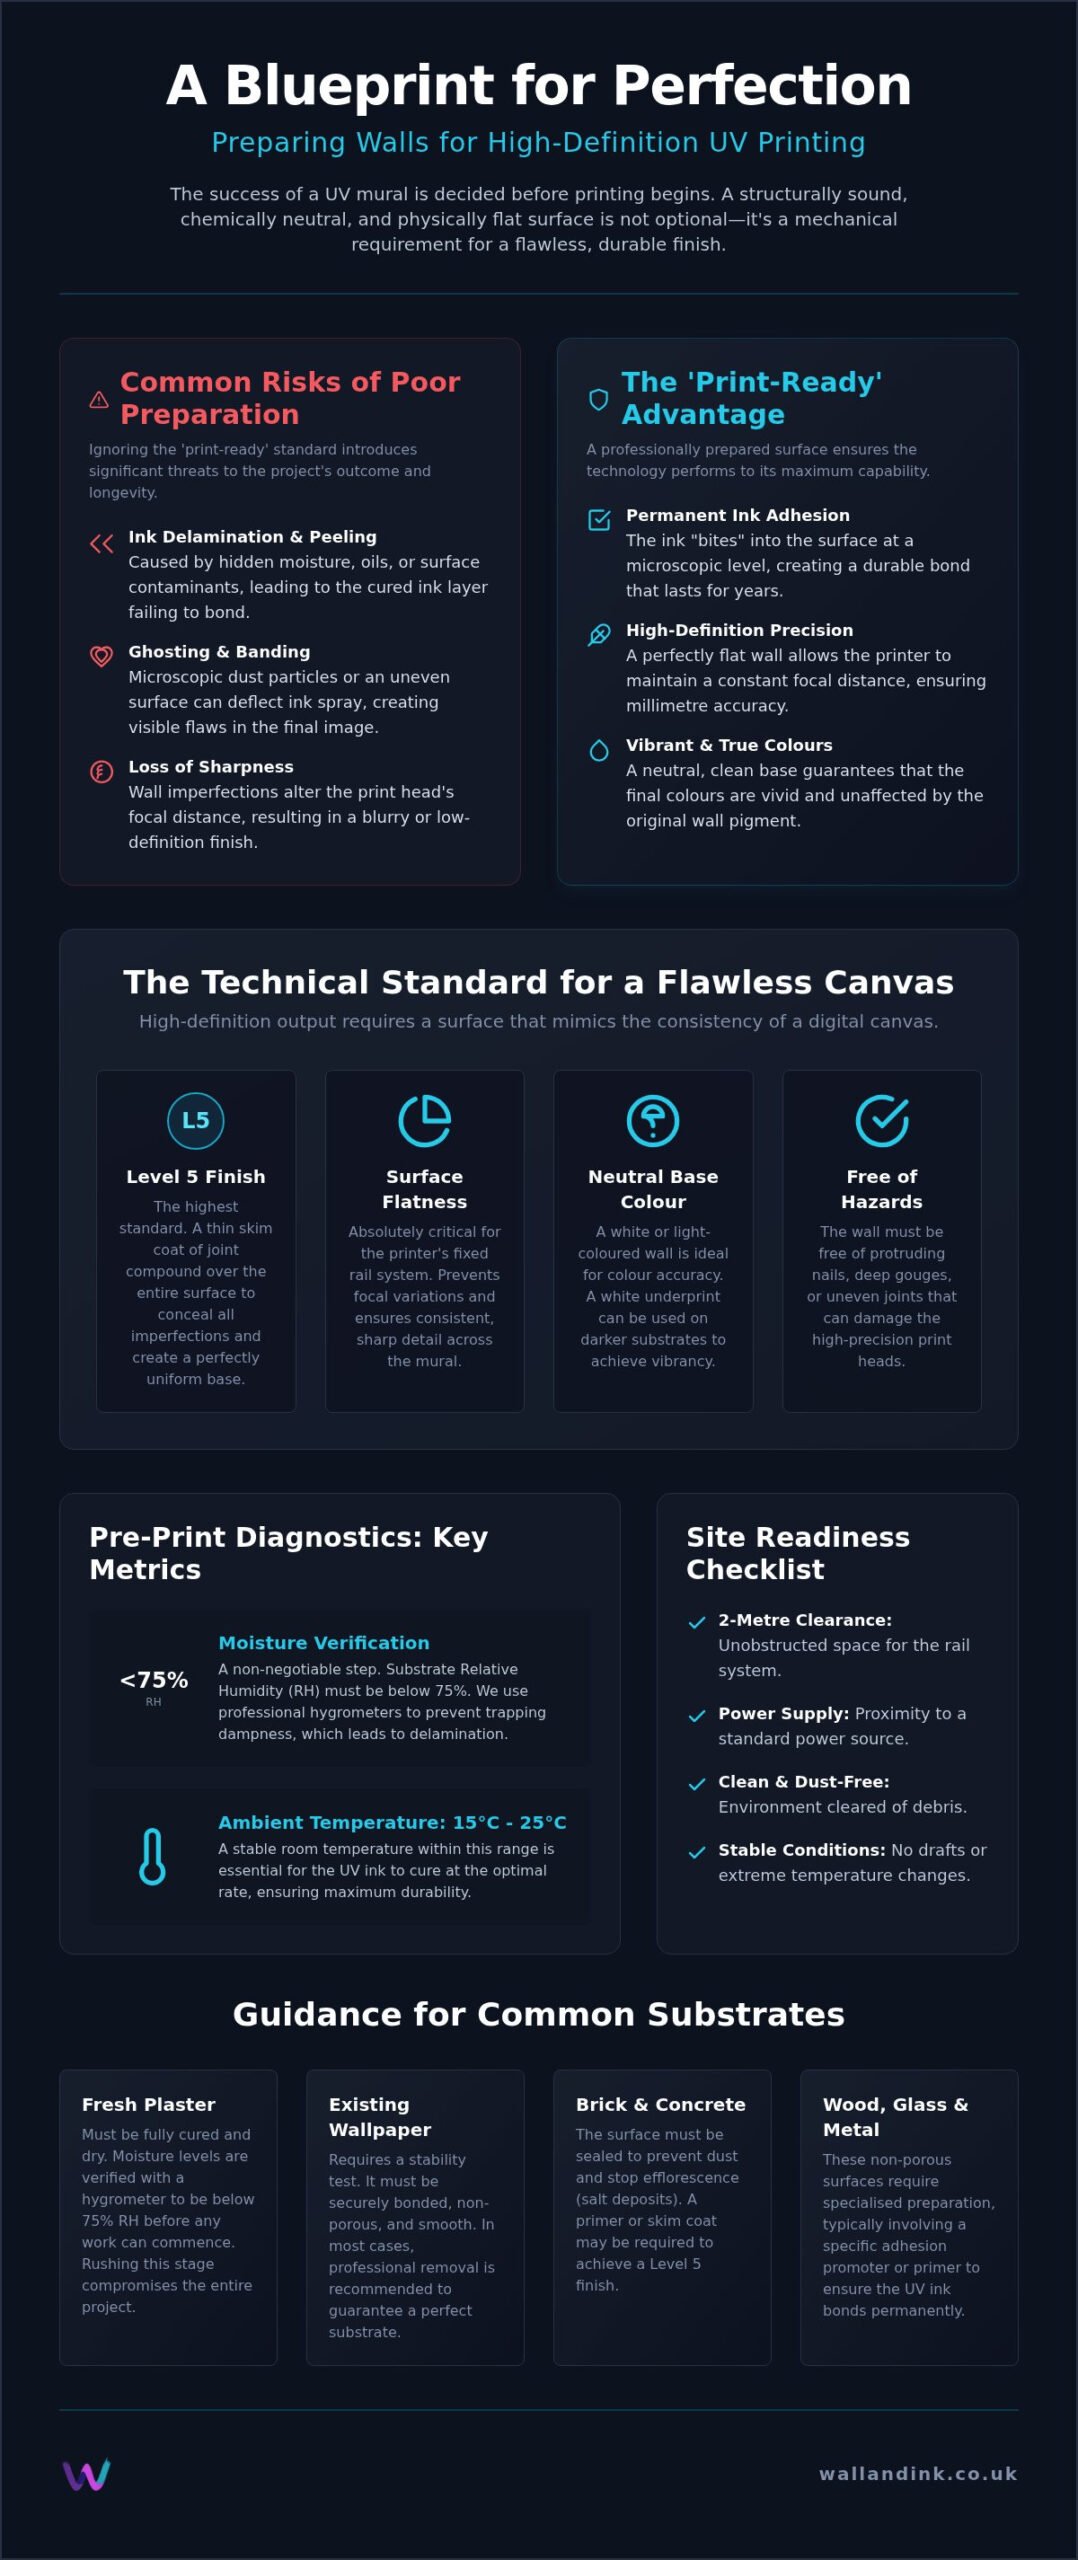
High-definition output requires a surface that mimics the consistency of a digital canvas. We advocate for a Level 5 Finish, which represents the highest standard of drywall finishing. This involves a thin skim coat of joint compound over the entire surface to conceal imperfections. Because our printers operate on a fixed rail system with millimetre precision, any deviation in wall flatness can affect the focal depth of the print heads. We adhere to strict technical standards for surface preparation to ensure the substrate is uniform and stable.
A neutral base colour is equally critical. For maximum colour accuracy, a white or light-coloured wall is the ideal starting point. Whilst our technology can underprint white ink on darker substrates, a white base provides the most efficient path to vibrant results. Additionally, the wall must be entirely free from physical snags. Protruding nails, deep gouges, or uneven plaster joints are physical hazards that can damage precision equipment. Rigorous preparation eliminates these mechanical risks before we begin.
Measuring surface moisture and humidity
Measuring surface moisture is a non-negotiable step for newly plastered walls. We utilise professional hygrometers to verify that the Relative Humidity (RH) of the substrate is below 75%. Printing on surfaces with higher moisture levels risks trapping dampness behind the cured UV ink. This can lead to delamination over time. Ambient temperature also plays a role. We recommend a stable environment between 15°C and 25°C to ensure the ink cures at the optimal rate.
Cleaning protocols for different environments
Cleaning protocols vary by environment. In hospitality settings, we use sugar soap to strip away grease and oils that accumulate in kitchens. In active construction zones or schools, industrial dust extraction is required to prevent airborne debris from settling on the wet ink. For older brickwork or concrete, we must address efflorescence. These white salt deposits can push through the surface and ruin a finish. Ensuring a clean, stable substrate through professional wall preparation for printing is the first step in achieving a flawless mural.
Material-specific preparation: Plaster, brick, and glass
Different substrates react differently to UV ink. In the UK, we primarily deal with five surfaces: gypsum plaster, brickwork, glass partitions, timber, and polished concrete. Each requires a tailored approach to wall preparation for printing to ensure the ink “bites” correctly. Whilst gypsum is the most common, the rise of industrial aesthetics in commercial spaces has seen a surge in direct-to-brick applications. Each material presents unique challenges in terms of porosity and surface tension.
The question of printing over wallpaper is a matter of stability. We perform a “dry-pull” test to check for adhesion. If the paper shows any signs of lifting at the seams or bubbling, it must be stripped. Printing over unstable wallpaper is a recipe for delamination. If the paper is flush, non-textured, and perfectly bonded, it can serve as a substrate. However, a direct wall application is always the superior choice for longevity.
For brick or stone “character” walls, the goal isn’t a Level 5 Finish but a clean, stable surface. We remove loose mortar and dust whilst retaining the natural texture. This creates a tactile, industrial look where the art integrates with the building’s architecture. We ensure these projects meet PCA Industry Standards for surface integrity before deployment. This level of scrutiny ensures that even the most rugged surfaces are safe for our precision print heads.
The fresh plaster challenge: Drying and mist coating
For a standard 3mm skimmed plaster wall, the minimum drying time is typically four weeks. Applying a mural too early traps moisture, leading to bubbling and ink failure. Once dry, a mist coat, which is a diluted mixture of emulsion and water, is vital to seal the porous plaster. You must avoid non-breathable sealants or PVA primers. These materials trap residual moisture behind the print and compromise the UV bond, leading to premature fading or peeling.
Non-porous substrates: Glass, metal, and tiles
Surfaces like glass, metal, and tiles lack the natural “tooth” of plaster. We use a chemical bonding agent to create a mechanical bridge between the substrate and the UV ink. In office environments, glass partitions must be meticulously degreased using industrial-grade cleaners to remove fingerprints and oils. For tiled areas, remember that grout lines will remain visible. The printer applies ink across the entire surface, meaning the texture of the grout becomes part of the final mural’s character.
A professional site readiness checklist
Ensuring a wall is “print-ready” extends beyond the substrate itself. The physical environment must accommodate the machinery to maintain the precision required for high-resolution output. Proper wall preparation for printing involves clearing a 2-metre corridor along the entire length of the target area. This space allows for the installation of the printer’s rail system and ensures the technician can move freely whilst monitoring the application. Additionally, a stable 240v UK power supply must be available within 5 metres of the wall to avoid voltage drops across long extension leads.
Vertical obstructions require careful consideration before the machinery arrives. Items such as light switches, coving, or skirting boards can interfere with the printer’s travel path. Whilst some obstructions can be accommodated through design, others may need temporary removal to allow for full-bleed coverage. Access is equally vital. The printer is a piece of heavy, precision-engineered machinery; therefore, the path from the delivery point to the wall must be clear of debris and stairs unless lift access is available. If you are unsure about your space’s suitability, you can request a technical on-site survey from our specialists to confirm readiness.
Preparing the digital file for the physical space
Accuracy in your design file prevents costly “cropping” issues during the printing phase. We require high-resolution files with a minimum of 300 DPI to ensure clarity at a large scale. Your design must account for “dead zones” such as windows, doors, or permanent fixtures. Measuring the wall dimensions accurately is the first step; however, we also recommend identifying the exact centre point and any height variances across the floor. This allows the software to align the mural perfectly with the building’s architecture.
The environment: Temperature and dust control
Atmospheric stability is a non-negotiable factor for ink curing. We maintain a consistent room temperature between 15°C and 25°C to ensure optimal ink flow through the print heads. Dust control is the most frequent cause of surface imperfections. You must stop all dust-creating works, such as sanding or drilling, at least 24 hours before the scheduled print. Managing airflow is also necessary; whilst ventilation is required, you must shield the area from direct, harsh sunlight and strong drafts that could carry airborne particles onto the wet ink.
The Wall & Ink advantage: Precision from survey to print
Wall & Ink operates as a technical partner rather than just a print provider. We eliminate the uncertainty surrounding wall preparation for printing by conducting comprehensive technical surface surveys. This on-site assessment identifies substrate irregularities, moisture levels, and mechanical risks before any ink is deployed. Our national team of specialists is trained to manage complex industrial and commercial substrates. We ensure that the precision of our machinery is matched by the expert knowledge of our operators.
We utilise advanced UV ink technology that offers mechanical superiority over traditional vinyl or wallpaper. These inks are engineered for high-traffic durability, providing a finish that is both scratch-resistant and chemically stable. By integrating our technical survey with bespoke digital visualisations, we provide a transparent view of the final outcome on your specific wall. This methodical approach ensures that every project meets our internal standards for high-resolution clarity and long-term adhesion.
Bespoke design consultations
The design phase involves adapting your existing logos or bespoke artwork into a high-precision, “wall-ready” digital format. Our iterative feedback loop ensures that the design accounts for architectural nuances like light switches or windows identified during the site survey. We provide precise colour-matching to align the mural with your brand identity or interior palette. This level of digital preparation ensures that the final print is a perfect reflection of the initial visualisation without the distortion often found in traditional large-format applications.
Professional installation and aftercare
On the day of installation, our team handles the complete setup and calibration of the rail system. Most projects reach completion within a few hours, followed by an instant-dry reveal thanks to our UV curing technology. Maintenance is straightforward. The finished surface is durable enough to be washed and resists the typical wear and tear found in busy commercial or educational environments. If you are ready to transform your space with industrial-grade precision, you can enquire about your national wall printing project today.
Achieve Industrial Precision for Your Next Project
Successful direct-to-wall printing is a technical partnership between advanced machinery and a perfectly primed substrate. You’ve learned that achieving a “print-ready” standard involves more than just a clean surface; it requires precise moisture verification and a Level 5 finish to ensure mechanical adhesion. By following a professional site readiness checklist, you eliminate the traditional hassles of decorating whilst guaranteeing a high-definition result. Proper wall preparation for printing is the most critical step in ensuring your mural remains durable and vibrant for years.
Our specialist national installation team is ready to handle the technical heavy lifting for you. We provide bespoke digital mock-ups for every project, allowing you to visualise the final result before the first drop of durable UV ink is applied. This methodical approach ensures your environment is fully optimised for our precision-engineered machinery. Book a technical consultation for your custom wall mural to start your project with expert guidance. We look forward to transforming your space with modern, industrial-grade reliability.
Frequently Asked Questions
Do I need to remove my old wallpaper before printing?
You should ideally remove old wallpaper to ensure the best results. Whilst we can print over perfectly bonded, non-textured paper, any instability in the adhesive will cause the mural to fail. Removing the paper allows the UV ink to bond directly with the substrate, providing the durability we guarantee. A direct application is the only way to meet our technical “print-ready” standard for a long-lasting, high-resolution finish.
How long does fresh plaster need to dry before I can book a print?
Fresh gypsum plaster requires a minimum drying time of four weeks before we can begin wall preparation for printing. It’s vital that the moisture content has stabilised to prevent dampness from being trapped behind the cured ink layer. We use professional hygrometers during our technical survey to verify that the relative humidity is below 75%. Booking your print before the plaster is fully cured risks delamination and bubbling.
Can you print on a wall that isn’t perfectly white?
We can print on walls of any colour thanks to our advanced UV technology. For dark or non-white surfaces, our printer applies a specialised white underprint before the final colours are layered. This base layer ensures that your artwork remains vibrant and colour-accurate, regardless of the original wall pigment. This process allows us to achieve high-definition results on diverse substrates, including grey concrete or dark-painted office partitions.
Does the wall need a special primer or undercoat?
Most standard plaster walls only require a mist coat of watered-down emulsion to seal the surface. However, non-porous materials like glass, tiles, or metal require a specific chemical bonding agent to ensure mechanical adhesion. You must avoid using PVA-based primers or non-breathable sealants, as these can interfere with the UV curing process. Our technical survey will identify exactly which preparation is required for your specific wall material and environment.
What happens if there are light switches or sockets on the wall?
Light switches and sockets are common architectural features that we manage through careful design and masking. We can adapt your digital visualisation to ensure key elements of the artwork avoid these “dead zones”. Alternatively, switches can be temporarily removed by a qualified electrician to allow for a seamless, full-bleed print. If left in place, we mask them with precision tape to protect the hardware from any ink overspray during the process.
Is the preparation different for exterior wall printing?
Exterior wall preparation focuses heavily on surface stability and cleanliness. We must remove all organic growth, such as algae or moss, and ensure that any loose masonry or mortar is repaired. The substrate must be completely dry and free from efflorescence or salt deposits. Whilst the UV ink is weather-resistant, the underlying surface must be structurally sound to prevent the print from flaking away with the masonry over time.
Can you print on textured surfaces like woodchip or rendered brick?
We can print on rendered brick or timber to create a tactile, industrial aesthetic, but unstable textures like woodchip wallpaper are unsuitable. The printer’s rail system requires millimetre precision; therefore, surfaces with extreme or loose textures can interfere with the print heads. Rendered surfaces must be “tight” and non-crumbling. During our on-site survey, we test the surface profile to ensure it meets the mechanical tolerances required for a high-definition finish.
Do I need to be out of the room whilst the printing is happening?
You don’t need to vacate the premises whilst the printer is in operation. Our UV inks are low-emission and cure instantly under ultraviolet light, meaning there are no lingering fumes or wet surfaces. We only require that you and your staff or family stay clear of the 2-metre exclusion zone around the machinery for safety. This allows your business or household to continue functioning normally whilst we transform your space.