
A striking design can’t disguise a poorly prepared plasterboard wall. Joints, dents and uneven colour may become more noticeable once a mural is printed. Wall printing on plasterboard can create a crisp, seamless result, but the board’s visible finish matters as much as the artwork.
Bare, unfinished plasterboard isn’t automatically ready for direct printing. Joints and fixings should be finished, and the surface should be clean, stable and even. Existing paint should be well bonded, with peeling, flaking or raised areas dealt with before printing. The right preparation depends on the wall’s current condition and the design you have in mind.
This guide explains how different plasterboard finishes affect a mural, which surface details to look for and how to prepare the wall. You’ll also find practical advice for planning a design around your space. Wall & Ink prints artwork directly onto prepared walls, with free design visualisation included with every booking to help you picture the mural in place.
Key Takeaways
- Wall printing on plasterboard depends on the board’s finish and condition, not just the design you choose.
- Direct-to-wall UV printing applies artwork to a prepared surface using quick-drying, odourless inks suitable for indoor use.
- Bare, painted, jointed and textured finishes each have different details to assess before printing.
- A simple preparation sequence helps you spot defects, plan repairs and keep the wall clean before work begins.
- A free consultation and design visualisation with every booking help you plan a mural before professional on-site printing.
Can you print directly onto plasterboard? Start with the wall’s condition
Yes, WALL&INK prints directly onto suitable plasterboard, including plaster and most painted surfaces. Whether a wall is ready depends on its visible finish, not simply on the board behind it. Bare or unfinished plasterboard needs its surface assessed and prepared before a mural is planned.
Direct-to-wall printing means applying artwork straight onto a prepared wall, rather than hanging a separate covering over it. Plasterboard is the board itself; paint, joint compound, repairs and texture make up the visible finish that the artwork sits on. For a general overview of the material and its uses, see What is Plasterboard?
This distinction matters. A sound board can still have visible joints or uneven patches, while a finished wall may have peeling paint or colour variations that affect the mural. The print follows the prepared surface, so flaws in that finish can influence the final appearance.
What makes plasterboard a suitable printing surface?
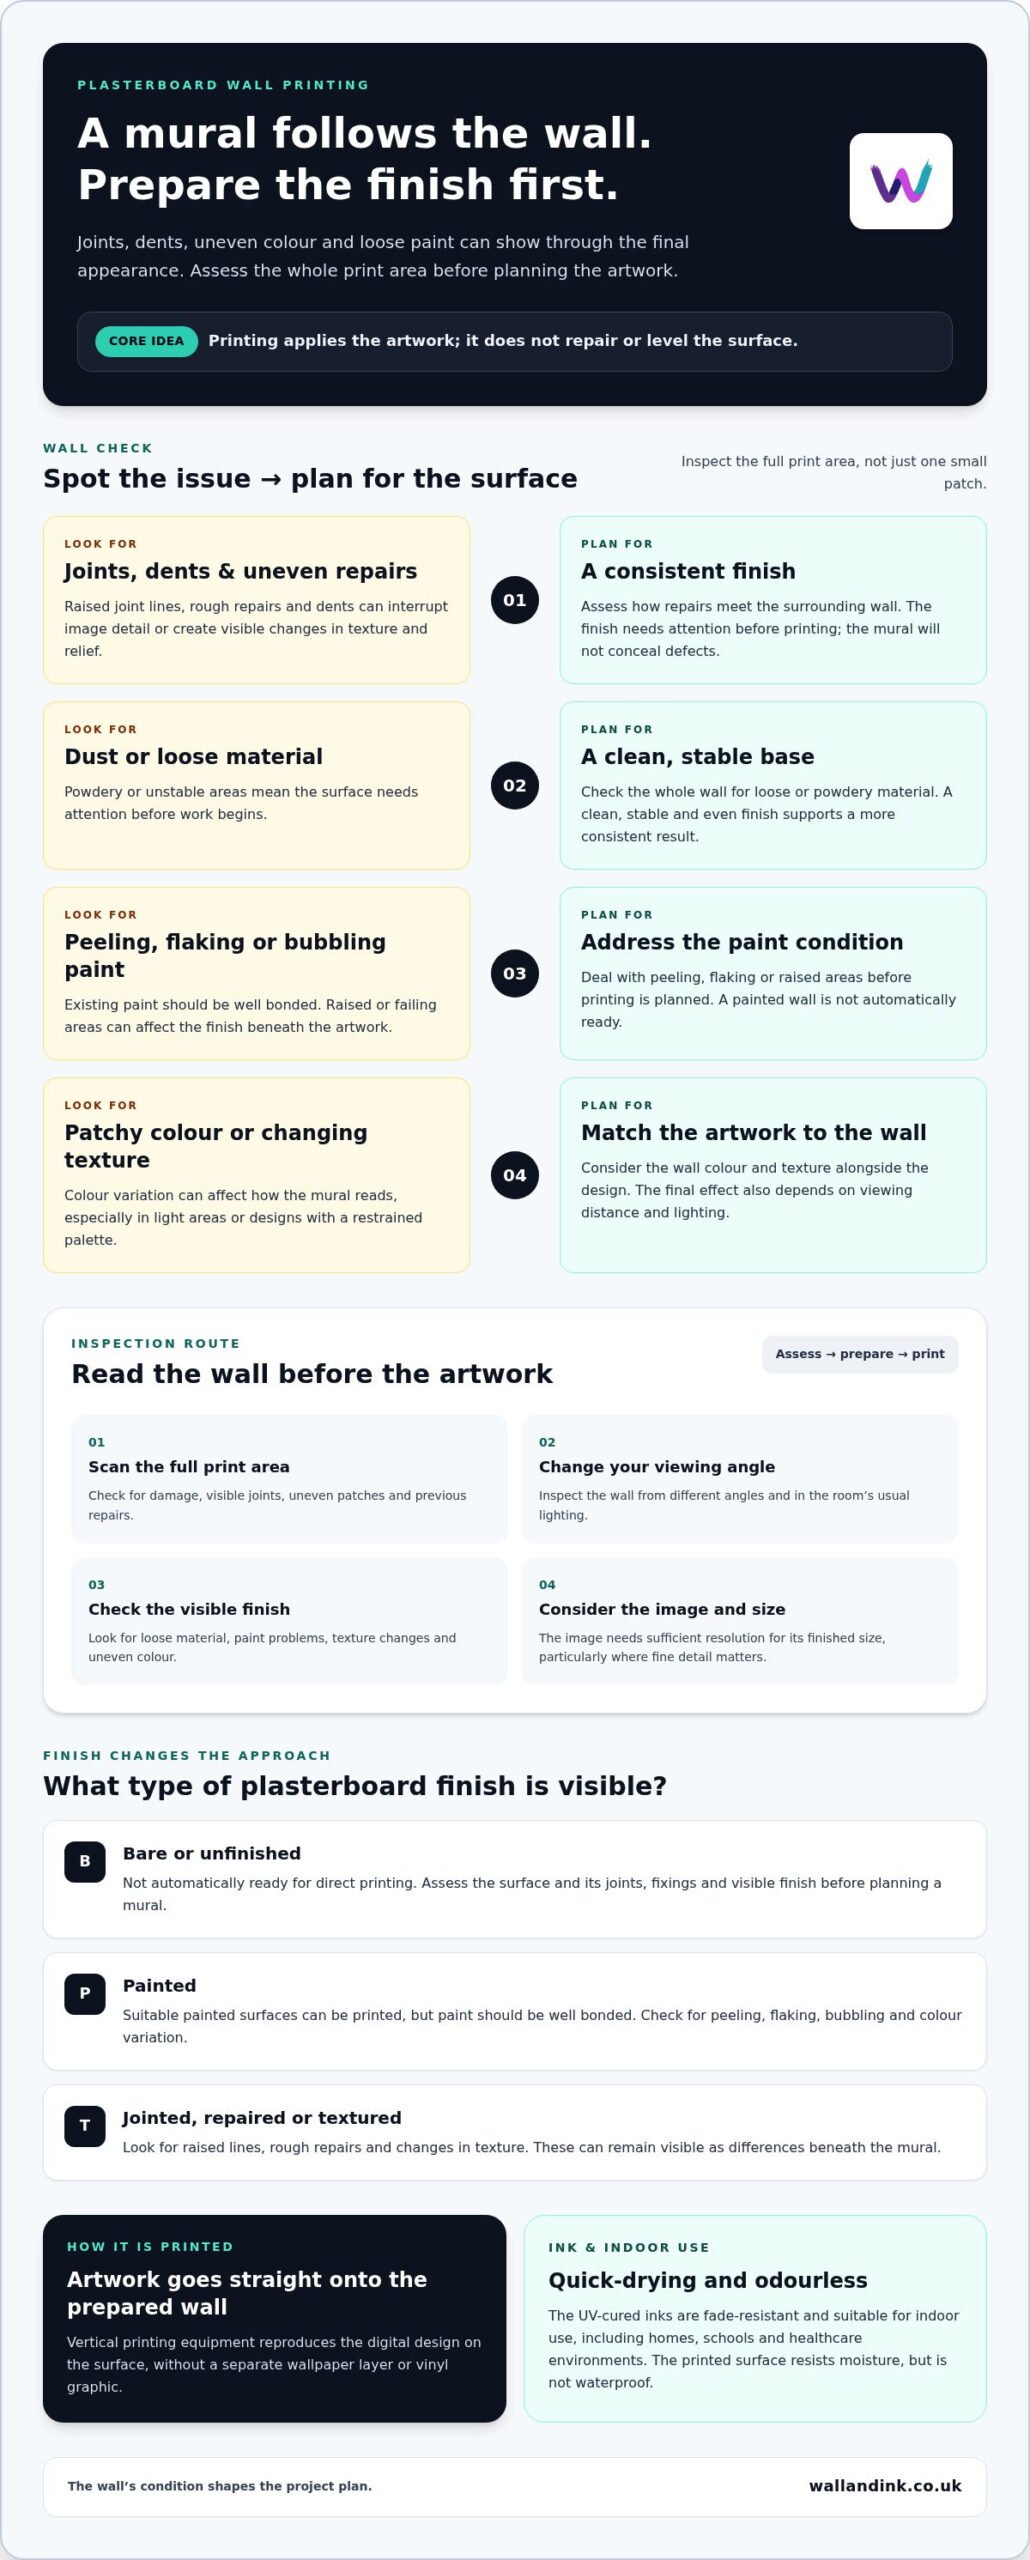
A stable, clean and even finish gives the artwork a consistent base. Raised joint lines, dents and rough repairs can interrupt image details. Dust or loose material also means the surface needs attention before printing. The image itself matters too: it needs sufficient resolution for the finished size, or fine details may look soft even on a well-prepared wall.
There isn’t one condition that makes every plasterboard wall ready. New, painted and previously repaired surfaces can each need a different approach. Assess the whole print area, including how evenly repairs meet the surrounding wall, rather than judging one small section.
Which wall conditions should be assessed first?
Look closely across the full area planned for printing. Check for loose or powdery material, cracks or other damage, visible joints, uneven patches and signs of previous repairs. Inspect the wall from different angles and in the room’s usual lighting. A small defect can stand out more across a large, detailed image.
Colour matters as well. The wall colour beneath the print can influence how the design appears, particularly where the artwork has light areas or a restrained palette. A varied or patchy finish may make the mural look less even. Check paint for peeling, flaking or bubbling, as these signs need attention before printing is planned.
These checks help identify preparation needs; they don’t replace an assessment of the finished surface. The wall’s condition informs the project plan, including whether repairs or further finishing should be completed first. The useful question isn’t only “Is it plasterboard?” but “What condition and finish is this wall in?”
How direct-to-wall UV printing creates a mural on plasterboard
Direct-to-wall printing applies a digital design straight onto the prepared wall using vertical printing equipment. The printer moves across the surface to reproduce the artwork as a high-resolution mural, without a separate wallpaper layer or vinyl graphic. The result can appear seamless across the wall when the artwork and surface are planned for the space.
For wall printing on plasterboard, preparation and printing are separate stages. The printer applies the image; it doesn’t repair the board or level an uneven finish. A raised joint, a dent or a change in texture can still affect how the mural looks. The colour beneath the print can matter too, particularly for designs with light areas or a restrained palette.
The printing method applies the artwork; the prepared surface determines the canvas it follows. The mural follows the wall rather than concealing defects, filling joints or correcting inconsistent repairs. That’s why the finish needs attention before printing begins.
What UV-cured ink means for an indoor wall
UV-cured ink is set using ultraviolet light as part of the printing process. WALL&INK’s inks are quick-drying, odourless, fade-resistant and suitable for indoor use, including homes, schools and healthcare environments. These are product features, not a substitute for considering the room and wall as part of the project plan.
The printed surface resists moisture, but it isn’t waterproof. Consider the room’s conditions and don’t treat moisture resistance as protection from prolonged exposure to water. The wall’s finish and care should suit the setting where the mural will be used.
Why the prepared finish affects image quality
A clean, even surface supports a more consistent visual result. Dust, loose material and uneven patches can disrupt fine details and colour transitions. How noticeable a variation is depends on the mural design, viewing distance and lighting.
Joints and repairs remain relevant beneath the artwork. A visible joint line can show as a change in texture or relief, while a textured area may make a smooth section of the image appear different. Contrasting or patchy wall colour can also affect how parts of the design read. Printing doesn’t remove these underlying differences.
Consider the artwork and the wall together. A detailed image needs suitable resolution for its intended size, while the surface needs to support the planned appearance. The free design visualisation included with every booking helps you picture the artwork on your wall and plan the composition in context.
For a project-specific discussion of direct-to-wall mural printing, WALL&INK’s free consultation can help align the design with the plasterboard finish before professional on-site printing.
Bare, painted or textured plasterboard: how the finish changes the approach
Plasterboard walls can look very different once you consider their finish. One may be painted and even; another may have exposed board, visible joints or pronounced texture. These categories help you assess the surface, but none means a wall is automatically ready for printing.
The wall’s existing finish helps determine its preparation needs.
| Finish | What to look for | Preparation questions |
|---|---|---|
| Bare board | Exposed paper face, unfinished joints or fastener marks | Are joints and fixings finished, and is the surface clean and even? |
| Painted board | Colour, sheen, peeling, flaking or bubbling | Is the paint sound and consistent across the mural area? |
| Jointed or repaired board | Raised seams, dips, cracks or patches that differ from the surrounding wall | Are repairs level and visually consistent with the rest of the surface? |
| Textured board | Raised patterns or changes in texture across the wall | Could the texture affect how details and colour appear? |
Printing on bare plasterboard versus painted board
Bare board shouldn’t be treated as ready to print simply because it’s new. Its joints, fastener heads and overall finish still need attention, and unfinished areas can look different from the board face. Preparation depends on what has already been completed and the condition of the visible surface.
WALL&INK prints on plaster and most painted surfaces when the surface is suitable. Check that the paint is well bonded and look for areas that are peeling, bubbling or patchy. Colour affects how the artwork appears too: a light design against a dark wall may look different from the same image on a pale surface. Consider the wall and artwork together rather than assuming the design will look identical against every background.
Joints, repairs and textured finishes
Joint lines and repairs can remain visible through changes in relief or texture. A raised seam may interrupt a straight graphic; a shallow repair may catch the light differently from the surrounding board. Printing won’t flatten uneven joints, bridge cracks or disguise defective repairs.
Texture deserves the same attention. A pronounced finish can influence the appearance of fine details and make the image look different across smooth and rough areas. Before approving the artwork, check that repairs are complete and consider whether the surface is consistent across the full mural area. This helps match the design to the wall’s actual character.
For wall printing on plasterboard, compare the proposed design with the finish in the room’s usual lighting. Light and dark backgrounds can change how colours are perceived, while a varied surface may draw attention to underlying differences. Assessing the surface helps establish the right preparation approach before the print is planned.
How to prepare plasterboard for wall printing: a practical checklist
A reliable preparation plan starts with inspecting the wall, then completing any repairs and finishing before printing. The right approach depends on the board’s condition and the proposed design. A smooth, pale surface and a textured, dark wall can call for different preparation, so assess the actual finish rather than assuming every plasterboard wall needs the same treatment.
Inspect and document the wall before the project
Review the whole area intended for the mural, not just the most visible section. Look for damage, loose material, visible joints, uneven patches and differences between the existing finish and repairs. Note whether the board is bare, painted, previously repaired or textured. This creates a clearer picture of the work needed.
Measure the wall and take clear photographs in good light. Include the full surface and closer views of areas that may need attention. Dimensions and photographs also help inform the design visualisation, so the artwork can be considered in relation to the actual wall rather than an approximate space.
Complete surface preparation before print day
Once you’ve identified concerns, complete suitable repairs and finishing before the wall is assessed for printing. Let the work reach its finished state, then check that repaired areas sit consistently with the surrounding surface. Keep the wall clean and free from loose dust or debris. Preparation products and finishing requirements vary, so choose an approach suited to the board and its current condition.
Use this practical order to keep the project on track:
- Inspect the full wall and note visible defects or differences in finish.
- Measure the print area and photograph the wall, including any problem areas.
- Complete repairs and finishing suited to the surface.
- Check the finished wall for loose material, dust or uneven patches before planning the print.
Don’t plan printing around unfinished repair work. If the wall changes after the design has been visualised, its final appearance may differ from the surface originally considered.
Resolve the details during your consultation
A free consultation gives you an opportunity to discuss the wall and the artwork together. Before the project moves ahead, consider these questions:
- What is the wall’s current finish, and are there visible joints, repairs or texture?
- Which repairs or finishing tasks need to be completed before printing?
- How might the existing wall colour affect the artwork’s appearance?
- Do the photographs and measurements cover the full print area?
- Is the design visualisation based on the intended finished surface?
Clear answers help align the wall’s condition, preparation plan and design before professional on-site printing. To plan your plasterboard mural project, arrange a free consultation with WALL&INK. Design visualisation is included with every booking.
Plan your plasterboard mural with WALL&INK
A plasterboard mural project moves from an initial conversation to a visualised design, surface planning and professional on-site printing. Each stage connects the artwork to the wall it will occupy. WALL&INK provides direct-to-wall printing across the UK, including on plaster and most painted surfaces, and considers the surface’s condition as part of project planning.
From wall photographs to a visualised design
The free consultation helps establish the project brief and understand the wall’s context. Share clear photographs, approximate dimensions and any artwork ideas, such as a supplied image, preferred subject or a particular area you want the design to suit. These details help shape the discussion around your space and the intended mural.
Free design visualisation is included with every booking. It lets you preview the proposed artwork in your space and consider its scale and placement before printing is planned. The visualisation can also bring practical details into focus, such as how the composition relates to nearby features and the wall’s existing finish.
- Photographs showing the full wall and any areas that need attention
- Approximate wall dimensions and the intended print area
- Artwork files, references or a clear description of your design idea
- Notes about the wall’s finish, repairs or surface texture
With this information, the design and surface can be considered together. If the wall needs finishing work, factor that into the plan before arranging the on-site print.
What to expect from professional on-site printing
Once the design and wall preparation are planned, WALL&INK applies the approved mural directly to the prepared surface using vertical printing equipment. This on-site method creates a high-resolution mural without a separate wallpaper layer. The image follows the wall, so agreed repairs and finishing should be completed before printing.
For areas that experience frequent contact, an optional clear protective coating is available for high-traffic settings. The project plan can take the room’s use into account alongside the design and wall condition.
WALL&INK’s 12-month warranty covers ink fading, peeling or material defects under normal indoor conditions. It applies to those stated issues and conditions.
To start planning wall printing on plasterboard, share your wall photographs, approximate dimensions, finish details and design ideas. Discuss your plasterboard wall printing project.
Turn your wall into a considered design
Think of the mural as part of the room’s overall design, not just an image placed on a wall. Consider the atmosphere you want to create, where the artwork should draw attention and how its colours will sit alongside the room. These decisions give your project direction before the final design is settled.
WALL&INK’s high-resolution, seamless direct-to-wall printing uses UV-cured inks. For wall printing on plasterboard, bring your design ideas and wall details together so the artwork can be planned around the room and its prepared surface.
A free consultation and design visualisation are included with every booking. Share photographs of your wall, its approximate dimensions and any artwork inspiration to explore how a mural could look in your space.
Frequently Asked Questions
Can you print directly onto plasterboard?
Yes, WALL&INK prints directly onto suitable plasterboard, including plaster and most painted surfaces. Readiness depends on the finished wall, not just the board type. A newly installed wall with unfinished seams needs a different preparation approach from a previously painted wall in sound condition. The artwork matters too: fine text or a logo needs a high-resolution source file to retain clear detail at mural scale.
Does plasterboard need to be painted before wall printing?
No, plasterboard doesn’t always need to be painted before printing, but bare board isn’t automatically ready. WALL&INK prints on plaster and most painted surfaces, and the approach depends on the wall and design. Standard printing on a smooth, light-coloured wall does not require a base coat. Dark or textured surfaces use a white base layer. The wall’s finish and the design are considered as part of planning the project.
Can wall printing cover plasterboard joints or uneven patches?
No. Printing applies the image to the existing surface; it won’t fill a joint, level a raised seam or repair a crack. A logo with straight edges, for example, can make a raised joint line especially noticeable because it interrupts the graphic. Complete repairs before approving the artwork for the wall, so the design is planned for the intended finished surface rather than defects that may later change.
How should I prepare plasterboard for a wall mural?
Inspect the full print area and note damage, loose material, seams, repairs and changes in texture or colour. Photograph the wall and record its approximate dimensions, then complete suitable repairs and finishing before printing is arranged. Once the work is complete, remove loose dust and debris and review the surface again. If repairs are still underway, mention this during the consultation so planning can account for the finished wall.
Is UV wall printing suitable for indoor plasterboard walls?
Yes. WALL&INK’s UV-cured inks are suitable for indoor use, including murals in homes, schools and healthcare settings. The inks are odourless, quick-drying and fade-resistant. The plasterboard’s finish still needs to suit the application. Consider how the room is used and where people will view the mural, especially if the design includes small text or detailed imagery.
Will a wall print on plasterboard resist moisture?
The print resists moisture, but it isn’t waterproof. Treat this as moisture resistance, not protection from prolonged exposure to water or direct splashes. Consider the room’s conditions before choosing the wall for artwork. Address any moisture problem in the plasterboard before printing, as the print won’t resolve an underlying issue with the wall.
Can you print a custom image or logo onto a plasterboard wall?
Yes. WALL&INK can adapt client-supplied logos or photographs into wall-ready artwork for direct printing. A company mark in a reception area or a family photograph for a living space can be planned around the available wall dimensions. Share the original image or logo during your free consultation. Design visualisation included with every booking helps you assess its placement and scale in the room before printing.