
What makes a company history wall memorable isn’t the number of milestones it contains, but how clearly people can follow the story. A corporate history timeline wall should do more than record dates. It should show how important moments connect, fit the space and reflect the organisation.
Choosing what to include can be difficult when the archive is long and every milestone feels significant. Readability, layout and display format add further decisions, and a wall can quickly feel crowded or disconnected. A clear structure helps balance historical detail with a straightforward visual journey.
This guide explains how to organise milestones and choose a format for a timeline wall. It also covers how direct-to-wall printing can bring a company story into a commercial space, and how bespoke design and digital visualisations help plan the composition before printing. Use the guidance to identify an approach that suits your history, wall and audience.
Key Takeaways
- Shape a corporate history timeline wall around its audience and purpose, then prioritise milestones that build a clear story.
- Compare direct-to-wall printing, mounted panels and removable graphics by how they sit within the space and how easily the display can change.
- Use wall measurements, viewing distance and content hierarchy to plan a layout people can read comfortably.
- Bring brand colours, typography, logos and archival images together in a consistent visual system.
- Prepare approved copy, images and brand assets to help move from design consultation and digital visualisation to on-site printing.
What is a corporate history timeline wall, and what can it show?
A corporate history timeline wall is a visual account of an organisation’s history, designed for display on a wall. It brings selected events together in chronological order to show how the organisation has developed and what has shaped it. Dates can sit alongside short captions, photographs, key milestones and brand elements such as logos, colours and typography.
Its purpose is more than decoration. In a reception area, it can introduce visitors to the organisation’s heritage and identity. In an office, it can give employees a visible connection to the company’s progress and values. In a visitor-facing space, a clear sequence can help people follow the story as they move through the environment. Start with what the display needs to communicate, rather than trying to fill the available wall.
A timeline wall is one way to make corporate history accessible. It differs from a donor display, which centres on contributions, and a hall of fame, which highlights selected people or achievements. A general branded mural may express a company’s identity without telling its history. A timeline connects particular moments in sequence, helping viewers understand not only what happened, but how one chapter led to another.
What makes a timeline wall different from a list of dates?
A list records events; a timeline builds a narrative from them. Visual hierarchy makes the major turning points easy to spot, while spacing gives each chapter room to register. Concise captions explain why an event matters without making the wall difficult to scan. Photographs can add context, but each image should support the story rather than compete with the dates and text.
For example, a fictional engineering firm might connect its founding, the launch of a new product and a later move into a different market. Short captions could explain how each step changed the business. The result is a story of growth and adaptation, rather than three unrelated dates.
Which organisations and spaces can use a company history wall?
Organisations can use a history wall in reception areas, offices, meeting spaces and other places where employees, visitors or customers spend time. Let the audience determine the level of detail. Visitors may need a concise introduction, while employees may value references to internal achievements and shared milestones.
Match the content to the viewing context. A wall people pass briefly needs clear dates, strong visual cues and short copy. A display in a space where people can pause can carry more detail. In either case, a defined audience and purpose help keep the story relevant and readable.
How to turn company milestones into a readable timeline wall
A useful timeline starts with an editorial brief, not a layout. Decide who will read it and what they should understand afterwards. A corporate history timeline wall for visitors might introduce the organisation’s purpose and key turning points. One for employees could include more detail about internal developments and shared achievements.
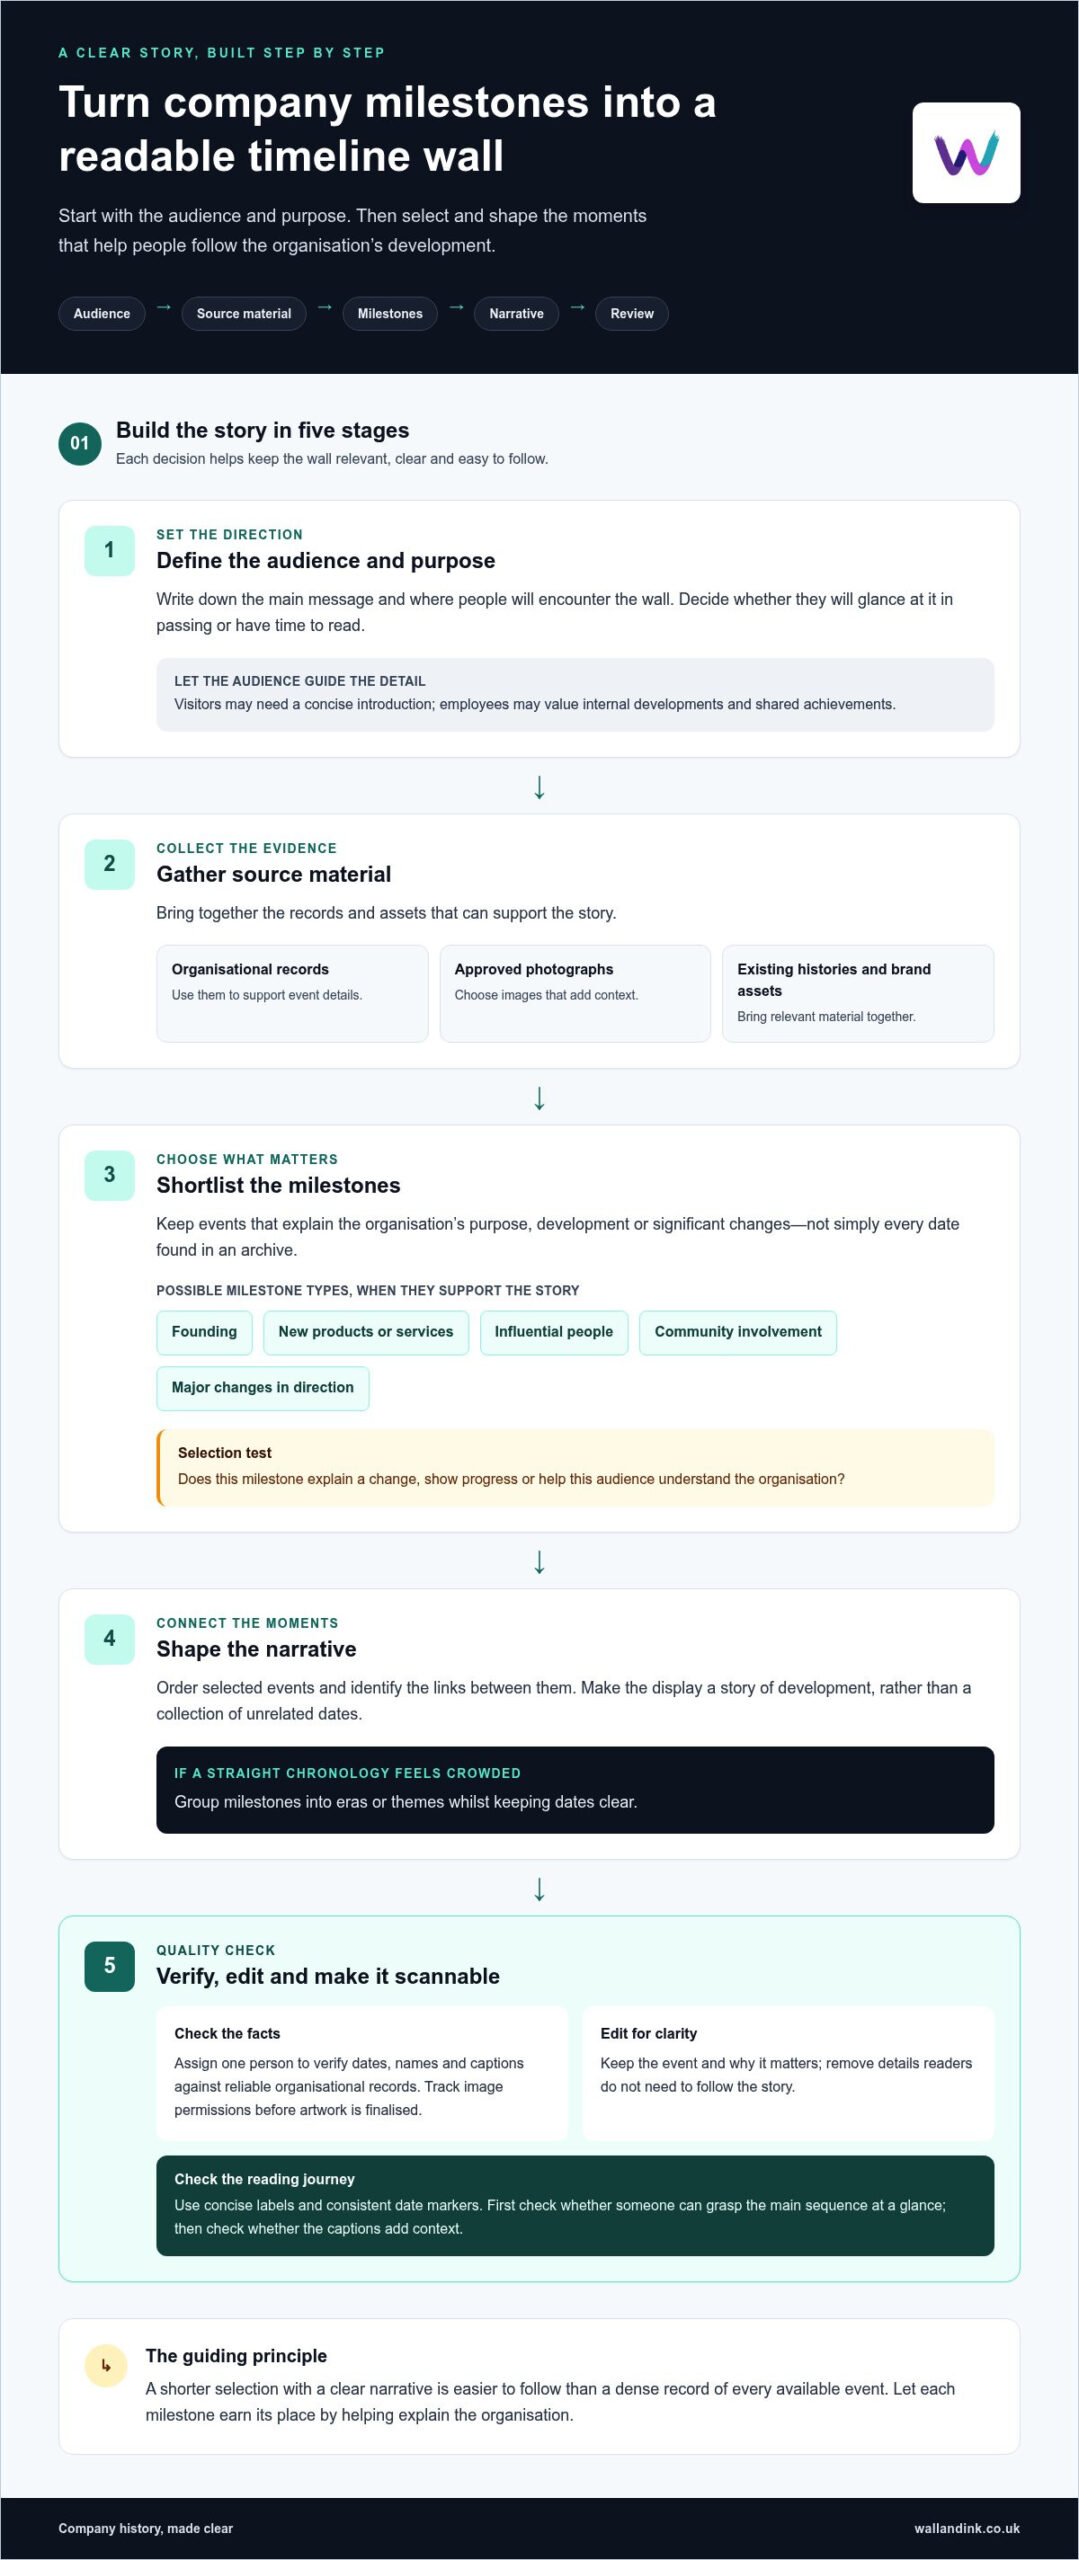
A timeline wall turns selected company records into a visual story, arranged so people can follow the organisation’s development. Use that principle to guide four steps:
- Set the audience and purpose. Write down the main message and where people will encounter the wall. Decide whether they will glance at it in passing or have time to read.
- Gather source material. Bring together organisational records, approved photographs, existing histories and relevant brand assets.
- Shortlist milestones. Keep events that explain the organisation’s purpose, development or significant changes. Depending on the story, these might include its founding, new products or services, influential people and community involvement.
- Shape the narrative. Order the chosen events and identify the links between them. If a straight chronology feels crowded, group milestones into eras or themes while keeping dates clear.
Which company milestones deserve a place on the wall?
Include an event because it helps explain the organisation, not simply because it appears in an archive. A founding date can establish its origins; a major change in direction can explain what the organisation became. Product or service developments, people and community milestones can add breadth when they support the story and matter to the audience.
Leave out dates that add no context or meaning. A shorter selection with a clear narrative is easier to follow than a dense record of every available event. As you shortlist, ask of each milestone: does it explain a change, show progress or help this audience understand the organisation?
How can a timeline remain accurate and easy to read?
Assign one person to coordinate fact-checking. They can verify dates, names and captions against reliable organisational records, and track image permissions before artwork is finalised. This creates a clear review point for details that can otherwise be overlooked when several teams contribute.
Edit each caption to retain the event and why it matters, then remove detail readers don’t need to follow the story. Use concise labels and consistent date markers to establish a scannable hierarchy. Check that someone can grasp the main sequence at a glance, then read the captions for context.
Exhibit design can also influence how people connect with organisational heritage. History Factory discusses powerful exhibit design for corporate heritage, offering another perspective as you plan the story and its presentation. For a printed wall, bespoke wall mural design can translate approved content into a planned visual composition.
Corporate history timeline wall formats: direct printing, panels or removable graphics?
The right display format depends on the wall, the story and how often the content may need to change. A corporate history timeline wall can be printed directly onto a surface or assembled from separate physical elements. Removable graphics are another format to consider, although they differ from direct-to-wall printing.
Compare the practical trade-offs before finalising the artwork. Consider whether you want one continuous composition, distinct sections or a display that can be changed. The history display ideas for company walls from Suttle-Straus offer further examples of ways to present an organisation’s past.
| Format | Visual integration | Surface relationship | Permanence and future changes |
|---|---|---|---|
| Direct-to-wall printing | Artwork can be composed across the wall as one continuous display. | The design is printed onto the wall surface, making the wall itself part of the presentation. | It’s suited to a planned, fixed composition. Changes may involve revising and reprinting part of the artwork or the wider design. |
| Mounted panels | Separate sections create a structured, segmented appearance. | Panels sit in front of the wall, giving the display a distinct physical layer. | Individual sections may be easier to replace or rearrange, depending on how the display is designed and mounted. |
| Removable graphics | Graphics can be arranged as a unified story or as separate elements. | The display is applied over the wall rather than printed directly onto it. | A format designed for removal can suit content expected to change, although the process depends on the material and application. |
When might direct-to-wall printing suit a timeline?
Direct-to-wall printing can make a timeline feel integrated with the space. UV printers apply the artwork to the wall, allowing the layout to be planned as a composed surface rather than a series of independent pieces. Wall & Ink creates bespoke artwork for direct-to-wall printing, with digital visualisations that help teams review how the proposed composition will sit in its intended setting before printing.
This approach can suit a considered, unified design where the wall is central to the story. Plan around the wall’s dimensions and any features that affect how people view the artwork, such as doors, windows or fittings.
When might a modular or removable display be more suitable?
Panels can suit a timeline intentionally divided into chapters, with each physical section representing an era or theme. Removable graphics may be worth considering if milestones or brand information are expected to change. Neither format is automatically more practical: the choice depends on how the content is structured, how the wall is used and whether future updates are likely.
Compare the formats against the project brief. A continuous story, a chapter-based display and a frequently updated record call for different design decisions. Think about the visual effect you want as well as how the display may need to change later.
How to plan the design, wall layout and artwork before printing
A strong layout starts with the wall, not the artwork file. Measure the available width and height, then note doors, windows, switches, furniture and other features that could interrupt the timeline. Record the wall surface and any access constraints that may affect on-site printing. These details give the design team a practical basis for composing the artwork.
How should the timeline fit the wall and viewing distance?
Think about where people will stand and how they’ll encounter the display. A timeline viewed from across a reception area needs a clear sequence and prominent date markers. People who can pause close by may be able to read more detailed captions. Set the scale of headings, dates and supporting copy according to those viewing positions.
Keep the composition open. Group related periods, leave space between sections and use visual hierarchy to lead the eye from one milestone to the next. If every date, image and caption competes for attention, the story becomes hard to scan. The wall’s dimensions and viewing context should shape the artwork, so the finished timeline feels designed for the space rather than squeezed into it.
Before finalising the artwork, review its digital visualisation in context. Check that architectural features don’t obscure important content, the chronology reads naturally across the wall and the amount of copy suits typical viewing positions. Adjust the composition at this stage, before it moves to printing.
What artwork and wall details should the project brief include?
Bring together the material needed to create an accurate, consistent design. A practical brief can include:
- Approved content: verified dates, names, milestone captions and the agreed sequence.
- Brand assets: current logos, colour guidance and typography references.
- Image files: selected archival photographs and other approved images, with permission to use them.
- Wall information: measurements, surface details and the position of doors, windows, fittings or other visible features.
- Viewing context: where people approach the wall from and how close they’re likely to stand.
A consistent visual system helps the timeline feel unified. Use brand colours to distinguish sections, typography to signal levels of information and imagery to support specific milestones. Avoid giving every photograph or date equal prominence. Give key turning points more visual emphasis while keeping supporting details legible and secondary.
Wall & Ink brings these decisions together through bespoke design and direct-to-wall printing, creating a composition planned for the space. Explore bespoke wall printing with Wall & Ink.
From company story to finished wall: what the Wall & Ink project process involves
A corporate history timeline wall moves from a clear brief to bespoke artwork, a planned visualisation and on-site printing. Each stage gives the organisation an opportunity to make practical decisions before the story becomes part of the space.
What happens during design consultation and visualisation?
The design consultation establishes the audience, purpose and story, as well as the intended wall. Bring the milestones you want to include, approved copy, relevant images and brand assets such as logos and colour guidance. Verified content lets the design team focus on composition rather than resolving historical details during artwork development.
Wall & Ink develops bespoke artwork for the project and creates a digital visualisation so your team can review the proposed design in its intended space. Consider how the chronology reads across the wall, whether key milestones stand out and whether image placement supports the story. Feedback can refine the hierarchy, imagery and copy before the artwork is prepared for printing.
Include practical details about the wall in the brief, such as its measurements, surface information and visible features such as doors, windows or fittings. These details inform the proposed composition and on-site installation planning. Keep one agreed version of the copy and brand assets to make reviews more straightforward.
How does direct-to-wall printing complete the project?
Once the artwork has been reviewed and prepared, UV printers apply it directly to the wall surface. This brings the planned timeline into the physical environment as one composed display. The wall and approved design inform the on-site work, so accurate project information and a settled composition matter before printing begins.
Professional on-site installation is the final physical stage. The result connects the company story with the space it occupies, rather than leaving the timeline as a document or screen-based record. The process moves from establishing the brief to developing bespoke artwork, reviewing its digital visualisation and printing the approved design on site.
Take your company milestones from brief to finished wall with Wall & Ink’s corporate history timeline wall service.
Turn your company history into a story people can follow
A strong corporate history timeline wall isn’t a catalogue of every date. It’s a carefully selected story, shaped around the people who’ll see it and the space where it will live. Prioritise milestones that explain the organisation’s development, then use clear hierarchy, concise captions and considered spacing to make the timeline easy to scan.
The display format and wall layout both matter. Think about how the content may change, where people will view it from and how the wall’s features affect the composition. Wall & Ink’s bespoke design consultation and digital visualisation help plan the artwork in context before direct-to-wall UV printing brings it to the surface. Professional on-site installation completes the project.
Ready to turn your milestones into a considered wall story? Plan a bespoke corporate history timeline wall with Wall & Ink. Start with a clear brief and a focused selection of milestones, then work with Wall & Ink to develop the design for your space.
Frequently Asked Questions
What is a corporate history timeline wall?
A corporate history timeline wall is a designed visual account of an organisation’s development, displayed on a wall. It arranges selected events in sequence, often using dates, concise captions, photographs and brand elements to connect milestones into a story. Unlike a general branded mural, its focus is the organisation’s history. It can introduce visitors to the company’s heritage or give employees a visible connection to its progress and identity.
What should a company include on a history timeline wall?
Include milestones that explain the organisation’s purpose, development or significant changes. Depending on the story, these might cover its founding, important products or services, influential people, major achievements and community involvement. Use verified dates and names, short captions and relevant images. Each item should help readers understand the company’s journey. Avoid adding events simply because records are available; too much detail can make the display harder to follow.
How do you organise milestones on a corporate timeline wall?
Start by defining the audience and the message the wall should communicate. Gather company records, shortlist events that contribute to that story, then check dates, names and claims against reliable sources. Arrange selected milestones chronologically, using clear date markers and concise captions. If a straight sequence feels crowded, group events into eras or themes while keeping the order understandable. Give major turning points more visual prominence than supporting details.
Can a timeline be printed directly onto an office wall?
Yes. Direct-to-wall printing uses UV printers to apply prepared artwork to a wall surface, so a timeline can be composed as part of the office environment. The layout can bring dates, captions, photographs and brand elements together across the available wall area. Wall & Ink provides bespoke design, digital visualisations and professional on-site installation for this type of project. The wall’s dimensions and features inform the design planning.
How does direct-to-wall printing compare with timeline wall panels?
Direct-to-wall printing places the artwork onto the wall surface, allowing the design to read as one integrated composition. Panels are separate physical sections mounted in front of the wall, which can give a timeline a more segmented, chapter-based structure. The better fit depends on the space, visual approach and likelihood of future changes. Consider how each format relates to the wall and how the organisation may update its story over time.
Can a corporate timeline wall include photographs and company branding?
Yes. Photographs and brand elements can make the history recognisable and visually consistent. Select images that support specific milestones, then combine them with approved logos, brand colours and typography. Keep the hierarchy clear so photographs and decorative elements don’t compete with dates or captions. Before artwork is finalised, check image permissions and verify that names, dates and accompanying copy are accurate and approved.
How do you prepare a wall and artwork for a timeline printing project?
Prepare a clear brief with the approved timeline copy, verified dates, selected images, image permissions, logos and brand guidance. Record the wall’s measurements, surface information and visible features such as doors, windows or fittings. Note where people will view the display from. A design consultation and digital visualisation help review the proposed composition in context before printing. This planning also informs the on-site installation stage.