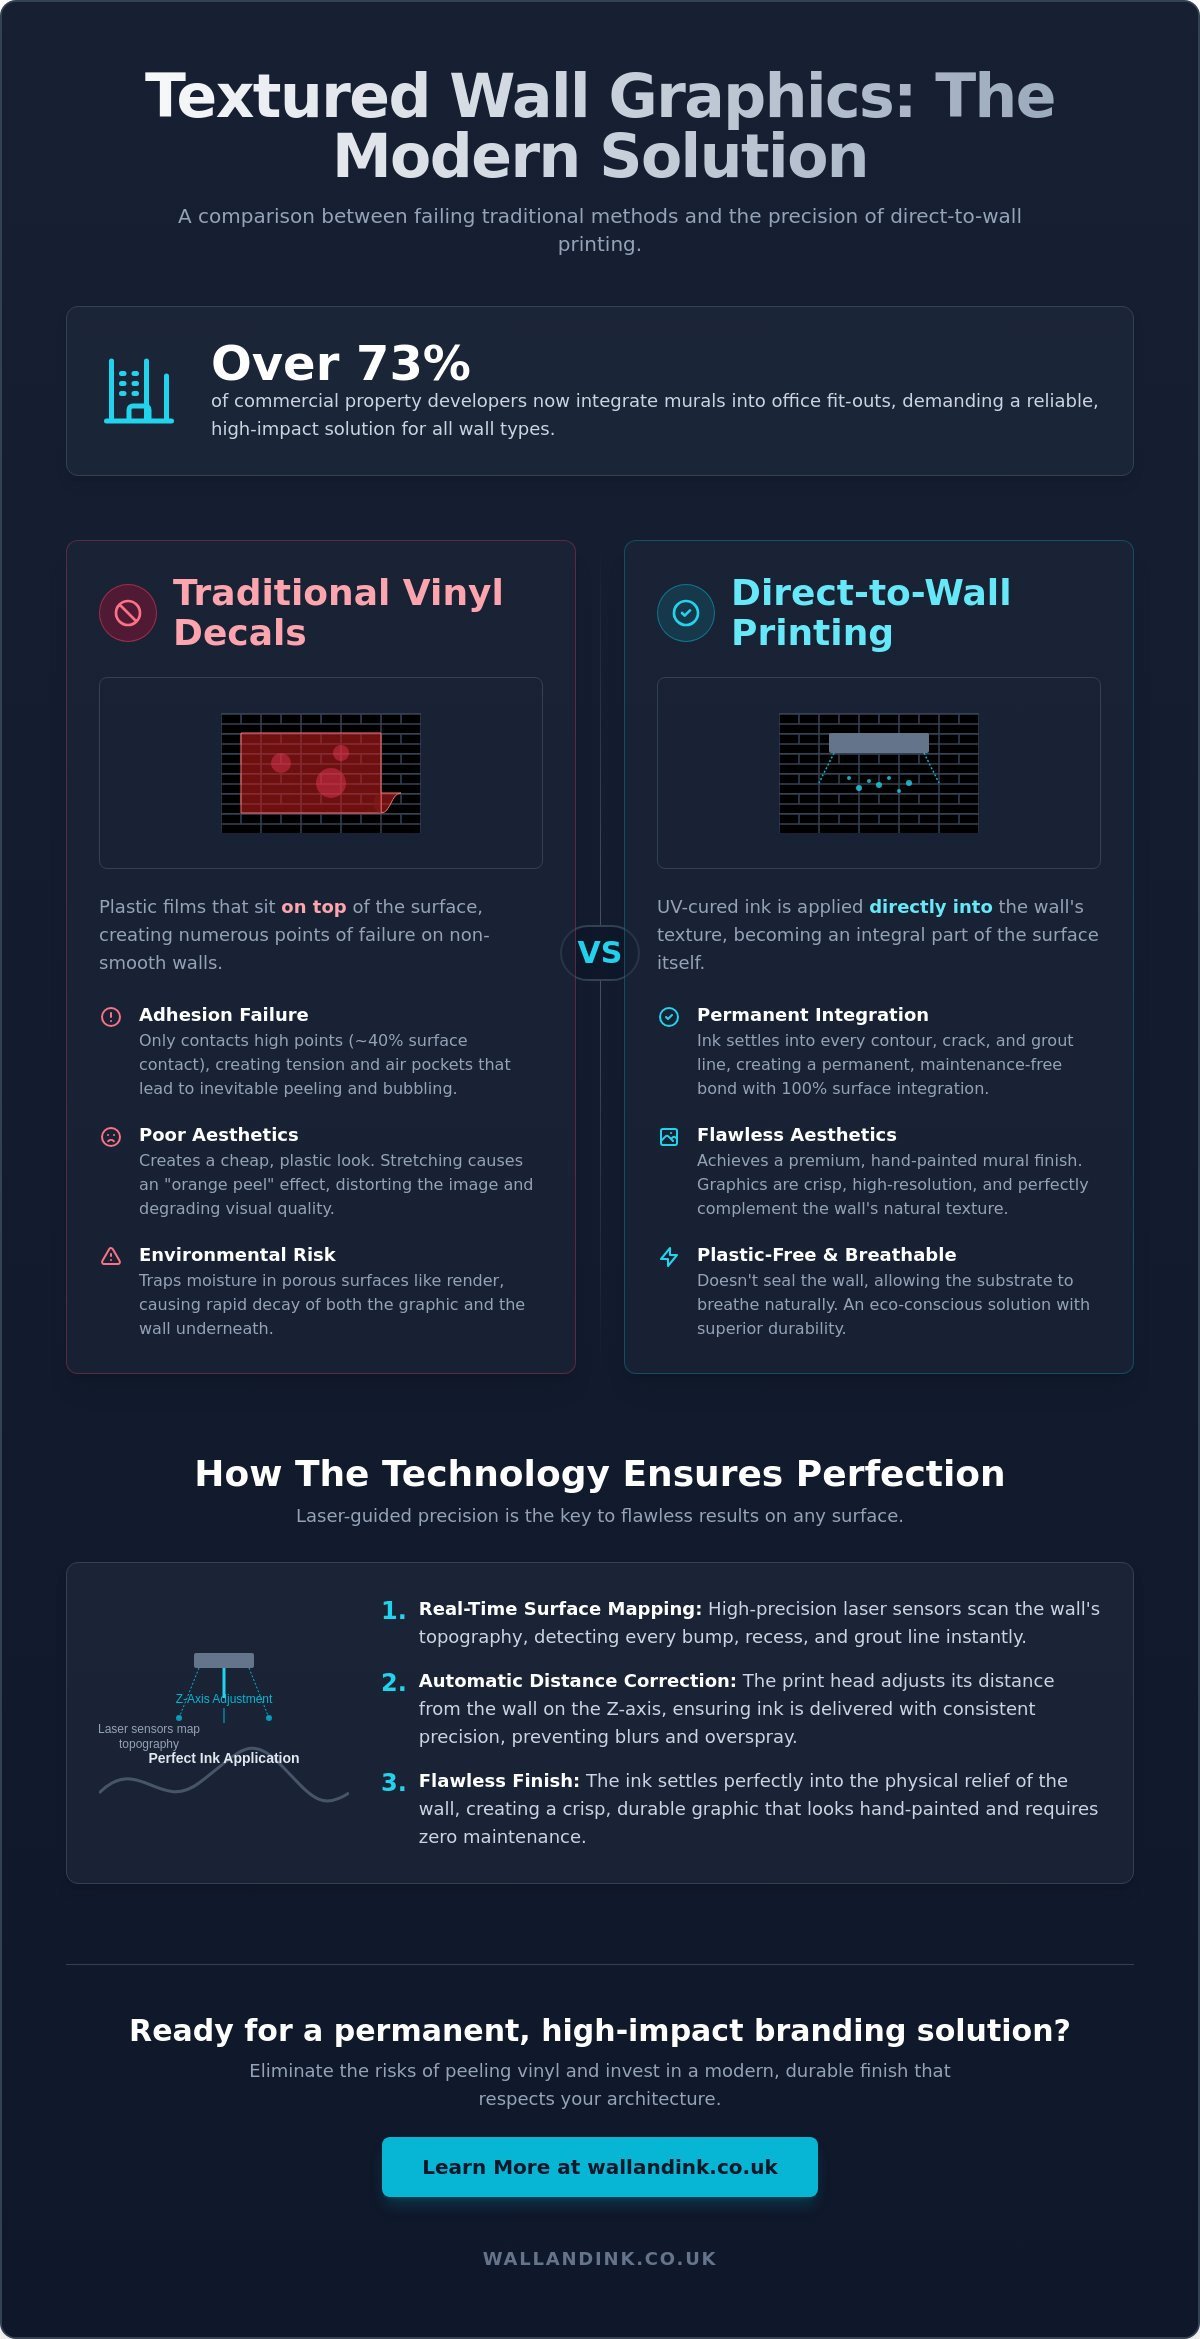
The traditional choice for wall branding, vinyl decals, is often the worst possible option for your space. Most designers treat brick, stone, or rough plaster as obstacles to be covered, yet these surfaces provide the perfect foundation for high-impact branding. You’ve likely seen the frustration of vinyl peeling off brick or bubbles forming under decals on uneven plaster; it’s a common industry failure that ruins the aesthetic and wastes your budget. With over 73% of commercial property developers now integrating murals into office fit-outs, the demand for a reliable, permanent solution has never been higher.
This guide demonstrates how to achieve flawless, high-resolution custom graphics for textured walls without the risks associated with plastic films. You’ll discover how direct-to-wall printing uses the surface as a canvas to create crisp graphics that look hand-painted and require zero maintenance. We’ll examine the technical process that ensures permanent results on both internal and external walls, providing a modern solution for pragmatic decision-makers who value precision and durability over temporary fixes.
Key Takeaways
- Learn why traditional adhesive methods fail on rough substrates and how direct-to-wall printing provides a permanent, high-resolution alternative.
- Discover the technical process of using laser-guided UV printers to apply custom graphics for textured walls, ensuring ink settles perfectly into every architectural contour.
- Understand the long-term value of switching to a plastic-free mural solution that offers superior durability and reduced maintenance for interior and exterior surfaces.
- Master design techniques such as the “Depth Effect” to create artwork that complements the physical relief of your wall rather than fighting against it.
- Explore the streamlined end-to-end process required to achieve consistent, professional branding across multiple commercial or educational sites in the UK.
The Challenge of Applying Custom Graphics to Textured Walls
Textured surfaces like exposed brick, weathered stone, and rough-cast plaster are often seen as architectural assets, yet they present a significant technical barrier for traditional branding. In the context of modern interior and exterior design, custom graphics for textured walls are bespoke visual solutions specifically engineered for these non-smooth substrates. Unlike flat surfaces, high-relief walls possess physical depth that disrupts the bond of conventional materials. Many designers attempt to use standard methods on these surfaces, only to find that the texture itself becomes the primary cause of graphic failure.
The primary technical barrier is what industry specialists call the Recession Risk. Traditional vinyl wraps and decals are designed to sit on flat, non-porous planes. When applied to brickwork or uneven plaster, the material is forced to bridge the gaps between the high points of the texture. Because the vinyl cannot naturally conform to deep grout lines or recessed pits, it creates a hollow bridge of tension. This lack of total surface contact means the adhesive is only working at a fraction of its intended capacity. Over time, the tension in the film causes it to pull away from the recesses, leading to a visible collapse of the graphic’s structural integrity.
Beyond structural failure, there is a significant aesthetic cost known as the orange peel effect. Thin adhesive films are often stretched during installation to force them into textures. This stretching thins the pigment layer and distorts the image, resulting in a pebbled, uneven finish that ruins the high-resolution impact of the original design. The texture doesn’t just show through; it actively degrades the visual quality of the artwork.
Why Vinyl and Decals Struggle with Surface Irregularities
Adhesive failure is a matter of simple physics. For a secure bond, an adhesive requires maximum surface area contact. On a rough stone wall, a decal might only touch 40% of the substrate, leaving the rest supported by trapped air pockets. These pockets are prone to expansion. As building temperatures fluctuate, the air behind the vinyl heats up and pushes the material outward. On stone or external brick, which holds thermal mass, the constant expansion and contraction cycle rapidly fatigues the adhesive. This process eventually leads to edge lift, where the graphic begins to curl away, creating an unappealing, industrial look that signals poor maintenance.
Common Failures: Bubbling, Peeling, and Poor Adhesion
External render presents even harsher conditions for traditional stickers. Moisture is the primary enemy here. Because render is porous, it naturally breathes. When a vinyl graphic is applied over it, it seals the surface and traps moisture behind the film. This leads to rapid degradation, often causing the graphic to bubble or peel within months of installation. The evolution of Digital Printing Technology has shifted the focus from these failing surface-applied films toward methods that integrate with the substrate. Unlike vinyl, direct-to-wall UV ink doesn’t seal the wall or rely on surface-area tension. It settles into the texture, providing a permanent result that survives the environmental pressures that destroy traditional decals.
Direct-to-Wall Printing: The Technical Solution for Textured Substrates
Direct-to-wall printing is a disruptive technology that has fundamentally changed the UK design industry. It replaces the outdated reliance on adhesive films with a process that treats the wall itself as the medium. By removing the need for carrier materials like paper or plastic, the process ensures that nothing sits between the artwork and the substrate. This direct application is the only reliable way to produce custom graphics for textured walls that maintain their clarity over time. It eliminates the risk of edge-lifting and delamination whilst providing a finish that is indistinguishable from a professional hand-painted mural.
The core of this system is a specialised print head equipped with high-precision laser sensors. As the machine moves along the vertical and horizontal axes, these sensors map the wall’s topography in real-time. They allow the print head to advance and retract on the Z-axis, maintaining a consistent distance from the surface regardless of bumps, grout lines, or recesses. This mechanical precision ensures the ink is delivered exactly where it’s needed; it prevents the blurring or distortion that typically occurs when trying to wrap a flat material over a 3D surface.
How UV Ink Conforms to Brick, Stone, and Render
UV ink droplets are microscopic. When sprayed onto a rough surface, they settle deep into the valleys of the texture rather than bridging over them like a vinyl bridge. This results in 100% coverage that looks like an integrated part of the architecture. Because the ink doesn’t form a continuous, non-porous plastic sheet, the substrate remains breathable. This is vital for materials like external render or historic brickwork, where trapped moisture would otherwise cause rapid degradation and structural damage. This method is compatible with almost any architectural texture, from fine-grain polished plaster to heavy industrial breeze blocks and coarse stone.
Maintaining Image Integrity Across Uneven Surfaces
Image integrity is maintained through a resolution range of 720 to 2880 dpi. Even on the roughest materials, the sensors ensure the droplets land with mathematical accuracy to prevent the “stepping” effect seen in lower-quality applications. This precision is essential when producing custom graphics for textured walls where every millimetre of relief matters. UV curing is the process of using ultraviolet light to instantly dry and harden ink onto a substrate. This instant reaction creates a durable bond between the ink and the wall. It represents a significant advancement for digital printing in interior décor, providing a finish that is scratch-resistant and waterproof immediately. If you require a permanent solution that survives high-traffic environments, considering direct-to-wall printing is the logical next step for your project.
Comparing Graphic Solutions for Textured Interiors and Exteriors
Evaluating the performance of custom graphics for textured walls requires a shift from viewing murals as temporary decorations to seeing them as architectural components. Pragmatic decision-makers use a framework based on durability, cost-per-year, and aesthetic longevity. Whilst traditional adhesive options might appear cost-effective on an initial quote, their high failure rate on textured surfaces often necessitates multiple replacements. Direct-to-wall printing eliminates these recurring costs by providing a permanent solution that matches the building’s lifespan.
Environmentally, the direct printing method offers a significant advantage over plastic-based alternatives. Standard vinyl installations generate substantial waste, including backing paper and non-recyclable plastic offcuts. Direct application uses only the necessary ink, removing hundreds of square metres of plastic from the mural process. It’s a cleaner, more sustainable approach for modern commercial environments focused on reducing their environmental footprint. This process doesn’t just look better; it’s fundamentally more responsible.
A common objection to direct printing is the perceived permanence of the ink. In reality, this method is more flexible than vinyl. If a design needs updating, the wall is simply painted over with a standard primer and topcoat, exactly like a traditional wall. There’s no adhesive residue to scrape away and no risk of the substrate being damaged during a removal process. It’s a low-risk solution for high-stakes environments.
Direct-to-Wall Printing vs Traditional Vinyl Wraps
The installation of traditional wraps is a labour-intensive manual process involving weeding, squeegeeing, and the use of industrial heat guns to force film into textures. Direct-to-wall printing is an automated, precise operation that requires none of these steps. This efficiency translates to a cleaner workspace and a faster turnaround. Architects and heritage consultants often prefer this method because it preserves the tactile nature of the substrate. You can still feel the grain of the stone or the texture of the brick through the ink, avoiding the artificial, plastic look that vinyl creates.
Durability and Longevity on High-Traffic Textured Surfaces
The UV-cured inks used in this process are engineered for industrial-grade durability. In high-traffic school corridors or busy office centres, the graphics resist scratches and scuffs that would easily tear a vinyl decal. For exterior wall printing, these inks provide exceptional fade resistance against direct sunlight, maintaining colour saturation on facades for years. Before proceeding, use this suitability checklist for your wall:
- The surface is free from loose debris or flaking paint.
- The substrate is completely dry and free from rising damp.
- There is at least 1.5 metres of clear floor space for the printing equipment.
- Any deep cracks have been filled to ensure a stable base.
Designing for Texture: Visual Strategies for Maximum Impact
Texture shouldn’t be hidden behind a plastic film. Instead, effective design treats the wall’s physical relief as a secondary layer of the artwork. When planning custom graphics for textured walls, the goal is to choose art that complements the substrate’s character. Watercolour styles work exceptionally well on rough plaster because the ink appears to seep into the material, mimicking a traditional fresco. Conversely, industrial schematics or technical drawings create a striking juxtaposition when applied to weathered stone, using the precision of the graphic to highlight the organic nature of the wall.
The “Depth Effect” is a critical strategy where designers use digital shadows and highlights to play with the physical relief. By adding artificial depth to the artwork, you can make elements appear to float over the brickwork or recede into the grout lines. Digital visualisation is essential during this phase. It allows you to see how a complex design interacts with the specific topography of your site before the printing process begins. This ensures that a logo or mural doesn’t just sit on the wall but becomes part of it. It’s a method that turns a challenging surface into a high-impact design feature.
Choosing Colours and Contrast for Rough Surfaces
High-contrast designs are the most effective choice for heavily pitted surfaces like brick or breezeblock. Sharp transitions between light and dark elements ensure that the graphic remains legible even when viewed under harsh directional lighting. Ambient light significantly changes the appearance of a graphic; grazing light across a textured surface creates shadows that can either enhance or obscure the design. Darker colours tend to hide surface imperfections while lighter tones emphasise the underlying texture.
Leveraging Natural Texture to Enhance Digital Art
Smart design uses the physical characteristics of the wall to its advantage. Grout lines in a brick wall can act as a natural grid for typography, allowing for a structured layout that feels integrated into the building’s architecture. An industrial mural on raw concrete, for example, looks far more authentic when the design allows the natural grey of the substrate to serve as a mid-tone. When organising complex logos on uneven office feature walls, it’s best to avoid placing fine text directly over deep recesses. If you’re ready to transform your space with architectural precision, book your direct-to-wall printing consultation to start the visualisation process.
Implementing Professional Wall Graphics Across the UK
Maintaining brand identity across a nationwide portfolio requires technical uniformity. For commercial real estate developers and retail chains, the ability to deploy consistent custom graphics for textured walls across multiple UK locations is a significant operational advantage. Unlike traditional methods that depend on the variable skill of local installers, our automated process ensures identical results in London, Manchester, or Edinburgh. This industrial precision eliminates the aesthetic discrepancies that often plague multi-site branding projects. It provides a reliable framework for pragmatic decision-makers who value efficiency and high-quality outcomes.
The process is designed specifically for high-stakes professional environments where downtime is a liability. There are no toxic fumes, no adhesive odours, and no disruptive preparation work required. Our equipment operates with surgical cleanliness; it allows graphics to be applied in occupied offices or active hospital corridors without compromising air quality or safety standards. It’s the logical conclusion for modern interior designers who prioritise efficiency alongside high-end visual results. By removing the traditional hassles of mess and smell, we provide a service that integrates seamlessly into a project’s final fit-out stage.
The Wall & Ink Process: From Visualisation to Execution
Every project begins with a technical consultation to assess the specific substrate and environmental conditions. We provide digital mock-ups that allow you to visualise the final graphic on your specific wall texture before any ink is applied. This visualisation phase is critical for ensuring the design interacts correctly with the physical relief of the wall. The printing itself is remarkably efficient. Depending on the design complexity, the machine covers significant areas quickly. Because the UV ink cures instantly, the surface is ready to touch immediately after the print head passes. This bespoke approach ensures the print is perfectly calibrated to the unique topography of your brick, stone, or plaster.
Transforming Commercial and Residential Textured Spaces
The applications for this technology are diverse and sector-specific. In the education sector, brick-walled corridors that were once considered un-brandable can now feature durable, educational murals that withstand the daily rigours of high footfall. For the retail and hospitality sectors, branding external render is a powerful way to attract high-street footfall without the maintenance issues of vinyl. Whether you’re managing a corporate headquarters or a private residence, the permanence and precision of the result remain the same. The process turns challenging architectural surfaces into high-impact branding assets. To start your project, enquire about our UK-wide wall printing services and discover how we can transform your textured space.
Transforming Architectural Surfaces into Branding Assets
Texture shouldn’t be a limitation for your branding strategy. By adopting direct-to-wall printing, you eliminate the common industry failures of vinyl peeling off brick or bubbles forming under decals on uneven plaster. This technical shift ensures that custom graphics for textured walls are no longer temporary additions but permanent architectural features. Our specialised UV-cured ink technology bonds directly to the substrate; it provides a finish that is both scratch and fade resistant, even in high-traffic commercial environments or on external facades.
The transition from legacy adhesive films to digital application is the only way to achieve high-resolution results on rough stone, brick, or render. With no vinyl to fail and no plastic waste generated, it’s the most durable and sustainable solution for modern interior designers and property developers. If you’re ready to upgrade your space with industrial precision, request a bespoke design visualisation for your textured wall to see the potential of your site. We’re here to help you turn challenging surfaces into your most impactful design assets.
Frequently Asked Questions
Can you print custom graphics on a brick wall?
Yes, direct-to-wall printing is engineered specifically for challenging substrates like brickwork. The printer’s integrated laser sensors map the wall’s topography in real-time, allowing the print head to adjust its distance from the surface. This ensures that ink settles deep into grout lines and recesses without the blurring or distortion common in traditional methods. It results in a crisp, permanent graphic that looks integrated into the masonry.
Do wall graphics for textured walls peel off over time?
No, these graphics cannot peel because they don’t use an adhesive carrier or plastic film. Unlike vinyl decals that rely on surface tension and often fail on rough substrates, UV-cured ink bonds at a molecular level with the wall material. This eliminates the risk of edge-lifting, bubbling, or delamination. The graphic remains a permanent part of the surface until you choose to paint over it.
How do I clean a direct-to-wall printed graphic on a textured surface?
Cleaning is straightforward due to the durable nature of UV-cured ink. You can wipe the surface with a damp cloth and a mild, non-abrasive detergent to remove dust or surface marks. The ink is waterproof and scratch-resistant, so it won’t smudge or fade during standard maintenance. For exterior walls, low-pressure water rinsing is usually sufficient to maintain the clarity and vibrancy of the artwork.
Is it possible to remove or change the graphics later?
Yes, graphics are easily updated by painting over them with a standard primer and topcoat. There is no adhesive residue to scrape away and no risk of damaging the underlying texture during removal. This makes it a low-risk solution for commercial spaces that require periodic branding updates. Once the new coat of paint is dry, the wall is ready for a new print or can be left as a plain surface.
Does the texture of the wall make the image look distorted?
Image distortion is prevented by the printer’s Z-axis sensors. These lasers map the wall’s relief and adjust the print head’s distance thousands of times per second. This ensures that every ink droplet lands with mathematical precision, regardless of bumps or recesses. Whilst the texture remains visible through the ink, the geometric integrity of logos and text is preserved at resolutions up to 2880 dpi.
What is the maximum size for a textured wall graphic?
There is no functional maximum size for these graphics. The printing equipment is modular and can be set up to cover entire building facades or expansive internal corridors. Because the machine prints in vertical strips that align with sub-millimetre accuracy, large-scale murals appear seamless. This makes the technology ideal for industrial warehouses, school halls, and large retail units where traditional signage would be impractical.
How much does direct-to-wall printing cost compared to vinyl?
Direct-to-wall printing typically requires a higher initial investment than basic vinyl stickers, but it offers a significantly lower total lifecycle cost. Vinyl often fails on rough surfaces within months, necessitating expensive removals and replacements. This permanent solution requires no maintenance or re-application, making it the more cost-effective choice for pragmatic decision-makers focused on long-term value and durability for custom graphics for textured walls.
Can you print graphics on external textured render?
Yes, the process is highly effective on external render and pebbledash. The UV-cured inks are engineered to be weather-resistant and fade-resistant, maintaining their saturation under direct sunlight. Crucially, the ink doesn’t seal the wall like a plastic film would. This allows the render to breathe, preventing the moisture build-up that often leads to structural damage and graphic failure in exterior environments.