The era of adhesive-based wall decor is ending, replaced by a method that integrates art directly into the substrate’s grain. You’ve likely dealt with the frustration of peeling vinyl edges or the bubbles that inevitably form in traditional wallpaper, especially in high-traffic corridors. It’s a common headache for pragmatic decision-makers who require branding that remains intact. The direct to wall printing process offers a modern, industrial alternative, moving away from temporary applications and toward permanent, high-resolution surface integration.
This technical guide explores the precision engineering and mechanical stages behind transforming any vertical surface into durable art. We’ll examine how specialised UV-curable inks and rail-based printheads ensure accuracy on challenging textures whilst maintaining a clean, non-disruptive installation. You’ll gain a clear understanding of the calibration required for professional results, the science of instant ink curing, and the maintenance protocols that confirm long-term durability on materials ranging from brick to glass.
Key Takeaways
- Understand how industrial-grade piezoelectric printheads and laser-guided sensors achieve microscopic accuracy on vertical surfaces.
- Learn the technical stages of the direct to wall printing process, from initial site assessment to the precision application of UV-curable inks.
- Identify which substrates are compatible with this technology, including standard plaster and challenging textures like natural brick or concrete.
- Discover why integrated UV murals outperform traditional vinyl through superior scratch resistance and lightfastness in high-traffic environments.
- Recognise the benefits of a non-contact application method that eliminates the mess of adhesives and the risk of bubbling or peeling.
Understanding the Direct-to-Wall Printing Revolution
Vertical digital printing represents a fundamental shift in how we approach surface decoration. It is a non-contact, direct-to-substrate application method that eliminates the need for intermediary materials like paper or plastic. Whilst traditional decorating relies on bonding a physical layer to a wall, this technology uses precision-engineered machinery to apply pigment directly. By leveraging advanced Digital printing technology, the art becomes an integrated component of the surface rather than a temporary addition. This method ensures that the final result is as durable as the wall itself.
The direct to wall printing process addresses the inherent flaws found in legacy media like vinyl and wallpaper. These adhesive-based solutions are prone to structural failure. In high-traffic commercial environments, peeling seams and bubbling are not just aesthetic issues; they represent a failure of the material itself. By removing the adhesive layer, we remove the primary cause of graphic degradation. Modern UK architecture, with its blend of heritage brickwork and contemporary glass, requires this level of flexible, integrated branding that traditional methods simply cannot provide.
The Limitations of Traditional Wall Graphics
Adhesive failure is a persistent problem in the UK, where variable humidity and internal temperature changes can cause vinyl to shrink or lift. Physical limitations also apply. Traditional graphics cannot conform to textured or porous substrates such as natural stone or brick without significant risk of failure. The bond is often superficial and temporary. Additionally, the environmental impact is substantial. PVC-based vinyls contribute to landfill waste and involve complex manufacturing processes. Direct ink application is a low-waste alternative that uses UV-curable inks with zero VOCs, making it a more responsible choice for modern projects.
The Direct-to-Wall Advantage
Precision is the hallmark of this method. The printer follows the natural contour of the wall, ensuring the image remains sharp even on irregular surfaces. This mechanical superiority allows for high-resolution output on substrates that were previously considered unprintable. Site disruption is minimal. The direct to wall printing process provides a “clean install” that produces no dust, no hazardous fumes, and no physical offcuts. It allows for branding on almost any vertical surface without the need for specialist adhesive layers or extensive surface preparation. The result is a durable, integrated finish that maintains its integrity long after traditional alternatives have failed.
The Core Technology: How UV Vertical Printers Function
The mechanical foundation of the direct to wall printing process relies on a precision-engineered vertical rail system. This assembly allows the printer to traverse any wall surface with micrometre accuracy, ensuring that the final mural is perfectly aligned regardless of the floor’s level. Laser-guided sensor arrays work in tandem with the motor, continuously mapping the wall’s surface topography. These sensors adjust the printhead’s position in real-time, maintaining a consistent distance from the substrate. This prevents mechanical collisions whilst ensuring the ink droplets land exactly where intended, even on bowed or irregular surfaces.
The engine of this system is the piezoelectric printhead. Unlike thermal heads, piezoelectric technology uses electric charges to physically vibrate a crystal, which then ejects microscopic ink droplets with industrial precision. This method allows for a wide range of architectural applications including glass, metal, and wood. The ink used is a CMYK+W gamut, which includes a dedicated white channel. This white layer is crucial for achieving vibrant, opaque results on dark or coloured backgrounds, providing a high-contrast base that makes colours pop even on non-white substrates.
Ink Chemistry and Surface Adhesion
UV-curable inks operate through a process called polymerisation. When the ink hits the wall, integrated ultraviolet lamps follow the printhead and instantly cure the pigment. This creates a cross-linking bond with the substrate, effectively merging the ink with the surface material. This instant curing prevents smudging and allows for the immediate use of the space after completion. Modern UV inks are formulated without Volatile Organic Compounds (VOCs), ensuring that the process remains safe for indoor environments like hospitals or schools. If you are looking to upgrade your space with this technology, you can explore professional direct-to-wall printing services to see how these chemical properties benefit your specific environment.
Resolution and Detail Accuracy
Professional vertical printers can achieve resolutions up to 2880 dpi. This level of detail allows for photographic-quality murals that remain sharp even when viewed from a close distance. The sensors maintain a consistent printhead distance, which is vital for maintaining focus on textured walls like brick or concrete. This technology is highly scalable. Whether you require a small corporate logo or a multi-storey feature wall, the machine maintains the same level of industrial precision across the entire surface area. The result is a seamless, high-definition mural that traditional methods cannot replicate.
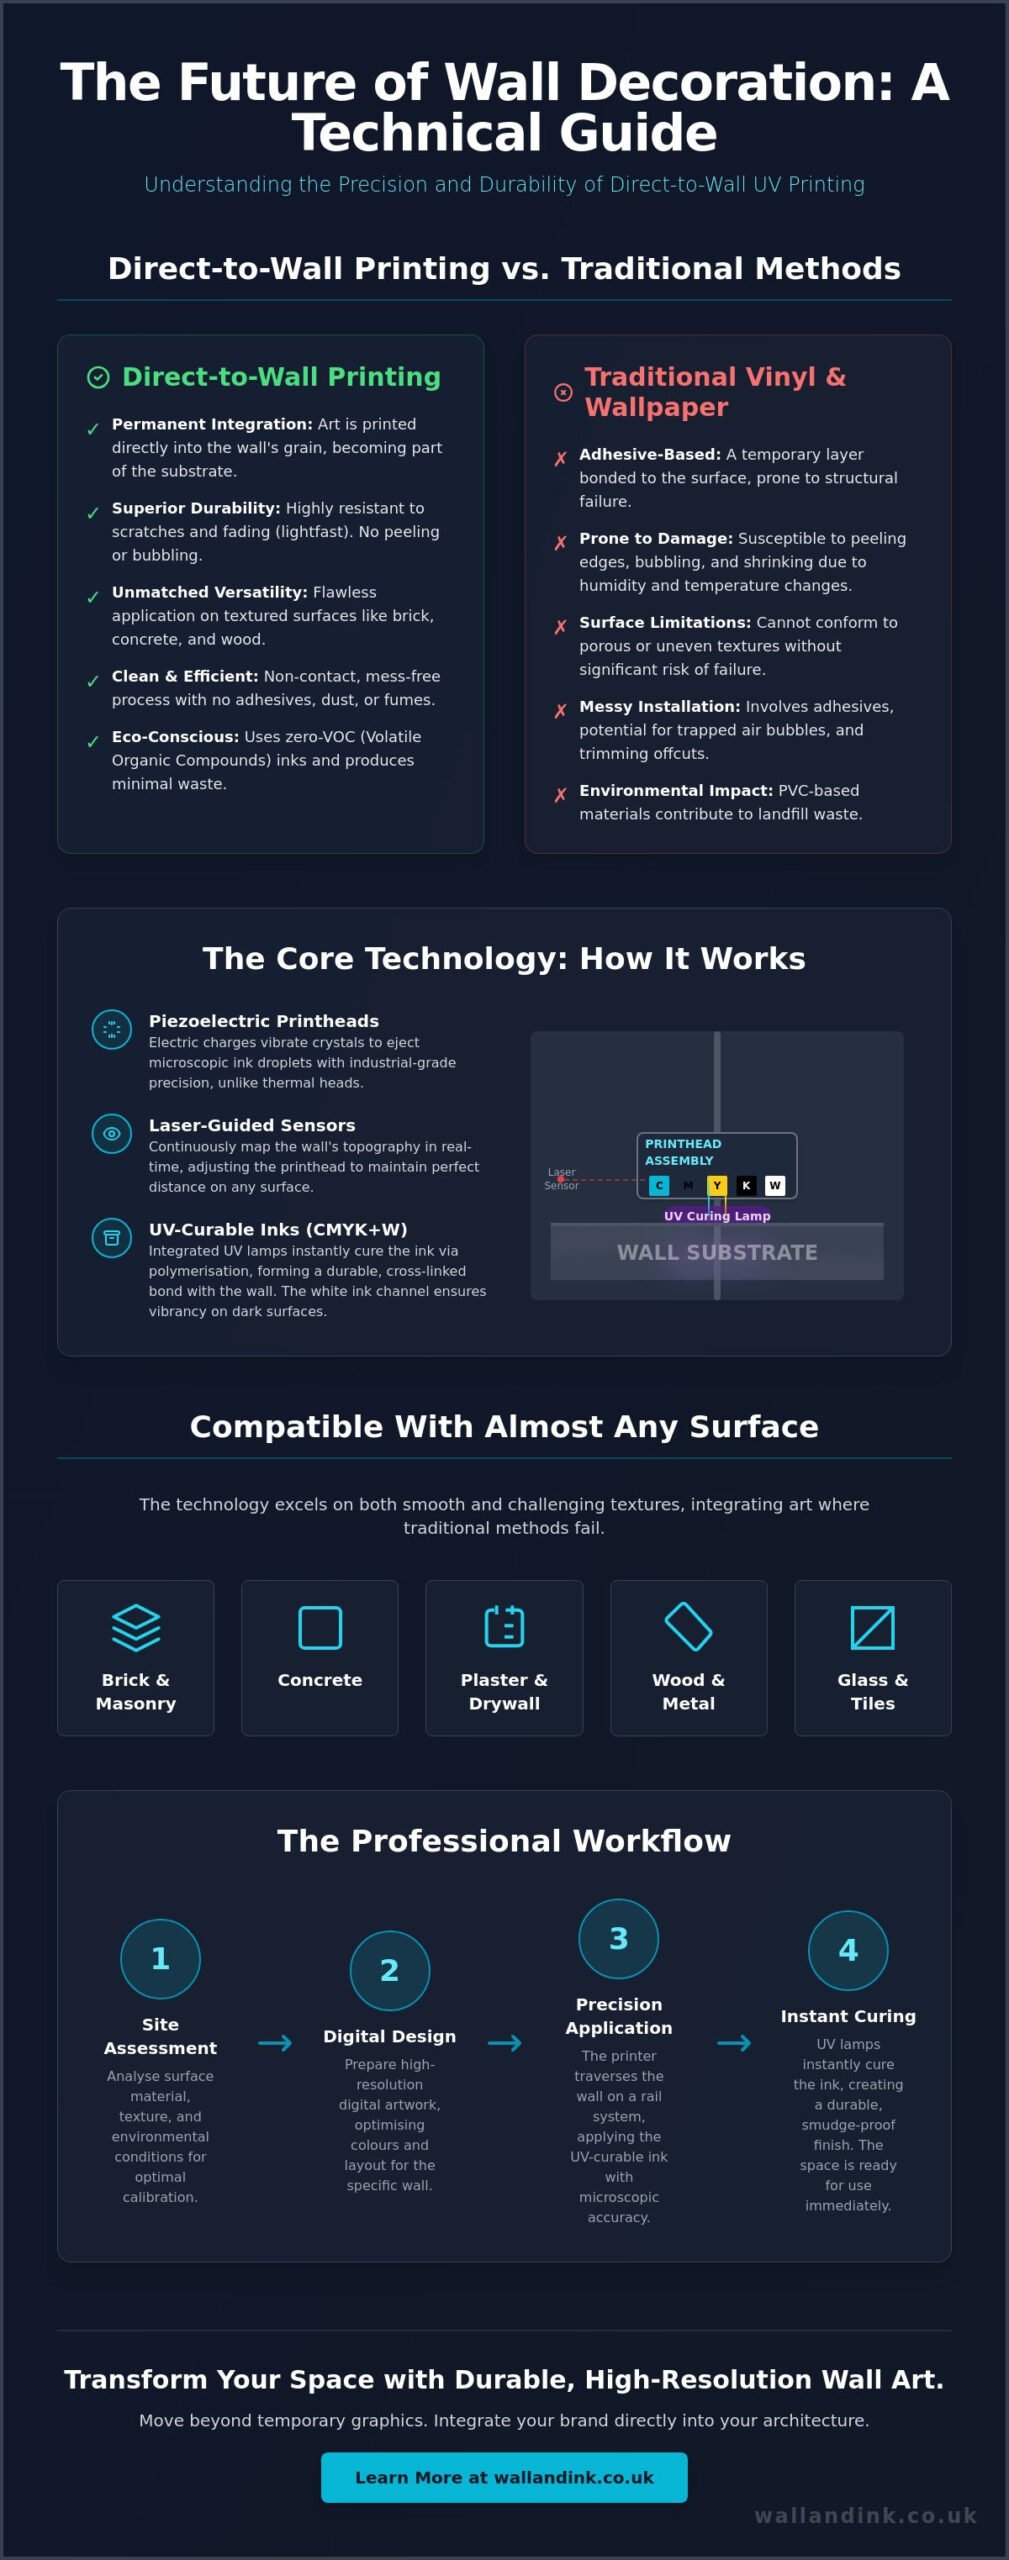
Surface Science: Substrates Compatible with Direct Printing
The versatility of the direct to wall printing process is one of its most significant industrial advantages. Unlike traditional media that requires a perfectly smooth surface for adhesion, vertical printing technology is engineered to adapt to the physical characteristics of the substrate. This mechanical flexibility allows for high-resolution output on materials that would otherwise be impossible to brand or decorate. From standard office partitions to rugged industrial exteriors, the ability to print directly onto the source material ensures a permanent bond that resists the common failure points of adhesive-based graphics.
We categorise compatible substrates into four primary groups based on their porosity and surface tension:
- Standard Interior Surfaces: Plasterboard, drywall, and walls finished with standard matt or silk emulsion.
- Industrial Masonry: Facing brick, breeze blocks, shuttered concrete, and natural stone.
- Non-Porous Materials: Toughened glass, stainless steel, aluminium, and ceramic tiles.
- Organic Substrates: Natural timber, plywood, and various composite wood panels.
Exterior applications require additional consideration. Whilst the UV-curable inks are inherently lightfast and water-resistant, the substrate itself must be structurally sound. Printing on exterior brickwork or concrete requires a surface free from efflorescence (salt staining) and crumbling mortar to ensure the ink anchors correctly to the stable material underneath.
Preparing the Wall for Digital Application
Optimal ink adhesion begins with a clean, dust-free environment. Any loose debris or oily residue can compromise the cross-linking bond of the UV ink. For projects involving fresh plaster, the wall must be fully cured. Printing on damp plaster is a common mistake; trapped moisture can eventually push the ink off the surface as it evaporates. We typically recommend a minimum drying time of two to four weeks for new plaster. When working with dark or high-contrast backgrounds, we utilise the printer’s dedicated white channel to create an opaque base layer, though applying a neutral primer beforehand can often be a more efficient solution for large-scale dark surfaces.
Printing on Textured Surfaces
Texture is where the direct to wall printing process truly outperforms legacy alternatives. Instead of bridging gaps like a vinyl decal, the ink settles into the recesses of brick or stone. This preserves the natural character of the wall, creating an “integrated” aesthetic that looks like bespoke hand-painted art rather than a stuck-on layer. However, there are technical limits. The laser sensors mentioned previously can handle significant irregularities, but surfaces with deep crevices exceeding 10mm may cause the printhead to lose focus. Identifying these limits during the site assessment ensures that the final image remains sharp across the entire topographic profile of the wall.
The Professional Workflow: From Digital Design to Physical Wall
The direct to wall printing process is a methodical industrial operation that extends far beyond simply pressing ‘print’. A professional result requires a structured workflow that starts with a technical site assessment. During this initial stage, we evaluate the substrate’s condition, the lighting environment, and the exact dimensions of the target area. This ensures that the digital file is perfectly scaled and that the hardware calibration matches the wall’s topography. This level of preparation is what distinguishes industrial-grade murals from temporary decorative layers.
Digital file preparation is equally critical. We optimise resolution and colour profiles to ensure that large-format outputs maintain clarity even at high resolutions. This stage involves converting artwork into a format that the vertical printer’s software can interpret with microscopic precision. Every pixel is mapped to a physical coordinate on the wall. This ensures that the transition from digital concept to physical reality is flawless, maintaining the integrity of the original design across the entire surface area.
Design Visualisation and Mock-ups
Decision-makers need certainty before an industrial application begins. We provide digital mock-ups that place the artwork directly onto photos of the actual wall. This visualisation stage allows us to adjust designs around architectural features such as doors, windows, and light sockets. It’s about ensuring brand colour accuracy through rigorous digital proofing. By seeing the design in situ, clients can confirm that the scale and positioning align with the room’s function and traffic flow. This eliminates guesswork and ensures the final output meets the specific aesthetic requirements of the space.
On-Site Installation Logistics
The execution phase is designed for minimal disruption. Setup times are brief, typically requiring only a small footprint for the printer rails and gantries. Unlike traditional decorating, this is a “clean install” process. There is no dust from sanding, no hazardous adhesive odours, and no physical waste like wallpaper offcuts. The low noise levels allow the machine to operate during standard working hours without disturbing office staff or residents. If you are ready to transform your vertical surfaces, you can request a technical site assessment to begin the process.
Once the printer is calibrated, the precision printing begins. The machine moves methodically along its rail, applying and curing the ink in a single pass. After the print is complete, a final post-print inspection is conducted to ensure the output meets our industrial standards. This final handover ensures that the client is satisfied with the durability and resolution of their new digital mural, providing a permanent solution that requires no further maintenance.
Longevity and Maintenance of UV Printed Murals
The industrial advantage of the direct to wall printing process lies in the long-term stability of the polymerised ink bond. Unlike traditional media that relies on surface-level adhesives, UV-curable pigments are chemically anchored to the substrate during the curing phase. This creates a surface that is inherently scratch-proof and abrasion-resistant. In professional environments, this durability ensures that the mural remains a permanent asset rather than a temporary fixture that requires frequent replacement. The lack of a physical film means there are no edges to catch or seams to pull away from the wall.
Lightfastness is a critical metric for any architectural application. The UV inks used in this process are engineered to resist degradation from ultraviolet radiation, which is the primary cause of fading in traditional prints. For interior installations, you can expect a lifespan exceeding ten years without significant colour loss. Exterior applications, whilst subject to harsher British weather conditions, typically maintain their integrity for five years or more. This longevity depends on the orientation of the wall and its exposure to direct sunlight, but the chemical stability of the ink remains superior to standard exterior paints.
Durability in High-Traffic Commercial Zones
High-traffic areas like hospital corridors, school halls, and busy retail centres demand materials that can withstand physical impact and rigorous sanitisation. The cured ink is resistant to common cleaning chemicals and industrial detergents used in these sectors. This resistance allows for frequent cleaning without the risk of pigment lifting. For extreme environments where mechanical damage is a high risk, such as loading bays or primary school play areas, we can apply a clear protective varnish over the print. This adds an extra layer of industrial protection without compromising the high-resolution clarity of the artwork.
Maintenance and Future Updates
Maintaining the visual quality of the mural is straightforward. Dust and smudges can be removed using a soft cloth and water or mild pH-neutral detergents. Because the ink is polymerised, there is no risk of the image “bleeding” or smearing during cleaning. If the wall itself suffers structural damage, such as a deep gouge, the mural can be patched. This involves repairing the physical substrate and then re-printing only the affected area. This direct to wall printing process is far more efficient than replacing entire rolls of wallpaper. Should branding requirements change, the mural does not need to be stripped. It can simply be over-painted with a standard primer and emulsion, returning the wall to a blank canvas for future projects.
Future-Proof Your Vertical Surfaces
Adopting an industrial approach to wall decor ensures that your branding remains a permanent asset rather than a maintenance burden. The direct to wall printing process replaces the failures of traditional adhesives with the mechanical precision of vertical digital technology. By integrating pigment directly into the substrate, you achieve a level of durability and resolution that legacy methods simply cannot match. Every project we undertake includes bespoke design and digital visualisation as standard; this ensures that your vision is perfectly calibrated to the specific topography of your wall.
Our commitment to quality is backed by technical specifications that matter. We utilise UV-cured ink for instant drying and zero VOC emissions, delivering high-resolution prints up to 2880 dpi for true photographic quality on almost any material. This technology provides a clean, non-disruptive installation that respects both your time and your environment. If you are ready to eliminate the hassles of peeling vinyl and bubbling wallpaper, you can calculate your project cost with our transparent wall printing fees. We are here to help you redefine what’s possible for your commercial or residential space.
Frequently Asked Questions
Can you print on newly plastered walls?
No, the plaster must be fully cured before the printing begins. We recommend waiting at least two to four weeks for moisture to evaporate completely from the substrate. Trapped moisture can compromise the cross-linking bond of the ink, which may lead to surface degradation over time.
How long does the direct to wall printing process take?
Setup typically takes under an hour, whilst the printing speed varies based on the resolution and complexity of the design. A standard office-sized logo might be completed in a single morning. Larger, multi-storey murals require a more extensive schedule, which we define during the initial technical assessment of the site.
Is the ink used in wall printing safe for schools and hospitals?
Yes, the UV-curable inks are entirely safe for sensitive professional environments. The ink is instantly polymerised by ultraviolet lamps, which means it produces zero Volatile Organic Compounds (VOCs) and has no lingering chemical odour. This makes it an ideal solution for healthcare and educational facilities that require immediate room re-entry.
Does the wall need to be perfectly flat for the printer to work?
No, the printer is equipped with laser-guided sensors that continuously map the wall’s surface topography. These sensors adjust the printhead’s distance in real-time to account for bows, bumps, or textured substrates like brick. However, the wall must be structurally sound and free from significant cracks or crumbling material to ensure a consistent finish.
Can the printed mural be removed or painted over later?
Yes, the mural can be easily updated or removed by painting over it. Because the ink is integrated into the surface rather than sitting on a physical film like vinyl, you simply apply a standard primer and emulsion. There is no need for scraping or chemical stripping, which protects the integrity of the underlying wall material.
How much does the direct to wall printing process cost per square metre?
Pricing is calculated based on the total surface area, the complexity of the artwork, and the specific substrate involved. We provide transparent, project-specific quotes following a site assessment or design review. This ensures you only pay for the precision engineering required for your unique vertical surface without hidden consultation fees.
What is the maximum height and width the wall printer can cover?
The width is virtually unlimited due to the modular rail system that the printer traverses during the direct to wall printing process. Height is generally limited by the vertical gantry, which typically covers up to four metres in a single pass. For taller surfaces, specialised gantry extensions or multi-pass techniques can be utilised to achieve full coverage.
Is wall printing suitable for outdoor environments in the UK?
Yes, the process is highly effective for exterior masonry, brickwork, and concrete. The UV inks are water-resistant and lightfast, meaning they can withstand the variable British climate without fading or peeling. We evaluate exterior substrates during the consultation to ensure they are properly prepared for long-term ink adhesion.