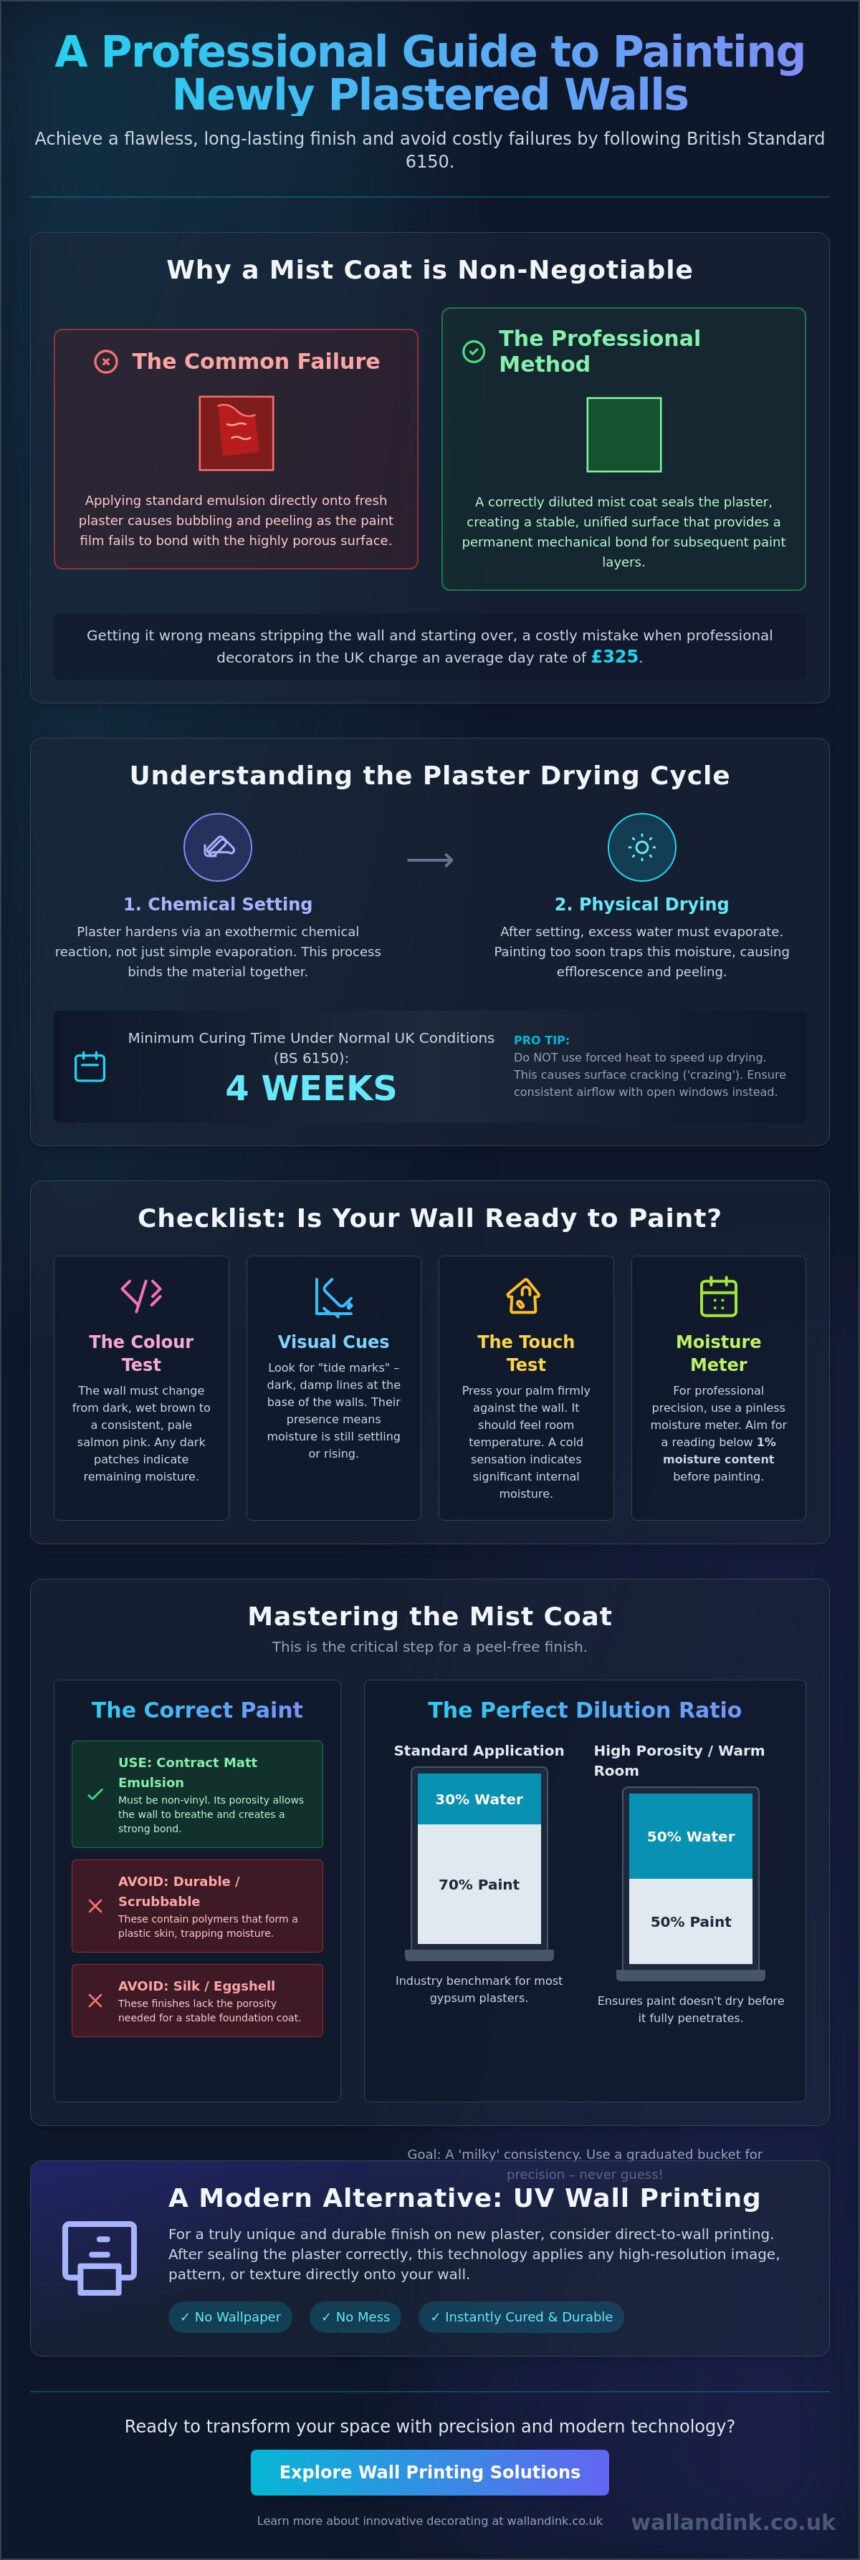
Applying standard emulsion directly onto fresh plaster is a guaranteed recipe for expensive failure. Without a precise mist coat to manage high porosity, your finish will inevitably bubble and peel, forcing you to strip the surface back to the substrate. Learning how to paint newly plastered walls correctly is not just about aesthetics; it is a technical requirement governed by British Standard 6150 to ensure long-term durability. We understand the frustration of staring at damp walls whilst waiting for the moisture to escape, especially when professional decorators in the UK now charge an average day rate of £325.
You want a smooth, industrial-grade finish that doesn’t flake off the moment it dries. This guide provides the exact water-to-paint ratios and drying schedules needed to achieve professional results. You will learn the step-by-step process of sealing new plaster and discover why modern direct-to-wall printing is disrupting traditional decorating by offering a “no wallpaper, no mess” alternative. From technical mist coat preparation to advanced UV curing technology, we provide the clarity you need to transform your space with precision.
Key Takeaways
- Understand the critical distinction between the chemical setting and physical drying of plaster to prevent moisture entrapment and efflorescence.
- Master the precise dilution ratios required for an effective mist coat; this is the fundamental step in how to paint newly plastered walls to ensure a peel-free finish.
- Identify the technical signs of over-polished, glassy plaster that rejects standard emulsion and learn the professional methods to rectify these surfaces.
- Follow a methodical workspace preparation protocol to manage the high-moisture application of sealers whilst protecting existing woodwork and flooring.
- Explore direct-to-wall UV printing as a high-resolution, modern alternative that delivers durable visual impact with no wallpaper and no mess.
Understanding the Drying Cycle of Fresh Plaster
Plastering is a wet trade that relies on a specific chemical transition. To understand what plaster is at a technical level, you must recognise that it doesn’t just “dry” like a spilled liquid. It sets through an exothermic reaction that binds the material together. Once set, the remaining water must evaporate completely. If you apply paint too soon, you trap this moisture. This leads to efflorescence, where hygroscopic salts are pulled to the surface, leaving unsightly white streaks that can’t simply be painted over.
Mastering how to paint newly plastered walls requires a deep respect for this drying cycle. Most standard gypsum plasters require a minimum of four weeks to cure fully under normal UK conditions, as outlined in the BS 6150 code of practice. Skipping this wait time is the most common cause of decorating failure. When moisture is trapped, it eventually forces its way out, causing the paint film to lose adhesion and peel away in large sheets. Efficiency in decorating starts with patience during the curing phase.
Factors Affecting Plaster Drying Times
Environmental conditions dictate your schedule more than the calendar does. In the UK, seasonal humidity levels often fluctuate between 60% and 80%, which can extend drying times by several days. It’s a mistake to use high-powered heaters to accelerate the process. Forced heat causes the surface to shrink and “craze,” creating tiny cracks because the moisture at the centre hasn’t had time to escape. Consistent airflow from open windows is the most reliable way to ensure a uniform dry across the entire wall.
Checklist: Is Your Wall Ready for Paint?
Before you open a single tin of paint, conduct a methodical inspection of the substrate. This ensures the surface is chemically stable and ready to accept a coating.
- The Pink Test: Look for a total colour shift. The plaster must change from a dark, wet brown to a consistent pale salmon pink with no dark patches remaining.
- Visual Cues: Check the base of the walls for “tide marks.” These damp lines indicate that moisture is still rising or settling at the bottom of the stack.
- The Touch Test: Press your palm against the surface. It should feel exactly like room temperature. If the wall feels cold to the touch, it still contains significant moisture.
- Moisture Meter: For absolute precision, use a pinless moisture meter. Professionals typically wait for a reading below 1% moisture content before applying a mist coat.
The Essential Mist Coat: Ratios and Application
A mist coat is a sacrificial layer designed to satisfy the intense thirst of fresh gypsum. When you’re learning how to paint newly plastered walls, you must understand that standard emulsion is too viscous to bond with a bare substrate. If applied undiluted, the plaster instantly sucks the moisture out of the paint, preventing it from forming a mechanical bond. The result is a brittle film that sits on the surface, ready to flake at the slightest impact. A mist coat solves this by providing a diluted, high-penetration sealer that anchors deep into the plaster pores.
The choice of paint is non-negotiable. You must use a contract matte emulsion, specifically one that is non-vinyl. Modern ‘durable’ or ‘scrubbable’ paints contain polymers that create a plastic skin. On fresh plaster, this skin acts as a barrier that traps remaining moisture and prevents the necessary suction. Silk or eggshell finishes are equally unsuitable for this initial stage. They lack the porosity required to create a stable foundation for your subsequent decorative layers. Efficiency in this phase determines the longevity of your entire project.
Calculating the Perfect Mist Coat Ratio
Achieving the right viscosity is a matter of technical precision. For most standard applications, a ratio of 70% paint to 30% water is the industry benchmark. If the plaster is particularly thick or the room is exceptionally warm, a 50/50 mix may be required to ensure the liquid doesn’t dry before it penetrates. Your goal is a ‘milky’ consistency. It should be thin enough to flow into the microscopic texture of the wall but thick enough to leave a visible pigment layer. Never guess these measurements; use a graduated mixing bucket to ensure consistency across the entire project.
Application Techniques for a Seamless Seal
Whilst rollers are faster, a large masonry brush is often superior for the first mist coat. The mechanical action of the bristles forces the diluted paint into the plaster, ensuring no air pockets remain. If you choose to use a roller, expect significant splatter due to the watery consistency. You must manage drips immediately. Once they semi-dry on a porous surface, they leave permanent textures that show through the final topcoat. Allow the mist coat to cure for a full 24 hours before moving to your first full-strength layer. If you require a more advanced, high-resolution finish without the technical hassle of multiple coats, consider a direct-to-wall printing solution for your feature surfaces.
Mastering how to paint newly plastered walls involves more than just picking a colour; it is about ensuring chemical adhesion. By correctly managing the science of suction, you create a surface that remains flawless for years.
Avoiding Common Decorating Failures on New Surfaces
The “Flaking Nightmare” occurs when the physical bond between the substrate and the coating is compromised. If you skip the technical mist coat discussed earlier, the paint film lacks a mechanical anchor. This results in the paint peeling away in large, rubbery sheets, often triggered by the tension of the drying topcoat. Another technical hurdle involves over-polished plaster. Skilled plasterers often use steel trowels to create a “glassy” finish. Whilst this looks impressive, the surface is too dense for paint to penetrate. You can identify this by a high-sheen reflection on the bare wall that feels slick to the touch.
Before considering how to paint newly plastered walls, you must also check for structural integrity. “Blown” plaster occurs when the material fails to bond to the underlying brickwork or backing coat. You should tap the wall gently across its entire surface; a hollow, drum-like sound indicates an air pocket. Painting over these areas is a wasted effort. The weight of the paint film can cause the entire section to collapse, necessitating a full repair. Identifying these faults early saves both time and materials.
The Myth of PVA Sealing
A persistent myth in the UK building trade suggests that sealing new plaster with PVA glue is an effective primer. This is a critical error. PVA creates a non-porous, plastic film that remains water-soluble. When you apply water-based emulsion over it, the PVA re-activates and prevents the paint from bonding to the plaster. If you have mistakenly applied PVA, you must sand the surface back to the bare substrate or use a specialised alkali-resistant primer to create a bridge. Professional decorators avoid PVA entirely, opting for dedicated contract matte emulsions that allow the wall to breathe.
Troubleshooting Surface Imperfections
Even high-quality plastering requires minor refinement before the first coat. Use a fine 120-grit sandpaper to remove “nibs” or small protrusions. You must do this lightly to avoid scuffing the delicate plaster skin. Hairline cracks frequently appear during the final drying phase as moisture leaves the material. Spot-prime these with a slightly thicker mist coat mixture before the main application. Finally, ensure the room is surgically clean. Dust is the silent enemy of a professional finish. Any particles left on the wall will create a gritty texture that ruins the high-resolution visual impact of your final design.
Success in how to paint newly plastered walls relies on identifying these technical pitfalls before they become permanent defects. By moving away from outdated myths like PVA sealing and addressing surface glassy finishes, you ensure a durable, industrial-grade result.
Step-by-Step Guide to a Professional Finish
Efficiency in decorating is born from preparation. Before you begin, you must protect all adjacent surfaces from the high-moisture mist coat. Use 1000-gauge polythene or heavy-duty drop cloths to cover flooring. Use precision-edge masking tape on skirting boards and architraves. A watery mist coat will find every gap. Once the area is secure, use a tack cloth to remove every trace of fine gypsum dust. Even a single fingerprint contains enough natural oil to cause “cissing,” where the paint pulls away from the surface during application.
Learning how to paint newly plastered walls requires a methodical top-down approach. Start with the ceiling, then move to the wall perimeters before filling in the large central sections. After the mist coat has cured for 24 hours, use 240-grit sandpaper for a light de-nibbing. This removes microscopic imperfections and ensures an industrial-standard smooth finish. Apply two full-strength topcoats of your chosen emulsion, allowing at least 4 hours between applications to ensure depth of colour and surface durability.
Tools of the Trade
The quality of your tools directly impacts the mechanical precision of the finish. For smooth gypsum plaster, select a short to medium pile roller (6mm to 10mm). A long pile roller creates excessive stipple, which ruins the seamless aesthetic of a fresh wall. Use high-quality synthetic brushes for cutting in; they hold their shape better than natural bristles when used with water-based emulsions. Transfer your diluted mist coat into a dedicated paint kettle. This allows for better control and prevents the contamination of your main paint supply.
Achieving Colour Consistency
If your final design involves deep or vibrant pigments, ensure your mist coat is tinted to a similar shade. This improves the opacity of subsequent layers and reduces the number of topcoats required. To avoid “picture framing”—the visible texture difference between brush marks and roller stipple—work in small sections and roll as close to the edges as possible whilst the paint is still wet. Conduct a final inspection using a 5000-lumen LED work light held at an oblique angle. This reveals shadows or uneven patches that aren’t visible under standard room lighting. If you prefer to bypass the manual labour of multi-coat painting, our professional wall printing services provide a direct-to-wall solution that eliminates the mess of traditional decorating.
Innovative Alternatives: UV Printing for New Plaster
Whilst the traditional method of how to paint newly plastered walls remains a staple trade skill, it is no longer the only path to a high-impact finish. Modern direct-to-wall UV printing represents a significant shift in decorative technology. Instead of multiple layers of liquid paint that require weeks of curing and days of application, UV printing uses advanced inkjet technology to apply pigment directly to the substrate. The ink is cured instantly by ultraviolet light; this creates a durable, scratch-resistant finish that traditional emulsion simply cannot replicate. It is a “no wallpaper, no mess” solution designed for pragmatic decision-makers who value efficiency and mechanical precision.
This technology bypasses the traditional risks of peeling and bubbling. Because the UV-cured ink bonds instantly with the plaster, it doesn’t rely on the same evaporation-based adhesion as water-based paints. In high-traffic commercial environments or bespoke residential projects, this eliminates the “flaking nightmare” associated with poorly applied mist coats. You achieve a permanent, industrial-grade result in a single visit, moving from a bare substrate to a finished mural without the logistical burden of traditional decorating schedules.
Why Choose Wall Printing Over Traditional Decorating?
- Precision Engineering: Our printers achieve a resolution and level of detail that hand-painting or stencilling cannot match, ensuring every line is sharp and every colour is vibrant.
- Superior Durability: UV-cured inks are fundamentally more resilient than emulsion. They don’t fade under direct sunlight and resist the scuffs and marks common in retail or school environments.
- Speed of Execution: We transform a room in a matter of hours. There is no waiting for mist coats to dry or topcoats to cure; the space is ready for use immediately after printing.
From Digital Design to Physical Wall
The process is as straightforward as it is innovative. We move from a digital brief to a physical wall with surgical accuracy, ensuring the final output matches your original vision perfectly. There are no joins, no bubbles, and no peeling edges. This seamless application provides a clean finish that wallpaper or vinyl wraps cannot provide, especially on newly plastered surfaces where moisture management is critical. Discover how Wall & Ink transforms new plaster with precision printing to see how we can elevate your next project with our direct-to-wall technology.
By choosing a modern alternative, you eliminate the technical frustrations of how to paint newly plastered walls whilst achieving a superior aesthetic result. It is the logical choice for modern spaces that demand both visual impact and long-term reliability.
Achieve a Flawless Industrial Finish
Mastering how to paint newly plastered walls requires a technical commitment to surface preparation. You must respect the natural drying cycle and implement a precise mist coat ratio to ensure a permanent bond. By avoiding outdated methods like PVA sealing and identifying over-polished surfaces early, you eliminate the risk of peeling and structural failure. These steps are essential for a durable finish that stands the test of time.
If you prefer to bypass the drying wait times and the mess of multiple paint applications, modern technology offers a superior path. Our direct-to-wall printing provides a seamless, high-resolution alternative for both residential and commercial projects. With durable UV ink technology starting from £120/m², we deliver bespoke designs with no wallpaper and no mess. We handle the technical precision so you can enjoy a high-impact visual result without the traditional decorating hassles. Transform your space with a custom wall mural from Wall & Ink and see how industrial-grade printing outperforms traditional emulsion.
Frequently Asked Questions
How long does plaster take to dry before I can paint it?
Standard gypsum plaster requires approximately four weeks to cure fully under typical UK conditions. This timeline depends on an ambient temperature of roughly 20°C and adequate airflow. You must wait for the substrate to transition from a dark, wet brown to a uniform pale salmon pink. Painting before this 28-day window risks trapping moisture, which leads to efflorescence and structural failure of the paint film.
Can I use a normal primer instead of a mist coat on new plaster?
You should avoid using standard primers or oil-based undercoats on fresh plaster. These products often contain vinyl or resins that create a non-porous skin, preventing the necessary mechanical bond. A mist coat is the technically correct solution. It uses diluted contract matte emulsion to penetrate the surface. This creates a stable foundation that standard primers cannot replicate on such a high-suction substrate.
What happens if I don’t use a mist coat on newly plastered walls?
Skipping the mist coat leads to immediate adhesion failure. Because bare plaster is exceptionally porous, it will instantly “drink” the moisture from undiluted paint. This prevents the paint from curing properly, leaving a brittle layer that will peel off in large sheets. If you’re learning how to paint newly plastered walls, you’ll find that skipping this seal is the most expensive mistake you can make.
What is the best paint to use for a mist coat?
A non-vinyl contract matte emulsion is the only suitable choice for a mist coat. You must avoid modern “durable” or “washable” paints for this initial layer. These products contain high levels of polymers that act as a barrier rather than a sealer. Using a basic, breathable matte paint ensures the plaster can continue to release residual moisture whilst providing the pigment needed for the base layer.
Is it better to use a brush or a roller for painting new plaster?
A large masonry brush is superior for the initial mist coat because the mechanical action of the bristles forces paint into the plaster’s pores. Whilst rollers are more efficient for large areas, they often sit on the surface and can cause significant splatter with diluted mixtures. For the subsequent two topcoats, a medium-pile roller is the professional choice to achieve a consistent, industrial-standard texture across the wall.
Can you use a dehumidifier to speed up plaster drying?
You can use a dehumidifier, but only after the plaster has undergone its initial 48-hour set. Removing moisture too aggressively in the early stages causes “crazing,” where the surface develops fine, spider-web cracks. It’s safer to rely on natural ventilation from open windows. If you must use a dehumidifier, keep it on a low setting to ensure the drying process remains uniform and controlled.
Why is my paint peeling off my new plaster walls?
Peeling is typically the result of trapped moisture or a failed bond with the substrate. If you apply paint when the moisture content is above 1%, the escaping water vapour will push the paint film away from the wall. This also happens if the surface was over-polished or contaminated with dust. Understanding how to paint newly plastered walls correctly prevents these bond failures and ensures a long-lasting, professional finish.
Can I print a custom mural directly onto fresh plaster?
Yes, direct-to-wall UV printing is a high-resolution alternative to traditional painting. Our technology allows us to apply bespoke designs directly onto the plaster substrate without the need for multiple coats of emulsion. The UV-cured ink bonds instantly, providing a durable finish that resists scratching and fading. It is a “no wallpaper, no mess” solution that transforms fresh plaster into a professional mural in a single visit.