The uniform light pink shade you see on your walls is often a deception that leads to a £1,100 repair bill. You’ve likely spent weeks planning your renovation, and the pressure to move from a dusty construction site to a finished home is intense. It’s frustrating to wait whilst the walls look mostly ready, especially when conflicting advice suggests anything from three days to three weeks. You don’t want to risk your investment on a guess. Understanding how to tell if plaster is dry enough to paint is the difference between a durable finish and a costly failure.
This guide provides the industrial precision you need to ensure your walls are ready for a professional finish without the risk of peeling or damp. We’ll examine the critical visual indicators, the technical role of moisture meters ranging from £16 to £150, and the chemical curing process required for a high-quality result. You’ll gain a definitive checklist to move your project forward with the confidence of a specialist. We focus on the technical reality of the trade to help you achieve a seamless, clean finish that lasts.
Key Takeaways
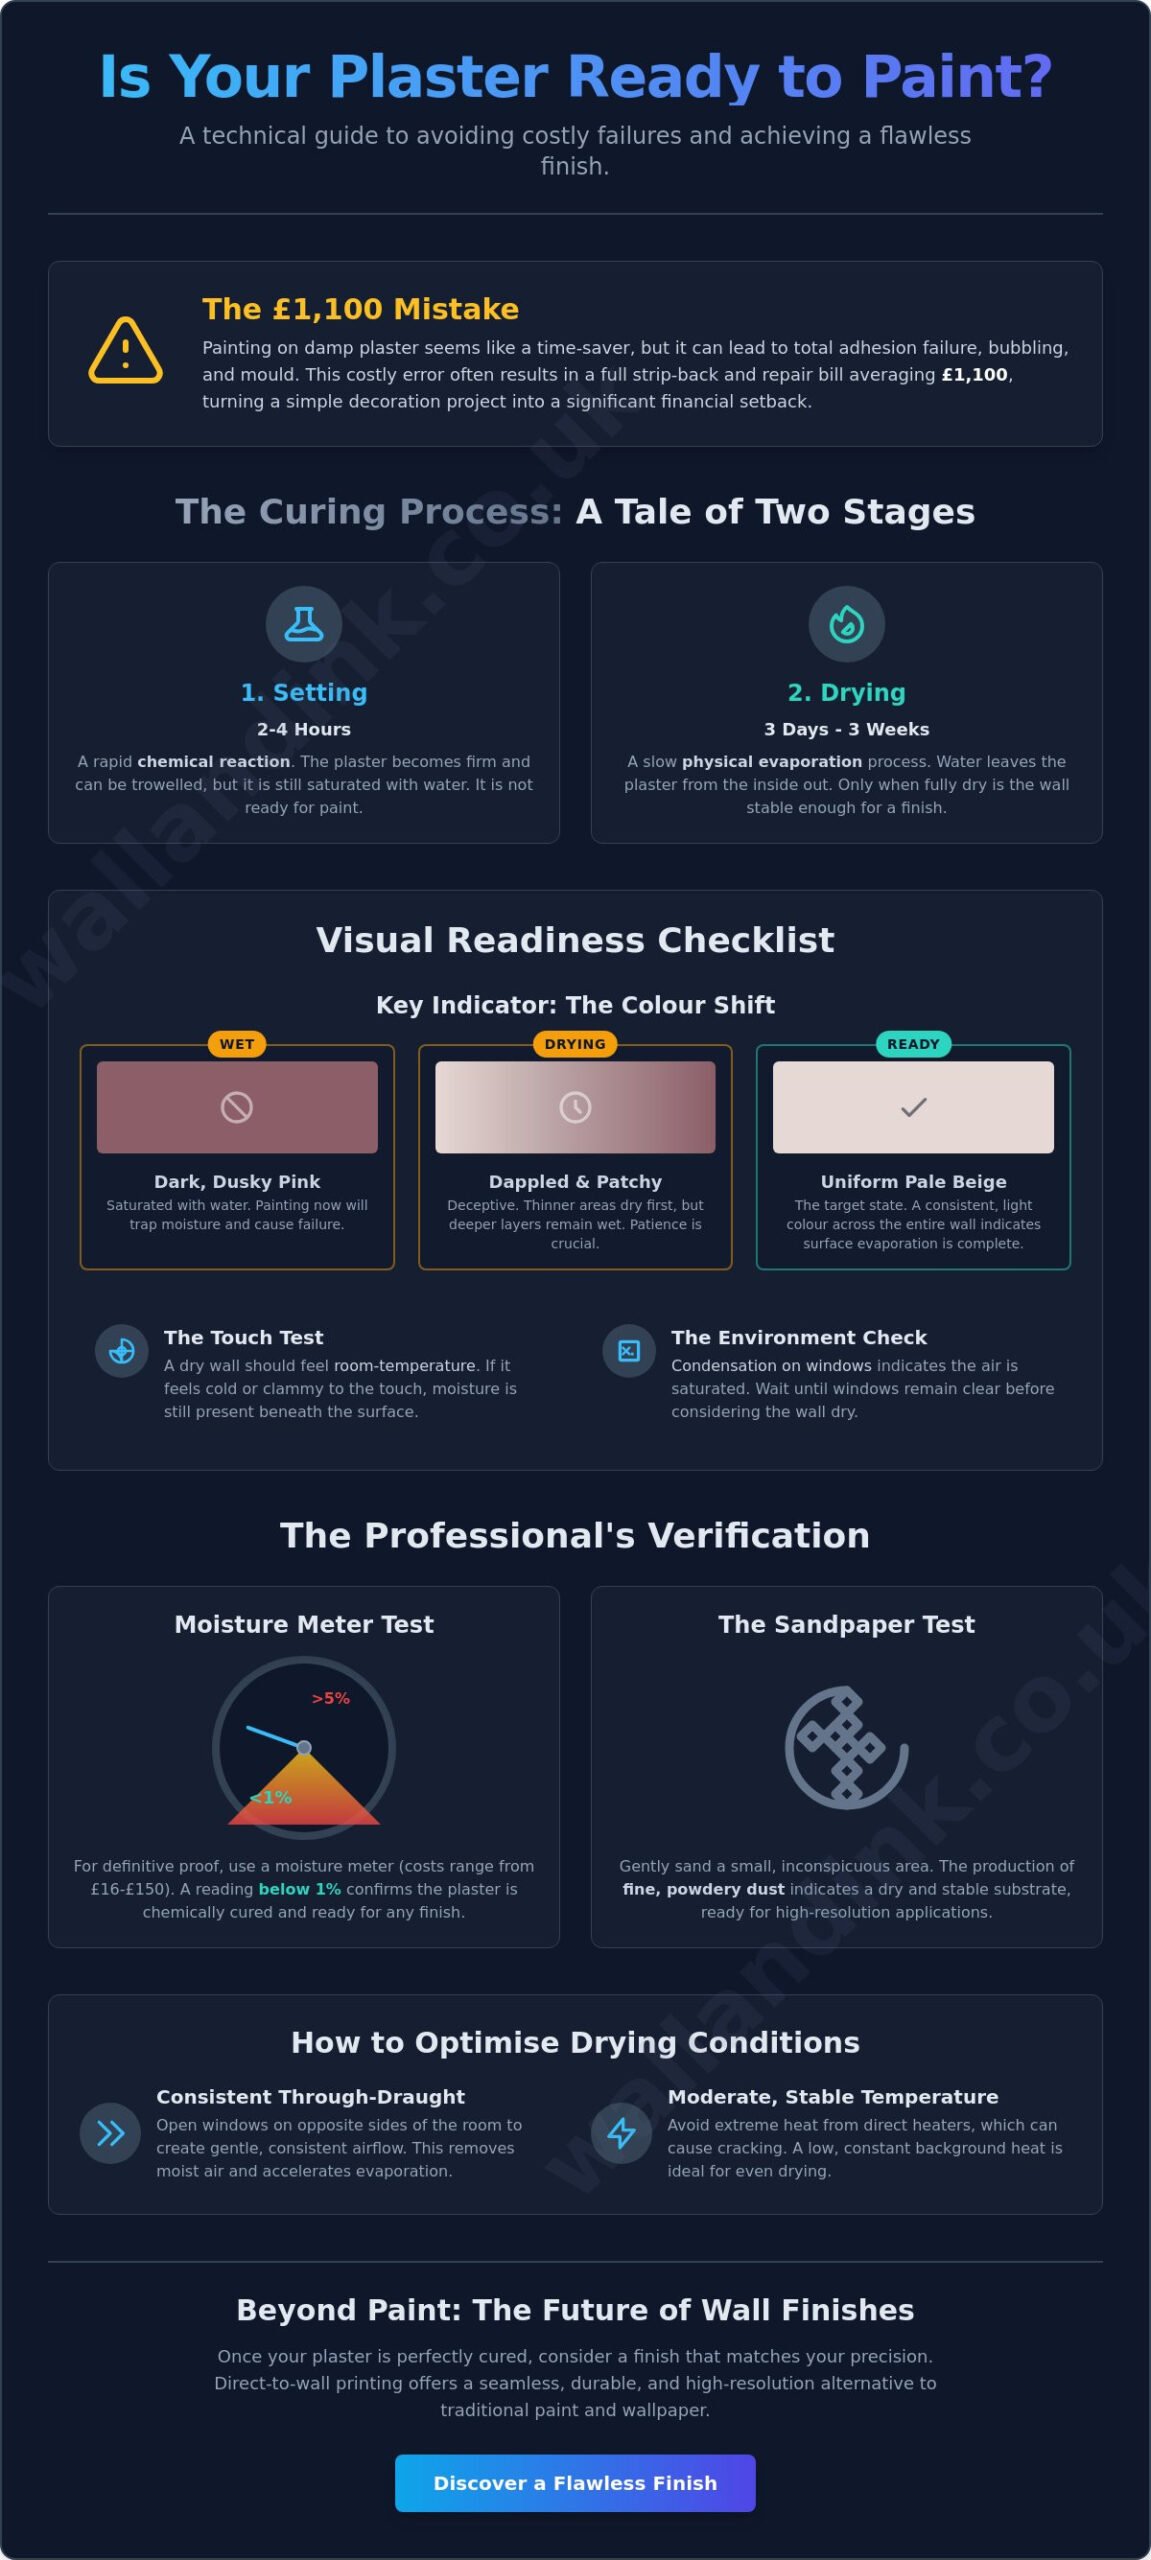
- Identify the critical colour shift from dusky pink to uniform pale beige that signals the completion of the gypsum crystallisation process.
- Master how to tell if plaster is dry enough to paint by using technical verification methods, including moisture meter readings below 1%.
- Optimise drying conditions with a consistent through-draught and moderate temperatures to ensure the plaster cures from the inside out.
- Perform the sandpaper test to confirm the presence of fine dust, ensuring the substrate is ready for high-resolution decorative applications.
- Explore the benefits of direct-to-wall printing for a seamless, durable finish that eliminates the need for traditional wallpaper or vinyl.
Understanding the Curing Process: Why Drying Time Matters
Plastering is a technical trade that relies on chemistry as much as manual skill. To understand what plaster is and how it behaves, you must view it as a reactive material rather than a simple coating. Most modern UK plaster is gypsum-based. Its transition from a wet paste to a solid wall involves the crystallisation of gypsum molecules. This process requires the total evaporation of all excess water used during the mixing stage. Because plaster dries from the inside out, the surface often presents a false sense of readiness. If you’re investigating how to tell if plaster is dry enough to paint, you must look beyond the immediate surface texture and consider the internal moisture levels.
Trapping water behind a layer of paint creates a non-breathable barrier that prevents natural evaporation. This leads to efflorescence, where hygroscopic salts are drawn to the surface as white, powdery deposits. It also causes bubbling and total adhesion failure. A stable, chemically cured wall is the only foundation for a professional finish. Without this stability, your decorative layer will fail. You’ll find that the bond between the paint and the substrate is weak, leading to long-term maintenance problems that are difficult to rectify without stripping the wall back to its base.
The Difference Between Setting and Drying
Setting is a rapid chemical reaction that typically occurs within two to four hours of application. During this phase, the plaster becomes firm enough to trowel and shape, but it remains saturated with moisture. Drying, however, is a physical process of evaporation that takes significantly longer. Depending on the substrate and ambient conditions, this can take between three days and three weeks. You can touch a set wall without leaving a mark, yet it remains unpaintable. Rushing this timeline ignores the laws of physics and compromises the durability of your project. It’s the most common mistake made by DIY decorators and hurried contractors alike.
Risks of Painting Too Early
Painting a damp wall is a recipe for long-term failure. When moisture is trapped, it can lead to total adhesion failure. This is where the paint peels away in large sheets because a mechanical bond never formed. You may also face the growth of mould spores behind the paint film. These spores thrive in dark, damp environments and create both health hazards and aesthetic ruin. Blistering and cracking occur as escaping water vapour forces its way through the drying paint. These failures often require the wall to be stripped back, which can cost approximately £15 to £30 per m² just for skimming repairs. Precision in timing is the only way to avoid these unnecessary costs.
Key Indicators: Visual and Physical Signs Plaster is Ready
Visual assessment provides the first definitive metric for readiness. Mastering how to tell if plaster is dry enough to paint requires a disciplined eye for colour and texture. The transition from a dark, dusky pink to a uniform pale beige or light pink is the most reliable visual benchmark. This shift indicates that the bulk of the water used during the mixing process has evaporated. Consulting a technical guide to plaster drying confirms that colour uniformity is the primary indicator of surface moisture evaporation. You must wait for the entire surface to reach this consistent shade before proceeding.
Physical checks augment your visual findings. A dry wall should feel neutral or room-temperature to the touch. If the surface feels cold or clammy, moisture is still migrating from the core of the plaster to the surface. You should also monitor the room’s atmosphere. Condensation on windows is a clear sign of high relative humidity. If droplets are forming on the glass, the air is saturated, and the plaster cannot release its remaining moisture. Once the windows remain clear and the walls feel dry, the environment has stabilised. This stability is essential for the durability of your final finish, whether you choose standard paint or high-resolution residential wall art printed directly to the substrate.
The Pink Scale: Identifying the Correct Shade
Plaster undergoes three distinct colour phases during the curing process. Freshly applied plaster appears as a dark, brownish-pink, indicating it is saturated. As evaporation begins, you will notice a dappled effect. This middle stage is deceptive; light patches appear where the plaster is thinnest, but moisture remains in the deeper layers. The target state for inspection is a uniform pale pink across the entire surface. There should be no variation in tone. Any lingering dark spots, no matter how small, indicate that the chemical curing process is incomplete.
Common “Cold Spots” to Inspect
Moisture does not leave a room evenly. You must pay particular attention to areas with restricted airflow or those prone to thermal bridging. Internal corners are notorious for retaining dampness because air cannot circulate effectively in these tight angles. Similarly, areas around window reveals and external door frames often dry slower due to the cooler temperature of the surrounding structure. Finally, check the base of the wall near the skirting. Gravity can cause moisture to pool at the bottom of a vertical run, making the base the last area to reach a paint-ready state. Inspecting these specific points ensures you don’t rush the project based on a dry centre-wall reading.
Environmental Factors That Influence Drying Times
The environment surrounding your new substrate dictates the speed and quality of the curing process. Whilst you may be tempted to accelerate the timeline, environmental variables must be managed with industrial precision. Ventilation is your most effective tool. A gentle through-draught, achieved by opening windows at opposite ends of a room, facilitates natural moisture transport. In contrast, a sealed room traps humid air, effectively halting the evaporation process. Temperature management requires a similar level of discipline. You should maintain a consistent, moderate heat of approximately 18°C to 20°C. Blasting radiators creates thermal stress that compromises the structural integrity of the gypsum.
Substrate composition also plays a significant role. Plasterboard is inherently drier and less porous than traditional masonry, which often requires a “two-coat” application. This difference directly impacts how to tell if plaster is dry enough to paint. In the UK, seasonal humidity is a primary factor. During winter months, when relative humidity often exceeds 80%, the expected drying timeframe can double compared to a project completed in late spring. You must account for these external conditions to avoid the risk of damp-related failures that could ruin a high-quality wall finish.
The Dangers of Forced Drying
Attempting to force moisture out of the wall is a high-risk strategy. Using powerful dehumidifiers or industrial space heaters often leads to “case-hardening.” This occurs when the surface dries too rapidly, forming a hard crust that traps moisture deep within the plaster. As this trapped water eventually tries to escape, it can “blow” the plaster, causing it to detach from the wall. Natural evaporation ensures a uniform cure from the inside out. This methodical approach provides a reliable surface for high-resolution graphics or commercial wall murals, ensuring the substrate is stable enough for long-term durability.
Typical Timelines for UK Projects
Timelines vary based on the depth of the application and the underlying substrate. For a standard skim coat on plasterboard, the surface is usually ready for decoration in 3 to 5 days. However, a full re-plaster on masonry requires a minimum of 7 to 14 days to reach a stable state. In commercial environments where durability is paramount, we recommend following a strict 2-week rule for final inspection. This ensures the chemical curing is complete and the wall is ready for professional-grade finishes without the hazard of trapped moisture or surface efflorescence.
Technical Testing and Surface Preparation
Whilst visual indicators provide a baseline, industrial-grade projects require empirical verification. The most reliable method for how to tell if plaster is dry enough to paint is the use of a digital moisture meter. These devices, which range in price from £16 to over £150 for professional models, provide a non-destructive way to measure the internal substrate saturation. For a safe application, the reading must consistently fall below 1% moisture content across the entire surface. This data-driven approach eliminates the guesswork associated with varying light conditions and provides a technical justification for moving to the decorative phase.
Physical verification continues with the sandpaper test. A light rub with a fine-grit sandpaper should produce a dry, airborne dust. If the material clumps or feels tacky, the core remains saturated. Surface preparation also involves the removal of “plaster splash”—excess material left during the trowelling process—and the cleaning of efflorescence salts. Use a dry, stiff brush to remove these crystals. This ensures the substrate is chemically and physically neutral before you introduce any liquid coatings. Skipping this step often leads to the adhesion failures that compromise a professional finish.
Applying the Mist Coat Correctly
Standard emulsion is formulated for porous but dry surfaces. It’s too viscous for fresh plaster and will sit on the surface rather than bonding with it. You must create a “mist coat” by thinning your paint with water, typically at a 70/30 paint-to-water ratio. This allows the plaster to “drink” the paint, creating a deep mechanical bond through suction. Using a contract matt or a specialist breathable primer is essential. These allow any microscopic remnants of moisture to pass through the film, preventing the blistering issues caused by trapped vapour. It’s a critical step that ensures the longevity of the decorative layer.
Preparing for High-Resolution Finishes
Advanced decorative technologies require a higher standard of surface preparation than traditional methods. If you’re opting for direct-to-wall printing, the plaster must be polished during the final trowel stages to achieve a perfectly flat finish. Any imperfections or ridges will be highlighted by high-resolution UV inks. A seamless, clean finish depends on this initial mechanical precision. By ensuring the wall is technically dry and physically smooth, you provide the optimal canvas for modern, no-mess wall murals that surpass the limitations of traditional wallpaper. This precision is what distinguishes a standard renovation from a professional-grade environment.
Beyond Paint: The Direct-to-Wall Printing Advantage
Once you’ve mastered how to tell if plaster is dry enough to paint, the traditional route involves several coats of emulsion or the application of wallpaper. However, modern technology offers a more efficient, industrial-grade alternative. Direct-to-wall UV printing allows for the application of high-resolution graphics directly onto your freshly cured substrate. This “no wallpaper, no mess” solution bypasses the common failure points of traditional decorating, such as peeling edges or air bubbles. Our industrial printers apply ink with mechanical precision, ensuring the durability required for high-traffic commercial environments or bespoke residential spaces.
UV-cured inks provide a significant structural advantage over standard paint. Whilst emulsion sits as a thin film on the surface, our direct-to-wall process uses UV light to instantly cure the ink, creating a robust and durable bond with the plaster. This technology is particularly effective in spaces that demand high-resolution visual impact, such as retail centres or educational facilities. You can transform a plain, pale pink wall into a bespoke mural without the logistical hassle of vinyl decals or the dust and debris associated with traditional renovation work.
Why Print Directly onto Plaster?
Seamless integration is the primary benefit of this modern method. The artwork doesn’t sit on the wall as a separate layer; it becomes part of the physical substrate. Unlike vinyl, which acts as a non-breathable plastic seal, UV inks allow the wall to maintain its natural breathability. This is vital for new plaster that may still be releasing microscopic amounts of moisture. Precision is another factor. Our technology captures details at a resolution that a brush or roller cannot match, delivering a clean finish that meets the standards of professional designers and pragmatic decision-makers alike.
The Wall & Ink Professional Process
Our UK-wide service is built on a foundation of reliability and technical expertise. The process begins with digital visualisation, ensuring the design fits your space perfectly before we arrive on-site. When our specialists attend, we conduct a final assessment of your plaster surface. We verify the moisture levels and surface flatness discussed in previous sections to confirm the substrate is technically ready for printing. This methodical approach guarantees a high-quality result from brief to execution. Enquire about our direct-to-wall printing services to begin your transformation with the confidence of a professional-grade finish.
Achieving a Professional Finish on Your New Walls
Mastering how to tell if plaster is dry enough to paint ensures your renovation survives the transition from a dusty building site to a refined space. Relying on the visual shift to a uniform pale pink and verifying moisture levels below 1% prevents the £1,100 repair costs often associated with trapped damp. These technical indicators provide the stable foundation required for any high-quality decorative application. Once your walls have cured, you aren’t limited to the repetitive maintenance of traditional emulsion.
Wall & Ink offers a modern solution that eliminates the risks of bubbling vinyl or peeling wallpaper. Our direct-to-wall printing uses UV ink technology for maximum durability in both residential and high-stakes commercial environments. We provide bespoke designs tailored to your space through a professional UK-wide service with no mess. This industrial-grade approach ensures your investment in new plastering is rewarded with a seamless, high-resolution finish that lasts.
Discover the “No Wallpaper, No Mess” way to decorate your walls and bring technical precision to your next project.
Frequently Asked Questions
Can I paint plaster that is still pink?
You should not paint plaster whilst it remains a dark, dusky pink. This shade indicates that the gypsum is still saturated with moisture from the mixing process. You must wait for the entire surface to shift to a uniform pale beige. Painting over dark patches will trap water, leading to adhesion failure and the potential for mould growth behind the paint film.
What happens if I paint new plaster too soon?
Painting too early traps water vapour, which causes the finish to bubble, peel, or crack as the moisture attempts to escape. This often leads to efflorescence, where white salts are pushed through the paint, ruining the aesthetic. In many cases, this failure requires a full skim repair, which can cost between £15 and £30 per m² to rectify. It’s a costly mistake that compromises the durability of your wall.
How long does a skim coat take to dry in the UK?
A standard skim coat on plasterboard typically takes 3 to 5 days to dry in the UK. However, if the plaster is applied to masonry or involves multiple coats, you should expect a 7 to 14-day timeframe. During winter, when UK humidity often exceeds 80%, these drying times can double. Monitoring these environmental variables is the most accurate method of how to tell if plaster is dry enough to paint.
Do I really need a mist coat on new plaster?
A mist coat is essential if you are using traditional emulsion on a fresh substrate. You should thin the paint with a 70/30 paint-to-water ratio to allow the porous plaster to “drink” the liquid. This creates a deep mechanical bond. Skipping this step means the paint sits on the surface rather than integrating with it, which almost always results in the paint peeling away in large sheets.
Can I use a dehumidifier to dry plaster faster?
Using a dehumidifier is not recommended as it can cause the plaster to “case-harden.” This occurs when the surface dries too rapidly whilst the core remains damp, leading to structural cracks or the plaster “blowing” off the wall. It’s better to use a gentle through-draught and maintain a consistent room temperature of 18°C to 20°C. Natural evaporation ensures the chemical curing process completes without thermal stress.
Is it better to wallpaper or paint new plaster?
Painting or direct-to-wall printing is superior to wallpapering because these methods allow the wall to breathe. Wallpaper acts as a non-breathable barrier that can trap moisture and lead to damp issues or peeling at the seams. Our “no wallpaper, no mess” approach provides a high-resolution, durable finish that integrates with the wall. This modern solution avoids the traditional hassles and failures associated with vinyl or paper applications.
How can I tell if my plaster has “blown”?
You can identify blown plaster by tapping the surface and listening for a hollow, drum-like sound. This indicates that the plaster has detached from the underlying brickwork or laths. Visible bulging or the appearance of large, spider-web cracks are also definitive signs of failure. Blown plaster cannot be painted and must be hacked off and replaced to ensure a stable foundation for any decorative finish.
Does direct-to-wall printing work on fresh plaster?
Direct-to-wall printing is highly effective on fresh plaster once the substrate has reached a technical moisture reading below 1%. Our UV ink technology provides a seamless, high-resolution finish that is more durable than traditional emulsion. This is a primary reason why commercial clients investigate how to tell if plaster is dry enough to paint. Once the wall is dry, our process delivers a professional-grade mural with no mess and no need for traditional primers.