
The assumption that every wall-sized graphic requires a 300 DPI file is a costly misconception that often stalls projects before they begin. When you’re preparing image file formats for wall murals, the rules of desktop printing simply don’t apply to a ten-metre span of brick or plaster. You’ve likely felt that spike of anxiety when a “low resolution” warning appears; perhaps you’re worried about wasting a significant branding budget on a print that looks like a collection of blurred squares. It’s a common frustration for project managers who need industrial precision but find themselves lost in a sea of conflicting technical advice.
We understand that your primary goal is a sharp, professional result that reflects the quality of your brand. This guide provides the technical clarity you need to bridge the gap between screen pixels and physical ink dots. You’ll learn why viewing distance dictates your resolution requirements and how to select the right file types for different substrates. We’ll provide a definitive checklist to ensure your large-scale graphics are perfectly scaled and ready for high-resolution execution, ensuring your next project is delivered with absolute mechanical superiority.
Key Takeaways
- Understand the critical distinction between digital PPI and physical DPI to ensure your design translates accurately from the screen to the wall surface.
- Learn how to select the optimal image file formats for wall murals by distinguishing between infinitely scalable vector paths and fixed-resolution raster grids.
- Apply the viewing distance rule to determine the necessary resolution for your project, debunking the common myth that large-scale graphics always require 300 DPI.
- Master the professional workflow for organising and exporting files within the Adobe Creative Suite to eliminate “low resolution” warnings and technical errors.
- Discover how direct-to-wall UV printing technology maintains high-resolution precision across challenging substrates, including brick, plaster, and wood.
Defining Resolution: Why PPI and DPI Dictate Mural Quality
Achieving a flawless finish requires more than just a creative eye; it demands technical mastery of your source files. Understanding the correct image file formats for wall murals starts with a clear distinction between digital data and physical output. High-quality wall printing isn’t a matter of guesswork. It relies on the precise relationship between the pixels on your screen and the ink droplets on your wall. If this foundation is flawed, even the most advanced UV printing technology cannot produce a sharp result.
PPI vs DPI: Clearing the Confusion
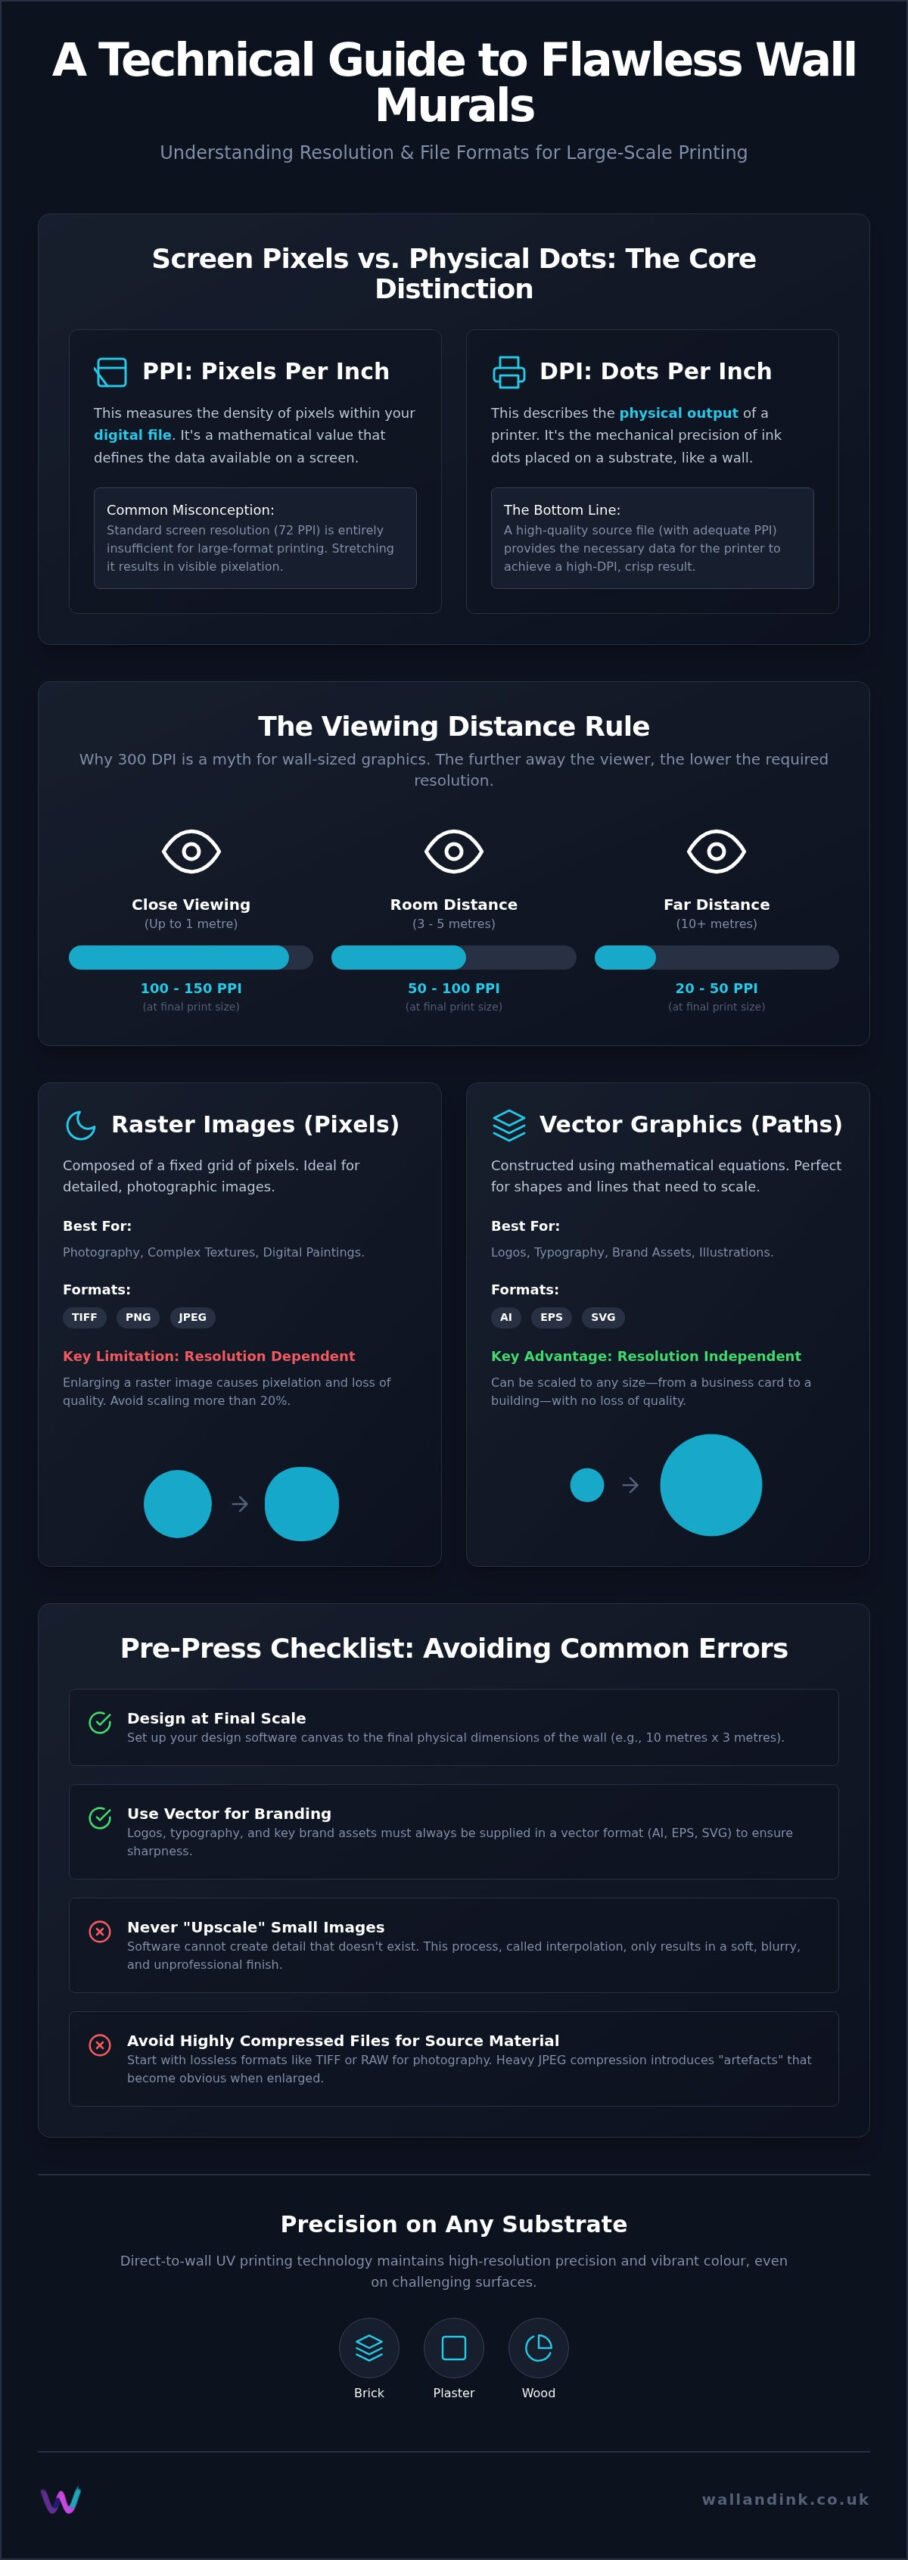
PPI (Pixels Per Inch) describes the density of the electronic grid within your digital file. Image resolution at this stage is purely mathematical. In contrast, DPI (Dots Per Inch) refers to the mechanical precision of a printer as it deposits ink droplets onto a substrate. Whilst many use these terms interchangeably, they represent different stages of the process. Your software settings must be configured to the correct PPI before you begin the design phase. If the digital density is too low, the physical printer simply won’t have enough information to create a crisp image.
Standard screen resolution is typically 72 PPI. This is perfectly adequate for a monitor but it’s entirely insufficient for professional physical printing. When you stretch a 72 PPI image across a four-metre wall, the individual pixels become visible to the naked eye. This results in a blocky, unprofessional appearance that undermines your branding or decor.
The Consequences of Low-Resolution Printing
Low-resolution files produce visible pixelation, often called the “staircase” effect. This is most noticeable on curved lines, circular logos, and fine text. Beyond jagged edges, low resolution leads to a significant loss of fine detail. Complex textures, such as wood grain or marble veining, become a blurred mess of indistinguishable colours. Colour accuracy also suffers. Without enough pixel data, the printer cannot render smooth gradients, leading to “banding” where distinct stripes of colour appear instead of a seamless transition. Selecting the right image file formats for wall murals ensures these technical failures are avoided.
A common mistake is attempting to “add” pixels to a small image by increasing the resolution in photo editing software. This process, known as interpolation, doesn’t create new detail. It merely guesses what the surrounding pixels should look like, resulting in a soft, muddy aesthetic. You cannot manufacture quality from a low-resolution source. For an industrial-grade finish, your file’s physical dimensions must match your wall’s scale from the outset, ensuring every ink dot is backed by genuine data.
Raster vs Vector: Choosing the Right Format for Scale
Defining the correct image file formats for wall murals requires a fundamental understanding of how digital data scales. You are essentially choosing between a fixed grid of colours and a set of mathematical instructions. This choice dictates whether your final print remains sharp or degrades into a soft, pixelated mess. For industrial-grade wall printing, the distinction between raster and vector is not just a design preference; it is a technical requirement for success.
When to Use Raster Images
Raster images, such as TIFF, JPEG, or PNG files, are composed of individual pixels. They are the industry standard for photography and complex digital paintings that require intricate textures. However, their fixed nature means they have a physical limit. A standard rule of thumb is to avoid enlarging a raster image by more than 20% of its original size. Beyond this threshold, the quality drops significantly as the software attempts to fill in the gaps between pixels. For professional results, always prioritise lossless formats like TIFF or RAW over heavily compressed JPEGs to avoid “artefacts” and colour distortion during the design phase.
The Power of Vector for Large-Scale Branding
Vector graphics use mathematical paths rather than pixels. This makes formats like AI, EPS, and SVG resolution-independent. You can scale a vector logo from the size of a business card to the side of a warehouse without losing a single edge of clarity. For this reason, brand assets and typography must always be supplied in vector format. If you only have a raster logo, manual redrawing is often superior to automated “Image Trace” functions, which can produce wobbly, imprecise lines that are glaringly obvious when printed at a large scale.
Successful mural layouts often combine both formats. You might use a high-resolution raster photograph for the background and layer vector text and logos on top. This hybrid approach ensures the branding remains perfectly crisp whilst the imagery provides depth and realism. Understanding how these elements interact is key, and referring to a Viewing Distance and Resolution Guide can help you determine the exact requirements for your specific site. Our team at Wall & Ink can review your file types during a bespoke design consultation to ensure they meet our industrial precision standards, helping you avoid the common pitfalls of low-resolution assets.
The Viewing Distance Rule: Why 300 DPI is a Myth for Walls
The insistence on 300 DPI as a universal standard is a technical fallacy when applied to large-scale environments. Whilst 300 DPI is essential for hand-held brochures, applying this density to a ten-metre wall results in redundant data and unmanageable file sizes. When preparing image file formats for wall murals, you must design for the eye of the observer, not the limitations of desktop office printers. Industrial precision is about efficiency, not just raw pixel count.
The human eye possesses a finite resolving power. As an observer moves further from a surface, the eye naturally blends adjacent pixels together. This physiological reality allows us to maintain perceived sharpness at lower resolutions without any visible degradation. Mechanical superiority in printing isn’t about achieving the highest possible DPI; it’s about finding the “sweet spot” where file performance meets visual clarity. At a distance of several metres, the difference between 150 DPI and 300 DPI is physically impossible for the human eye to detect.
Resolution Requirements by Distance
The necessary resolution for your mural is a direct variable of the nearest viewing point. Standardising your files based on these distances prevents wasted processing time and ensures a sharp finish:
- Hand-held (0.5m): Requires 300 DPI to maintain crisp text and photographic detail for close-up inspection.
- Wall-mounted (2m+): A resolution of 120 to 150 DPI is typically indistinguishable from higher densities in offices or retail units.
- Large Scale (5m+): In expansive environments like hospital foyers or school halls, 75 DPI appears perfectly sharp to the casual observer.
Managing File Sizes for Massive Murals
Attempting to design a full-scale mural at 300 DPI creates multi-gigabyte files that often crash standard design software. To maintain a responsive workflow, professional designers frequently work at a 1:10 scale factor. For instance, a ten-metre wall is designed on a one-metre canvas at 1000 DPI. When enlarged by the printer, this scales perfectly to 100 DPI at full size. This methodical approach ensures the design process remains efficient whilst preserving industrial-grade quality in the final output.
When managing image file formats for wall murals of significant scale, you should also prioritise resolution in the foreground elements of your layout. Background textures can often tolerate lower densities, whilst logos and fine text require higher precision. This balance allows you to maintain a professional aesthetic without the technical burden of oversized files. By focusing on perceived sharpness rather than arbitrary DPI targets, you ensure a successful execution of your large-scale branding.
How to Organise and Export Your Mural Files
A systematic approach to file preparation is the only way to guarantee industrial-grade results. When you’re finalising image file formats for wall murals, your workflow must transition from a creative mindset to a technical one. This ensures that every specification, from colour density to edge precision, is optimised for large-scale application. Precision at this stage eliminates traditional hassles and ensures that the final print reflects your professional standards.
Start by setting your canvas size to match the physical dimensions of the wall. If you’re using the 1:10 scale factor discussed previously, ensure your PPI is adjusted proportionally to maintain the final output quality. You must also verify the original image metadata. If the source file was captured at a low resolution, no amount of software manipulation can restore missing detail. Finally, convert your colour profile from RGB to CMYK. Most digital assets are created for screens, but industrial UV printers operate on a CMYK ink system. Converting early allows you to identify and correct any colour shifts before the printing process begins.
The Truth About Upscaling Software
AI upscaling tools have become popular for “enhancing” low-resolution images. These programmes work by generating guessed pixels to fill the gaps in a raster grid. Whilst this can be effective for abstract textures or backgrounds, it often fails to meet professional standards for sharp brand assets or technical photography. The results can often appear “waxy” or unnaturally smooth. For branding that requires mechanical superiority, reshooting the original subject or recapturing the asset at a higher resolution is always the more reliable path.
Final File Checklist for Professional Printing
Before you send your files to the production team, follow this technical checklist to prevent errors and delays:
- Flatten layers: This reduces file size and prevents accidental element shifts. You should always keep an unflattened version for your own future edits.
- Outline fonts: Convert all text to mathematical curves. This ensures that typography remains crisp and eliminates errors caused by missing font files on the print server.
- Set bleed and margins: Add a minimum of 50mm bleed to all edges. This provides the necessary tolerance for wall-to-wall coverage on surfaces that are rarely perfectly square.
Following these steps ensures your design is ready for high-resolution execution without the risk of digital artefacts. If you’re unsure about your technical setup, our team at Wall & Ink provides bespoke design consultations to verify your files and fix resolution issues before we begin the printing process.
Direct-to-Wall Printing: Precision on Any Substrate
The final stage of the process involves translating your digital data into a physical installation. Whilst choosing the correct image file formats for wall murals is the foundational step, the substrate determines how that resolution is perceived by the observer. Direct-to-wall printing represents a significant technological leap over traditional vinyl or wallpaper. By using advanced UV ink technology, our equipment deposits ink directly onto the surface, where it is instantly cured by ultraviolet light. This rapid curing prevents the ink from “bleeding” or spreading, even on porous substrates like wood or brick. This ensures that the high-resolution details you preserved in your digital files remain sharp on the physical wall.
Printing Beyond Paper: Substrate Challenges
Industrial precision means adapting to the specific environment of your project. Whether the surface is smooth plaster, textured brick, or raw concrete, our specialised equipment adjusts its focus in real-time. This maintains a consistent distance between the print head and the wall, ensuring that lines remain crisp and colours remain vibrant. Unlike vinyl decals, which often struggle to adhere to textured surfaces or highlight every imperfection beneath the film, direct-to-wall printing integrates with the substrate. The texture of the wall can actually enhance the aesthetic, provided the original image file formats for wall murals were prepared with the correct resolution and scale factor.
The Wall & Ink Professional Design Service
We operate as a reliable partner in your project, not just a service provider. Our bespoke design consultations include a thorough audit of your files before any ink touches the wall. If we identify resolution issues or colour profile mismatches, we address them during the visualisation phase. We provide digital visualisations that show exactly how your artwork will look in the intended space, allowing you to sign off on the quality with total confidence. This proactive approach eliminates the fear of wasting budget on low-quality prints and ensures a professional result every time.
Our experts are skilled at transforming low-resolution concepts into high-resolution masterpieces. Through professional visualisation and technical adaptation, we ensure your logos and photos are perfectly suited for large-scale architectural application. This methodical process moves from initial consultation to final execution with a level of transparency that distinguishes us from traditional design agencies. We focus on the physical reality of the trade, ensuring your branding is delivered with mechanical superiority and durability.
Achieving Industrial Precision in Large-Scale Graphics
Mastering the technical requirements of image file formats for wall murals is the first step toward a successful large-scale installation. You now understand that resolution is a variable of viewing distance rather than an arbitrary industry standard. By prioritising vector assets for branding and ensuring your raster files are exported with lossless settings, you eliminate the risk of pixelation and blurring. These technical foundations allow for a sharp, professional finish that reflects the quality of your brand.
We provide national UK coverage for both commercial and residential projects, utilising advanced industrial UV printing technology to achieve mechanical superiority on any substrate. Every project begins with an expert digital visualisation and a comprehensive design audit to verify your file compatibility before production starts. This methodical approach ensures your mural is delivered without the traditional hassles of wallpaper or vinyl. It’s time to transform your space with a modern, durable solution that stands the test of time.
Enquire about our high-resolution wall printing services
Frequently Asked Questions
What is the minimum DPI for a high-quality wall mural?
The minimum requirement for a high-quality wall mural is typically between 75 and 150 DPI at the final print size. Whilst 300 DPI is standard for brochures, murals viewed from over two metres away don’t require such high density. Lowering the DPI to 100 ensures your file remains manageable without sacrificing visual clarity. We recommend 150 DPI for retail spaces where customers may stand closer to the wall surface for inspection.
Can I use a photo from the internet for a large wall mural?
Images sourced from the internet are usually unsuitable for large-scale printing because they are often capped at 72 PPI. This resolution is designed for screens and will appear pixelated when enlarged to several metres. Additionally, you must ensure you have the correct commercial licensing for any asset. For industrial-grade results, it’s better to use high-resolution stock photography or bespoke vector graphics that scale without any loss of quality.
Is a higher resolution always better for printing on walls?
Higher resolution isn’t always superior as it can result in multi-gigabyte files that are difficult to process. Once you exceed the resolving power of the human eye at a specific viewing distance, extra pixels provide no benefit. Managing image file formats for wall murals effectively means balancing file performance with perceived sharpness. Providing a 300 DPI file for a mural viewed from five metres away creates technical hurdles without improving the aesthetic outcome.
What is the difference between PPI and DPI in simple terms?
PPI refers to the digital density of pixels within your software, whilst DPI describes the physical density of ink droplets placed on the wall. Think of PPI as the input and DPI as the output. Your digital file must have sufficient PPI to allow our UV printers to deposit ink at a high DPI. Understanding this distinction is vital for ensuring your branding remains crisp and professional across various architectural substrates and surfaces.
How do I check the resolution of my image file on a Mac or PC?
To check resolution on a PC, right-click the file, select ‘Properties’, and look under the ‘Details’ tab for dimensions and DPI. On a Mac, right-click the image and select ‘Get Info’, or open the file in Preview and navigate to ‘Tools’ then ‘Show Inspector’. These steps allow you to verify if your image file formats for wall murals meet the minimum technical requirements before you commit to the final printing stage.
What file format is best for high-resolution wall printing?
Vector formats like PDF, AI, or EPS are the best choice for logos and typography because they scale infinitely without pixelation. For photographic elements, a flattened TIFF file is the industry standard for high-resolution wall printing. TIFFs are a lossless format, meaning they preserve all the original detail and colour data from your design. This ensures our industrial UV printers have the highest quality data to work with during the application process.
Does increasing the DPI in Photoshop make an image high resolution?
Simply increasing the DPI setting in Photoshop doesn’t make an image high resolution. This process, known as upsampling, forces the software to invent new pixels based on the existing data. The result is often a soft, muddy image that lacks genuine detail. For a professional finish, you must start with a high-resolution source file or a vector asset. You cannot manufacture mechanical superiority from a low-quality digital original that lacks the necessary data.
Why does my high-res image look blurry on my office wall?
A high-resolution image might look blurry if it was originally a low-res file that was artificially upscaled. Even if the metadata says 300 DPI, the actual detail may be missing. Alternatively, the blurring might be caused by the viewing distance being too close for the chosen resolution. Our bespoke design audit identifies these issues early. We use digital visualisations to ensure your graphics are perfectly suited to the specific lighting and scale of your office environment.