
A flawless wall mural is not merely a design choice; it is a technical installation where the substrate’s structural integrity is as vital as the ink itself. Many project managers and homeowners rightfully fear that a lack of proper wall preparation for printing could lead to peeling, fading, or a finish that fails to meet professional standards. You might feel uncertain about whether aged plaster can support a modern UV print or how this process differs from traditional decorating methods. This uncertainty is a logical response to the complexities of modern surface technology.
We understand that a durable, gallery-grade result requires more than just a clean surface. This guide provides a definitive framework to prepare any UK wall surface for flawless direct-to-wall UV printing. You will gain the confidence that your investment is protected by a precise, mechanical approach to surface readiness. We will outline a practical physical checklist, clarify the distinction between wallpaper and printing prep, and define the digital file requirements necessary for industrial-grade precision.
Key Takeaways
- Understand why structural integrity is the primary requirement for permanent UV ink adhesion and long-term durability.
- Master the essential ‘Clean, Dry, Flat’ protocol for wall preparation for printing to ensure a professional finish on standard UK plaster.
- Explore how direct-to-wall technology integrates seamlessly with varied substrates such as brick, wood, and glass.
- Identify the exact resolution and file specifications required to maintain image clarity when scaling designs for large-scale murals.
- Learn how a comprehensive site survey removes the technical burden from the client and guarantees a hassle-free installation.
Why Surface Integrity is Vital for Direct-to-Wall Printing
Direct-to-wall printing is a specialised form of industrial application where UV-curable inks are jetted directly onto a vertical substrate. Unlike traditional decorating, this process relies on a precise mechanical bond between the ink and the wall. This makes the initial wall preparation for printing a critical phase of any project. If the host surface is unstable, even the most advanced ink technology cannot guarantee longevity. We prioritise substrate stability because the print is only as durable as the layer beneath it.
Many clients assume printing requires the same aggressive sanding and priming as wallpaper installation. This isn’t the case. Wallpaper prep often involves creating a “key” for heavy adhesives or hiding imperfections under thick paper. Direct printing is a cleaner, more precise alternative that eliminates the mess of traditional methods whilst demanding a higher standard of surface flatness. It’s a modern solution that replaces the physical bulk of vinyl with the precision of Digital printing technologies.
The Difference Between Painting and Printing Prep
Standard emulsion paint is forgiving. It fills small pores and hides minor undulations through its liquid volume. The technology used in wall murals operates with far greater sensitivity. The print head travels along a vertical rail at a fixed distance from the surface. If a wall is significantly bowed or uneven, the distance between the nozzles and the substrate fluctuates. This variation can lead to a loss of image sharpness or inconsistent ink density.
The UV curing process is instantaneous. As the ink hits the wall, high-intensity UV lamps solidify the liquid into a durable finish. This rapid transition means the ink doesn’t have time to “soak in” like traditional paint. It needs a flat, stable surface to ensure the dots land with mathematical accuracy. Proper wall preparation for printing ensures that the machine maintains its optimal focal length across the entire mural area.
Assessing Your Wall for Structural Soundness
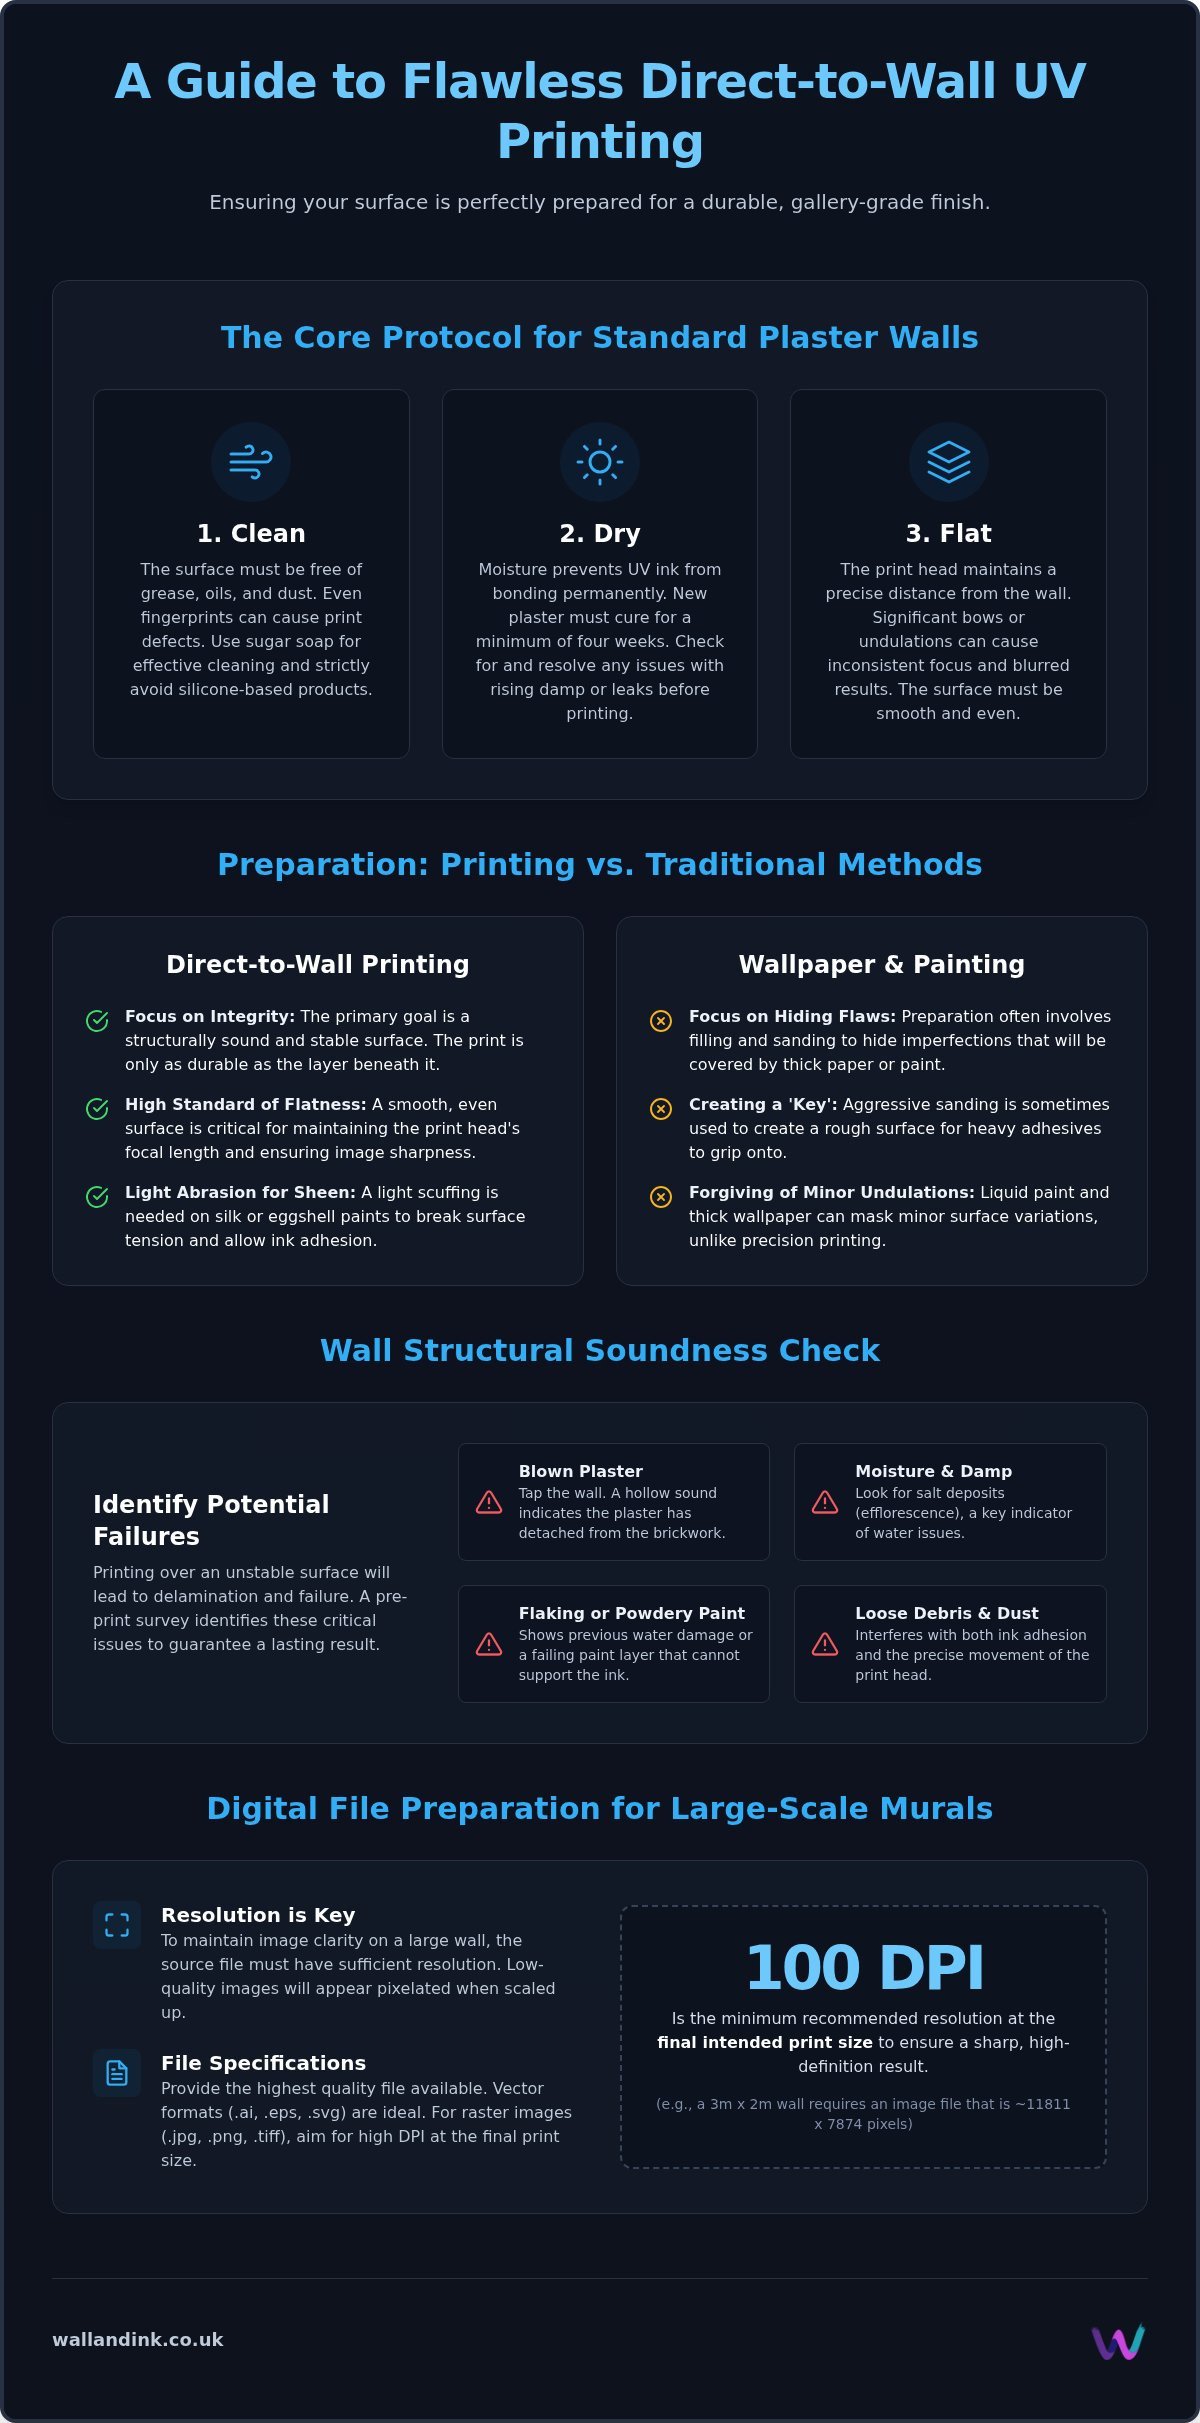
Before any ink is applied, we must verify the structural integrity of the plaster. Blown plaster is a common issue in older UK properties. You can identify this by tapping the wall; a hollow, echoing sound suggests the plaster has detached from the brickwork. If the substrate is loose, the print will eventually fail as the plaster crumbles. We cannot print over structural failure.
Moisture is the secondary enemy of successful ink adhesion. Rising damp or internal leaks prevent the UV ink from forming a permanent bond. We check for specific indicators of instability:
- Visible salt deposits or efflorescence on the surface.
- Flaking or powdery paint that indicates previous water damage.
- Loose debris and dust that could interfere with the print head’s movement.
A sound wall ensures the mural remains vibrant for years without the risk of delamination. By identifying these issues during the survey, we eliminate the traditional hassles of post-installation repairs.
Preparing Standard Plastered Walls for UV Ink Application
Standard UK plasterboard or skim-finished walls are the most common substrates for our installations. To achieve a high-definition result, we adhere to the “Clean, Dry, Flat” protocol. This isn’t just a recommendation; it’s a technical requirement for UV ink adhesion. Adhering to this standard ensures that the mechanical precision of our equipment translates into a flawless visual outcome. Proper wall preparation for printing begins with a critical assessment of these three factors before the machinery is even unboxed.
UK interiors often feature silk or eggshell paint finishes. These coatings are designed to be “wipe-clean,” meaning they are formulated to repel liquids and stains. Unfortunately, this same property can hinder the bonding of UV-curable inks. If your wall has a high-sheen finish, a light mechanical abrasion is necessary to break the surface tension. For those with newly plastered surfaces, timing is everything. You must allow a minimum of four weeks for a fresh skim to fully cure. Printing on “green” or damp plaster traps moisture behind the ink, which eventually leads to delamination as the wall naturally breathes.
Cleaning and Degreasing the Substrate
Grease is the primary enemy of UV ink. Even invisible oils from fingerprints can cause “fish-eyes” or spotting in the final print. Sugar soap remains the industry standard for cleaning because it effectively strips oils without leaving a filmy residue. We strictly prohibit the use of silicone-based cleaners near a print site. Silicone creates a non-stick surface that repels ink with industrial efficiency, leading to immediate print failure. Ensure the wall is 100% dry before the technician arrives. Any residual moisture can gass out during the curing process and create micro-bubbles in the finished mural.
Filling and Levelling for High-Resolution Results
The printer carriage operates on a precise vertical track. Any “pockmarks,” cracks, or small holes in the plaster will manifest as voids or distorted pixels in the final image. Use a high-quality, fine-surface filler to bridge these gaps. Once dry, sand the area with fine-grit paper until it’s perfectly flush with the surrounding surface. Surface deviations must not exceed 2mm over a 2-metre span to maintain the printer head’s focal accuracy. If you are unsure about your wall’s current state, our experts can provide a bespoke design consultation to assess your substrate’s suitability.
This level of physical readiness is what separates a standard wall mural from a professional architectural feature. By removing the traditional hassles of peeling vinyl or bubbling wallpaper, we provide a permanent solution that relies on the quality of your initial preparation. Once the physical surface is stabilised, the focus shifts to the technical requirements of the print itself.
Managing Challenging Substrates: Brick, Glass, and Wood
Direct-to-wall technology excels where traditional methods fail. Whilst vinyl decals struggle to adhere to uneven surfaces or non-porous materials, UV-curable inks create a permanent bond across a vast range of architectural substrates. This versatility allows for the integration of high-impact graphics into the existing fabric of a building. The wall preparation for printing on these challenging surfaces requires a more specialised approach than standard plaster, focusing on chemical adhesion and mechanical cleanliness to ensure industrial-grade durability.
Unlike wallpaper, which masks the underlying material, direct printing preserves the tactile quality of the substrate. This is particularly effective in commercial environments where the natural character of brick, wood, or stone is a core design feature. Our process ensures that the print becomes part of the wall, rather than an overlay that risks peeling or bubbling over time. By eliminating the need for adhesives, we provide a cleaner, more modern alternative to legacy graphics solutions.
Printing on Exposed Brick and Cinder Block
Exposed masonry presents a highly porous and textured surface. Prep work begins with a thorough mechanical cleaning to remove loose mortar, dust, and debris. We don’t aim to flatten the surface; we aim to stabilise it. The printer’s sensors adapt to the rugged profile of the brick, allowing the ink to settle into the natural crevices. This creates a result that looks integrated into the material itself. For exceptionally porous cinder blocks, we may apply a clear stabilising sealer. This prevents the ink from being absorbed too deeply, which maintains the vibrancy of the colours whilst preserving the “Industrial Chic” aesthetic.
Non-Porous Surfaces: Glass, Tile, and Metal
Glass, ceramic tiles, and metal partitions represent a different technical challenge. These surfaces are entirely non-porous, meaning there are no microscopic “pores” for the ink to grip. In these instances, wall preparation for printing involves the application of a specialised adhesion promoter. This chemical primer creates a molecular bridge between the smooth substrate and the UV ink.
When printing on tiles, we must ensure that grout lines are stable and free from mould or moisture. The ink bridges these gaps effortlessly, creating a continuous, high-resolution image across the entire installation. For metal surfaces, such as commercial office partitions, we perform a deep degreasing to remove any industrial oils or residues. This level of technical precision ensures that the mural remains durable even in high-traffic professional environments. Our methodical approach ensures that every substrate, no matter how challenging, provides a reliable host for our advanced UV technology.
Digital Preparation: Optimising Your Files for Large-Scale Print
Digital preparation serves as the technical blueprint for the entire project. Whilst physical wall preparation for printing focuses on the stability of the substrate, digital optimisation ensures the visual data is robust enough for large-scale application. A design that looks sharp on a 27-inch monitor can quickly degrade when projected across a 3-metre vertical span. We eliminate this risk through a methodical file-checking process that prioritises industrial precision over simple aesthetics. This digital-to-physical bridge is what allows us to deliver gallery-grade results in demanding professional environments.
The transition from a screen-based concept to a physical installation requires a deep understanding of ink behaviour and substrate interaction. We don’t just “print” a file; we calibrate the artwork to the specific environment it will inhabit. This preparation phase is where we identify potential resolution issues or colour shifts before they become physical problems on your wall. By managing the technical burden at the digital stage, we guarantee a more efficient and reliable installation process.
Resolution and Scaling Requirements
Resolution requirements are dictated by the “View Distance” rule. In a narrow corridor, viewers stand closer, necessitating a higher pixel density than a mural designed for a large corporate atrium. For a 3-metre wall, we typically require files that maintain clarity at 100 to 150 DPI at full output size. Vector files are the preferred choice for commercial branding and logos because they allow for infinite scaling without any loss of quality. Raster images, such as high-definition photography, require careful interpolation to avoid pixelation. Specialised AI-driven upscaling software is vital for enhancing low-resolution photos to ensure they maintain clarity when stretched across architectural scales.
Colour Accuracy and Proofing
Screens operate in RGB, but our UV printers utilise a specialised CMYK ink set for maximum durability and vibrancy. This transition requires professional colour management to ensure the final mural matches your specific brand guidelines. We must also account for the host substrate’s base colour. Because UV inks have a degree of transparency, a dark or vibrant wall colour can shift the hue of the print. To counter this, we often apply a white underprint. This creates a neutral base layer that allows colours to remain vibrant regardless of the underlying wall tone.
A digital visualisation is the final step in the preparation journey. We provide a mock-up that shows exactly how the design interacts with the architectural features of your space, including doors, windows, and light switches. This eliminates guesswork and ensures that every technical specification is met before the first drop of ink hits the wall. To begin this technical journey, you can book a bespoke design consultation to discuss your specific file requirements.
The Wall & Ink Precision Process: From Survey to Print
At Wall & Ink, we take full responsibility for the technical execution of your project. The physical wall preparation for printing is only half the journey. Our precision process moves the project from a digital concept to a permanent architectural feature through a series of rigorous on-site protocols. We manage the logistical complexities so that you don’t have to. This end-to-end service ensures that every technical specification is met with industrial care, resulting in a mural that is as durable as it is visually striking.
Our “White Glove” approach means we handle the final surface checks and mechanical setup with total transparency. We don’t just arrive and print. We verify every variable, from the stability of the substrate to the clearance of the printer’s vertical rail. By identifying potential obstacles early, we eliminate the traditional hassles associated with commercial decorating. This methodical progression guarantees that the final result meets our high standards for clarity and adhesion.
Site Survey and Environmental Controls
A site survey is the first step in our end-to-end service. We identify potential obstacles that standard contractors might overlook. Our technicians measure floor-to-ceiling heights with laser precision to ensure the printer’s vertical rail has sufficient clearance. We also assess the floor’s levelness. The printer requires a stable, flat path to maintain its focal distance. Any significant gradient or uneven flooring must be identified before the installation window to avoid mechanical interference during the print run.
The final phase of wall preparation for printing involves stabilising the environment. Dust control is paramount. A printing environment must remain clean whilst the UV lamps are active to prevent airborne particles from settling into the wet ink. We also monitor temperature and humidity. UV-curable inks perform optimally within specific thermal ranges. We verify these conditions during the survey to ensure a seamless execution that avoids the delamination risks found in less controlled environments.
Why Choose Professional Direct-to-Wall Printing?
Choosing our direct-to-wall service eliminates the inherent failures of legacy alternatives. There are no seams to misalign as you find with traditional wallpaper. There is no risk of edges peeling or adhesive failure common with vinyl decals. Our UV technology creates a durable, scratch-resistant finish that is specifically suited for high-traffic corridors in schools, hospitals, and corporate offices. This durability is backed by our advanced UV ink technology, which cures instantly to form a permanent bond with the substrate.
Ready to transform your space? Book a design consultation with Wall & Ink to begin your project with a team that values industrial precision and high-quality results.
Securing the Future of Your Architectural Surfaces
Industrial-grade results are the product of technical discipline. From assessing structural integrity to final digital calibration, every step in the wall preparation for printing process ensures your mural remains a permanent feature. This guide has outlined the transition from traditional, manual decorating to a modern, mechanical application that prioritises durability and precision above all else. It’s a cleaner, more efficient way to manage large-scale graphics without the inherent failures of legacy materials.
Our team offers national UK coverage for projects of any scale, delivering 10+ years of durability through advanced UV-stable inks. You won’t have to deal with the peeling edges of vinyl or the messy adhesives of wallpaper. We focus on providing a reliable, end-to-end service that respects your time and your environment. It’s a professional solution designed for those who value efficiency and high-quality results.
Transform your walls with a bespoke UK-wide printing service from Wall & Ink
We look forward to bringing this level of professional precision to your next project.
Frequently Asked Questions
Do I need to sand my wall before you arrive for printing?
You don’t usually need to sand the entire wall if it’s already in good condition. However, if the surface has a high-gloss finish or significant bumps, light sanding is required to ensure the mechanical path of the printer is clear. Proper wall preparation for printing focuses on flatness rather than creating a rough key for adhesives.
Can you print on a wall that has already been painted?
Yes, we print over existing paint regularly. Standard matt emulsion provides an excellent host surface for UV-curable inks. We recommend avoiding “easy-clean” or silicone-based paints just before our arrival, as these coatings are designed to repel liquids and can compromise the ink bond.
How long does a wall need to dry after being plastered before you can print?
You must allow at least four weeks for a fresh plaster skim to fully cure. Printing on “green” or damp plaster traps moisture behind the UV ink, which eventually leads to delamination. The substrate must be completely dry and chemically stable before the printing process begins.
Is it possible to print on textured surfaces like wood or brick?
It is entirely possible to print on textured architectural materials. Our equipment uses advanced sensors to adjust the print head distance over brick, wood, or cinder block. This preserves the material’s natural character whilst delivering high-resolution graphics that traditional vinyl cannot match.
What happens if there are small cracks in my wall plaster?
Small cracks must be filled with a fine-surface filler and sanded flush before we arrive. Any surface deviation greater than 2mm can affect the focal sharpness of the print. Ensuring the substrate is structurally sound prevents the image from distorting or crumbling as the building settles.
Do I need to apply a special primer to the wall myself?
You don’t need to apply specialised primers yourself for standard plastered walls. For non-porous surfaces like glass, tile, or metal, our technicians handle the application of adhesion promoters during the installation window. We manage the technical requirements to ensure a professional, durable finish.
Can you print over dark-coloured walls, or must they be white?
We can print on dark or vibrant walls by utilising a specialised white underprint. This base layer acts as a neutral canvas, ensuring that the CMYK colours remain vibrant and accurate regardless of the underlying wall tone. You aren’t restricted to white surfaces for your murals.
What digital file format do I need to provide for the best result?
Vector formats such as PDF, EPS, or AI are ideal for commercial branding and logos. For photographic murals, high-resolution TIFF or JPEG files are required to maintain clarity at scale. We review all digital files during the wall preparation for printing phase to ensure they meet our industrial scaling requirements.