
What if the smoothest-looking wall isn’t ready for a print? A surface can appear flat yet still have loose paint, dust or hidden moisture that affects the result. Good wall preparation for wall printing starts with checking that the wall is clean, dry, sound and stable. Peeling or bubbling paint isn’t just a cosmetic flaw; it can point to poor adhesion or an underlying issue that needs assessment before printing.
If you’re unsure whether your existing finish is suitable, you don’t need to guess. This guide explains how to check for visible issues, what details to record and why the wall material, paint condition and recent repairs may need a specialist’s view. You’ll also find out what photographs and wall information to share with your print provider, so you can discuss the surface before on-site printing. The aim is to identify concerns early and prepare the wall for a proper assessment.
Key Takeaways
- Wall preparation for wall printing depends on the actual surface, not just how smooth it looks. A flat finish doesn’t confirm that the paint or substrate is firmly bonded.
- Record visible defects such as cracks, stains, dust or dampness without trying to diagnose their cause.
- Painted plaster, bare plaster and masonry may need different checks. A general guide can’t confirm that a particular wall is suitable.
- Identify the surface and inspect it before deciding what to do. Don’t wipe, sand or prime over loose paint.
- Share clear photographs and accurate wall details with your print provider so you can discuss preparation requirements for the specific surface.
Wall preparation for wall printing: what makes a surface ready?
A wall can look smooth and still be unsuitable for direct-to-wall printing. Its visible finish doesn’t show whether the paint is firmly attached or the material beneath it is stable. Print readiness means checking both the surface and its condition, then confirming they’re suitable for the specific printing process.
A print-ready wall is clean, sound, dry and stable, with its suitability confirmed for the surface and printing process. These are practical qualities to assess, not universal technical thresholds. Requirements can vary with the substrate and print method, so a visual check is a starting point rather than final approval.
What does print-ready mean for a painted wall?
A painted surface should be free from loose material, dust and obvious contamination. The paint needs to remain attached, and the underlying wall must be stable. A recently patched area, for example, may look neat but still need its condition or suitability checked before printing. Understanding the construction and finish of drywall surfaces can help you describe what’s behind the paint, though the actual wall still needs assessment for the proposed print.
There isn’t one preparation recipe for every wall. Painted plaster, plasterboard and other substrates can differ, and a surface that works for one printing process may need different preparation for another. Share what you know about the wall rather than assuming that a coat of paint or a smooth finish is enough.
Why can peeling or bubbling paint matter?
Peeling edges or raised bubbles are warning signs because they can indicate that paint is no longer firmly bonded. They don’t reveal the cause by themselves. Moisture, earlier surface preparation or a failure in the coating may need investigation; appearance alone can’t establish which explanation applies.
Don’t cover the defect or treat it as a simple cosmetic issue before its condition is understood. If peeling or bubbling is spreading, the area feels damp, or the problem keeps returning, pause preparation and seek an appropriate assessment. Printing over unstable paint risks leaving the underlying issue unresolved.
For a useful first check, look across the whole proposed print area in good light. Note changes in texture, loose edges, visible dust, staining or damp-looking patches. Record what you can see without scraping or disturbing the finish. These observations help a print specialist discuss the surface and what, if anything, needs checking before professional on-site printing.
How to assess peeling, bubbling and other wall defects before printing
Before cleaning or repairing a wall, take time to record its condition. For wall preparation for wall printing, the aim is to identify and communicate visible concerns, not to diagnose them yourself. A mark or raised patch can have more than one explanation, so avoid assuming a particular symptom has a single cause.
What different paint symptoms can tell you
Peeling describes paint that’s lifting or detaching from the surface. Bubbling appears as raised areas beneath or within the coating. Both warrant a closer assessment of the paint and wall, but neither proves why the defect has occurred. Cracks, stains and powdery residue are useful observations to report, not definitive diagnoses.
Inspect the proposed print area in good light. Note what you see, where it is and whether it appears to be changing. Check for:
- Paint edges that are lifting, flaking or coming away.
- Bubbles or blistered patches, including areas that appear to be spreading.
- Cracks, noting their position and visible extent without trying to interpret them.
- Staining, discolouration or marks that may have changed since you last checked.
- Dust or powdery residue on the surface.
- Visible dampness or areas that feel damp, if you can identify them without disturbing the finish.
A visible paint defect is a reason to assess the surface, not proof of one cause. Moisture, earlier preparation or coating failure may need investigation, but appearance alone can’t establish which applies. Record what you see in neutral terms, such as “bubbling near the lower edge”, rather than guessing at the explanation.
When should you pause wall preparation?
Stop before wiping, sanding, scraping or covering a defect if paint is loose across a substantial area, blisters continue to appear, the surface seems damp, or damage keeps returning. Disturbing the coating can make its condition harder to assess. Document the area and seek advice from an appropriate building or decorating professional if dampness or recurring damage is suspected.
Don’t print over an unstable coating or hide an unresolved defect beneath a new finish. Take clear photographs that show both the affected patch and its position on the whole wall. Share them with your print provider, along with a short description of what you’ve noticed. Wall & Ink’s direct-to-wall printing service includes project discussion, giving you an opportunity to raise surface questions before the proposed print is assessed.
Which wall surfaces need different preparation for direct-to-wall printing?
The wall’s material is only part of the assessment. Its finish, cleanliness, stability and condition also affect whether it’s suitable for direct-to-wall printing. Painted plaster, bare plaster and masonry each have different features to check, but no general guide can confirm that a particular wall is ready. Use the comparisons below as a starting point, then confirm suitability for the specific surface and printing process.
Painted plaster, bare plaster and masonry
- Painted plaster: Check whether the paint looks even and firmly attached, with no peeling, bubbles, obvious contamination or dust. A smooth finish doesn’t establish that the coating beneath is stable. Note any repairs, staining or changes in texture.
- Bare plaster: Look for a consistent-looking finish and flag areas that appear fresh, powdery, damaged or uneven. Don’t assume bare plaster is ready because it has no paint. Confirm the condition and suitability of the surface, including any relevant plaster curing guidance.
- Masonry: Identify visible features such as joints, roughness, flaking material, dust or staining. Texture and condition can vary across a single wall, so record areas that look different rather than treating the whole surface as uniform.
These are visual checks, not instructions to apply a particular treatment. Avoid choosing a primer, cleaning method or waiting period based only on the material name. Requirements can depend on the actual substrate and the printing process.
How to decide whether a surface needs specialist assessment
Ask for a closer assessment if you don’t know what the substrate or existing coating is, or if it appears loose, damaged or inconsistent. Fresh, powdery or visibly uneven areas also deserve attention before printing. Where plaster is new, refer to the relevant plaster or product guidance for curing information rather than relying on a general rule.
For an informed discussion, tell the print provider what you know about the wall: its material, whether it’s painted or bare, and any visible repairs or defects. Include clear photographs of the full wall and close-ups of areas that concern you. This gives the provider useful context, though photos alone may not settle every question.
The printer or an appropriate surface specialist should confirm any preparation that depends on the specific substrate or printing process. That may include whether the existing finish is suitable and whether further checks are needed. Confirm those requirements before cleaning, repairing or applying products to the wall.
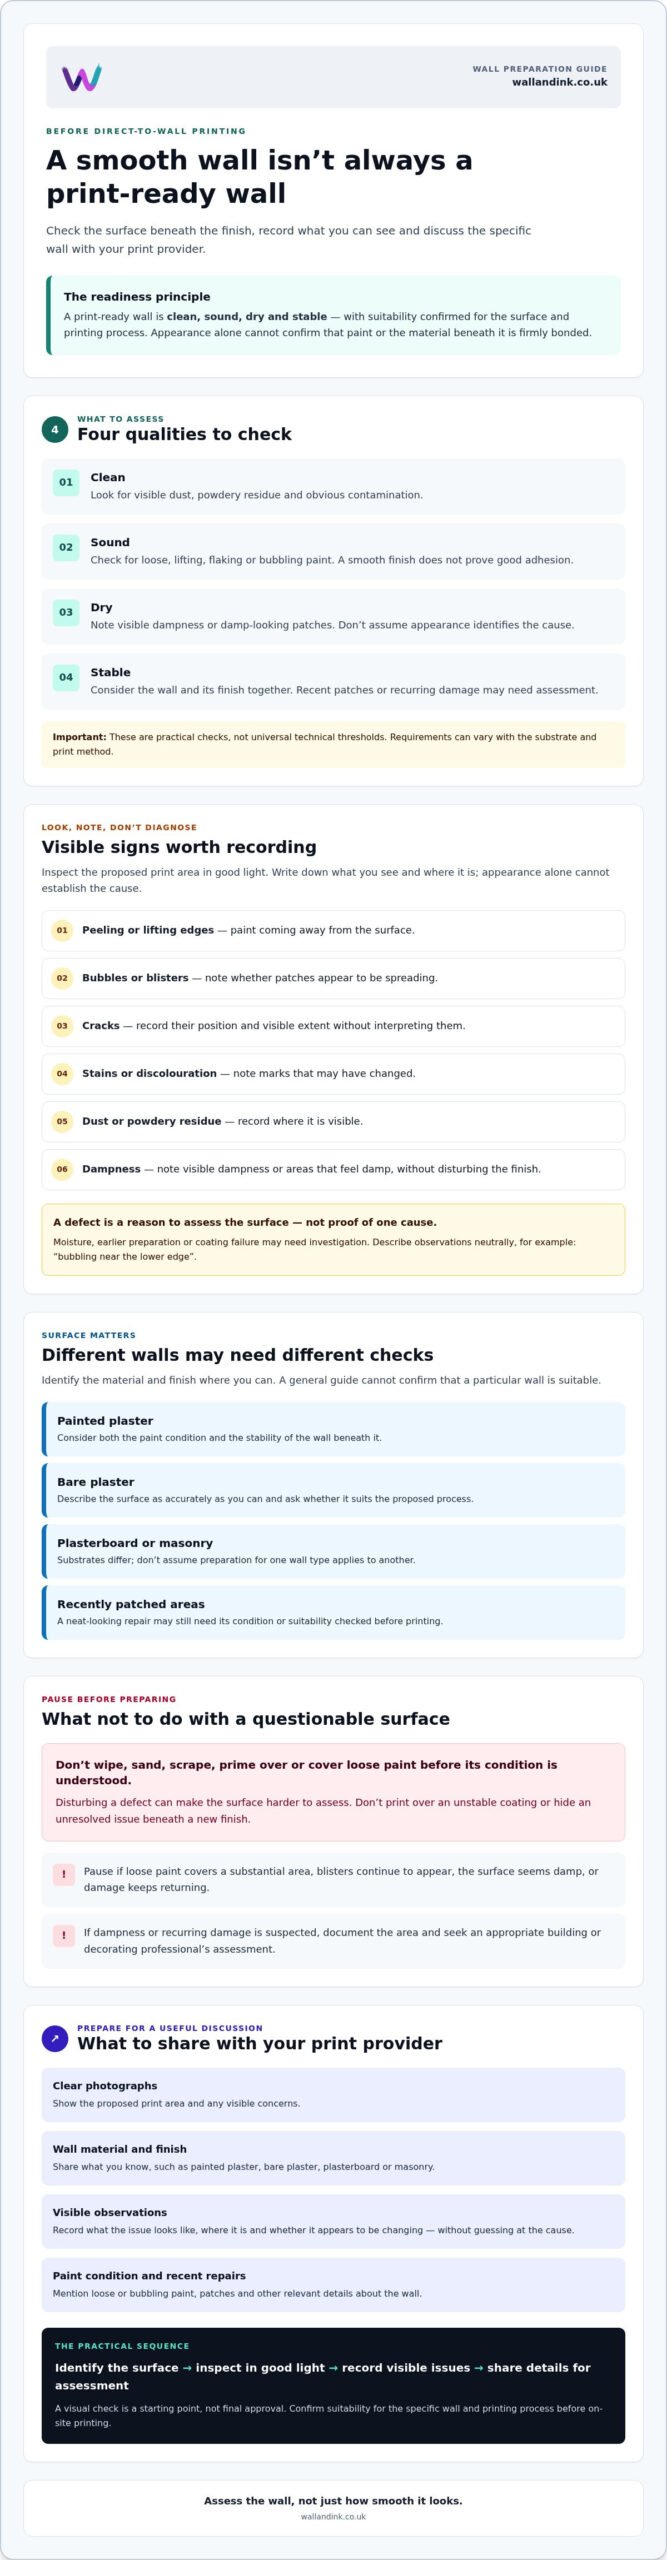
How to prepare a wall for printing: a practical readiness checklist
A clear sequence helps you prepare useful information without disturbing a surface that may need attention. Wall preparation for wall printing isn’t a case of applying the same cleaning or repair method to every wall. First establish what’s there, record its condition, then confirm the next step with the print provider.
A step-by-step wall preparation sequence
- Inspect the full print area. Look across the wall in good light. Note visible damage, contamination, uneven areas and changes in finish.
- Photograph it before doing any work. Take wider views that show the whole proposed print area, then close-ups of defects or unusual patches. Keep the original images so you can compare any changes later.
- Identify the surface and finish. Record the substrate if you know it, such as plaster or masonry, and whether the wall is painted, bare or has a different coating. If you’re unsure, say so rather than guessing.
- Separate cleaning from repair. Light cleaning may be appropriate for a stable surface, but confirm a suitable method for the existing finish first. Don’t wipe, sand or prime over loose or bubbling paint. Pause and ask for advice if the coating is unstable or dampness is suspected.
- Confirm readiness before printing. Ask the provider to clarify the required final surface condition and whether primer or finish requirements apply to your specific wall and printing process.
What information should you share with the printer?
Give the provider the wall dimensions, the substrate type if known and a plain description of the existing finish. Flag visible peeling, bubbling, staining, cracks, dust or suspected dampness. Attach wider and close-up photographs, and identify where each issue appears on the wall. This makes it easier to discuss the actual surface rather than relying on a general description.
Before arranging repair work, ask who should complete it and what condition the wall must be in before printing. Check whether the proposed cleaning method, primer or final coating needs approval. The right answer depends on the particular surface, so don’t assume that a product or treatment suitable elsewhere will be suitable here.
Use this simple decision point: go ahead with preparation only when the surface appears stable and the provider has confirmed the appropriate cleaning approach. Pause if you find loose paint, spreading defects or possible dampness. Seek a suitable assessment if the wall’s condition or substrate is unclear. To discuss a surface for a proposed print, contact Wall & Ink about direct-to-wall printing.
Getting a wall ready for a professional direct-to-wall print
A useful handover gives the print provider a clear picture of the wall before the project moves forward. Share accurate dimensions, the surface type if known, details of the existing finish and photographs that show both the whole area and any defects. This information helps start a practical conversation about suitability. It doesn’t replace an assessment of the actual surface or confirm that it’s ready for printing.
What happens when the wall is assessed for a print?
The provider can consider the wall’s visible condition, its dimensions, access to the print area and the proposed artwork. Preparation requirements depend on the actual surface and printing process, so ask the professional to confirm any specific cleaning, primer or finish requirements. If the wall needs repair, that work may need to be completed and checked before the print appointment.
For a productive discussion, have these details ready:
- Wall height and width, plus the area intended for the print.
- Substrate and finish, if known, such as painted plaster or bare masonry.
- Clear photographs of the full wall and close-ups of peeling, bubbling, staining, cracks or other concerns.
- Any known history of repairs or recurring surface issues.
- Questions about who should complete repairs and what condition the wall must be in before printing.
Be precise about what you’ve observed, but don’t try to diagnose the cause of a defect. Early, accurate details help the provider identify questions that need resolving before the project is planned around an assumed surface condition.
Plan the print once the surface is ready
Once the print area and surface requirements are understood, the confirmed dimensions can inform artwork sizing and digital visualisation. Wall & Ink offers bespoke design consultation and digital visualisations as part of its direct-to-wall printing service. These planning steps help develop the proposed image, but they don’t repair the wall or replace checks on its condition.
Good wall preparation for wall printing means coordinating the surface assessment with the artwork and on-site printing plan. If you’re considering a print, you can Discuss your wall-printing project with Wall & Ink and share the wall details you’ve gathered.
Prepare the wall, then plan the print
A successful project starts with understanding the wall, not assuming a smooth finish is ready. Check the surface and its condition, record visible defects without guessing at their cause, and share clear photographs and accurate details with your print provider. Peeling or bubbling paint calls for assessment before you clean, sand, cover or print over it.
Preparation depends on the substrate and printing process, so confirm the required surface condition and any product-specific steps with a professional. Once the wall has been assessed, bespoke design consultation and digital visualisations can help you plan the artwork for the intended area. They’re planning tools, not a substitute for resolving surface defects.
Wall & Ink provides professional on-site direct-to-wall printing for clients across the UK. If you’re ready to discuss your wall and proposed artwork, discuss your wall-printing project. A clear assessment is a practical first step towards confident wall preparation for wall printing and a print plan that fits the space.
Frequently Asked Questions
What does peeling paint indicate before wall printing?
Peeling paint means part of the coating is lifting or detaching from the wall, so the surface needs assessment before printing. It doesn’t prove a single cause: moisture, earlier preparation or coating failure may need investigation. Note where the paint is peeling, whether the area is spreading and whether you can see other changes. Share these observations and clear photographs with your print provider rather than guessing at the cause.
Can you print over bubbling or peeling paint?
Don’t assume bubbling or peeling paint is suitable for printing. Raised or loose paint may not provide a stable surface, and printing over it could leave the underlying defect unresolved. Pause preparation if the area is spreading, damp or recurring. Avoid wiping, sanding, priming or covering unstable paint until the condition has been assessed. Ask the print provider what surface condition is required and whether the wall needs separate attention first.
How do I prepare a painted wall for wall printing?
Start by checking the full print area for loose paint, dust, stains, cracks, bubbles or visible dampness. Photograph the wall and identify the finish and substrate if known. Clean only if the surface is stable, using a method confirmed as suitable for that finish. Don’t sand or prime over loose paint. Wall preparation for wall printing depends on the actual surface, so confirm repair, cleaning or primer requirements with the print provider.
Does a wall need to be perfectly smooth for direct-to-wall printing?
Not necessarily, but a smooth appearance alone doesn’t confirm that the wall is stable or suitable. The substrate, finish and texture all matter, and a coarse surface may affect how fine details in the artwork appear. Share photographs that show the overall wall and any pronounced texture or uneven areas. The print provider can assess whether the surface is appropriate for the proposed artwork and explain preparation requirements for that specific wall.
Can wall printing be done on plaster or masonry?
Plaster and masonry may be suitable, but the material name alone can’t confirm that a particular wall is ready for printing. Check for visible damage, dust, unevenness, staining or powdery areas, and note whether the surface is painted or bare. New or unfamiliar finishes may need closer assessment. Send the print provider the wall type if known and clear photographs, then ask them to confirm suitability for the intended printing process.
Should I use primer before printing directly onto a wall?
Don’t apply primer automatically. Whether one is appropriate depends on the substrate, existing finish and printing process, and the wrong preparation could create a surface that isn’t suitable. Ask the print provider to confirm whether primer is required and what product or finish, if any, is appropriate for the specific wall. If paint is loose, bubbling or damaged, don’t use primer to cover the symptom; have the surface condition assessed first.
What should I send a wall-printing company to check surface suitability?
Send the wall dimensions, the substrate type if you know it and a description of the existing finish, such as painted plaster or bare masonry. Include clear photographs of the full print area and close-ups of peeling, bubbling, cracks, stains, dust or suspected dampness. Mention known repairs or recurring defects, and distinguish what you’ve observed from what you’re unsure about. Ask what final surface condition and preparation the provider requires.