Why would you invest in the raw, industrial aesthetic of exposed masonry only to smother it under a layer of plastic film? It’s a common frustration for property owners who find that traditional vinyl graphics peel away from uneven mortar joints, whilst heavy wallpapers simply fail to adhere to porous surfaces. When you choose printing directly on brickwork, you’re no longer forced to compromise between a vibrant design and the architectural integrity of the wall itself.
You likely agree that a feature wall should enhance a room’s character, not mask it with a finish that feels like a temporary sticker. This guide promises to show you how advanced UV technology allows for high-resolution designs to be printed onto raw masonry, preserving texture whilst ensuring industrial-grade durability. We’ll examine the technical precision behind vertical digital printing, the long-term resilience of UV-curable inks, and the specific surface requirements needed to ensure your mural remains a maintenance-free asset for years to come.
Key Takeaways
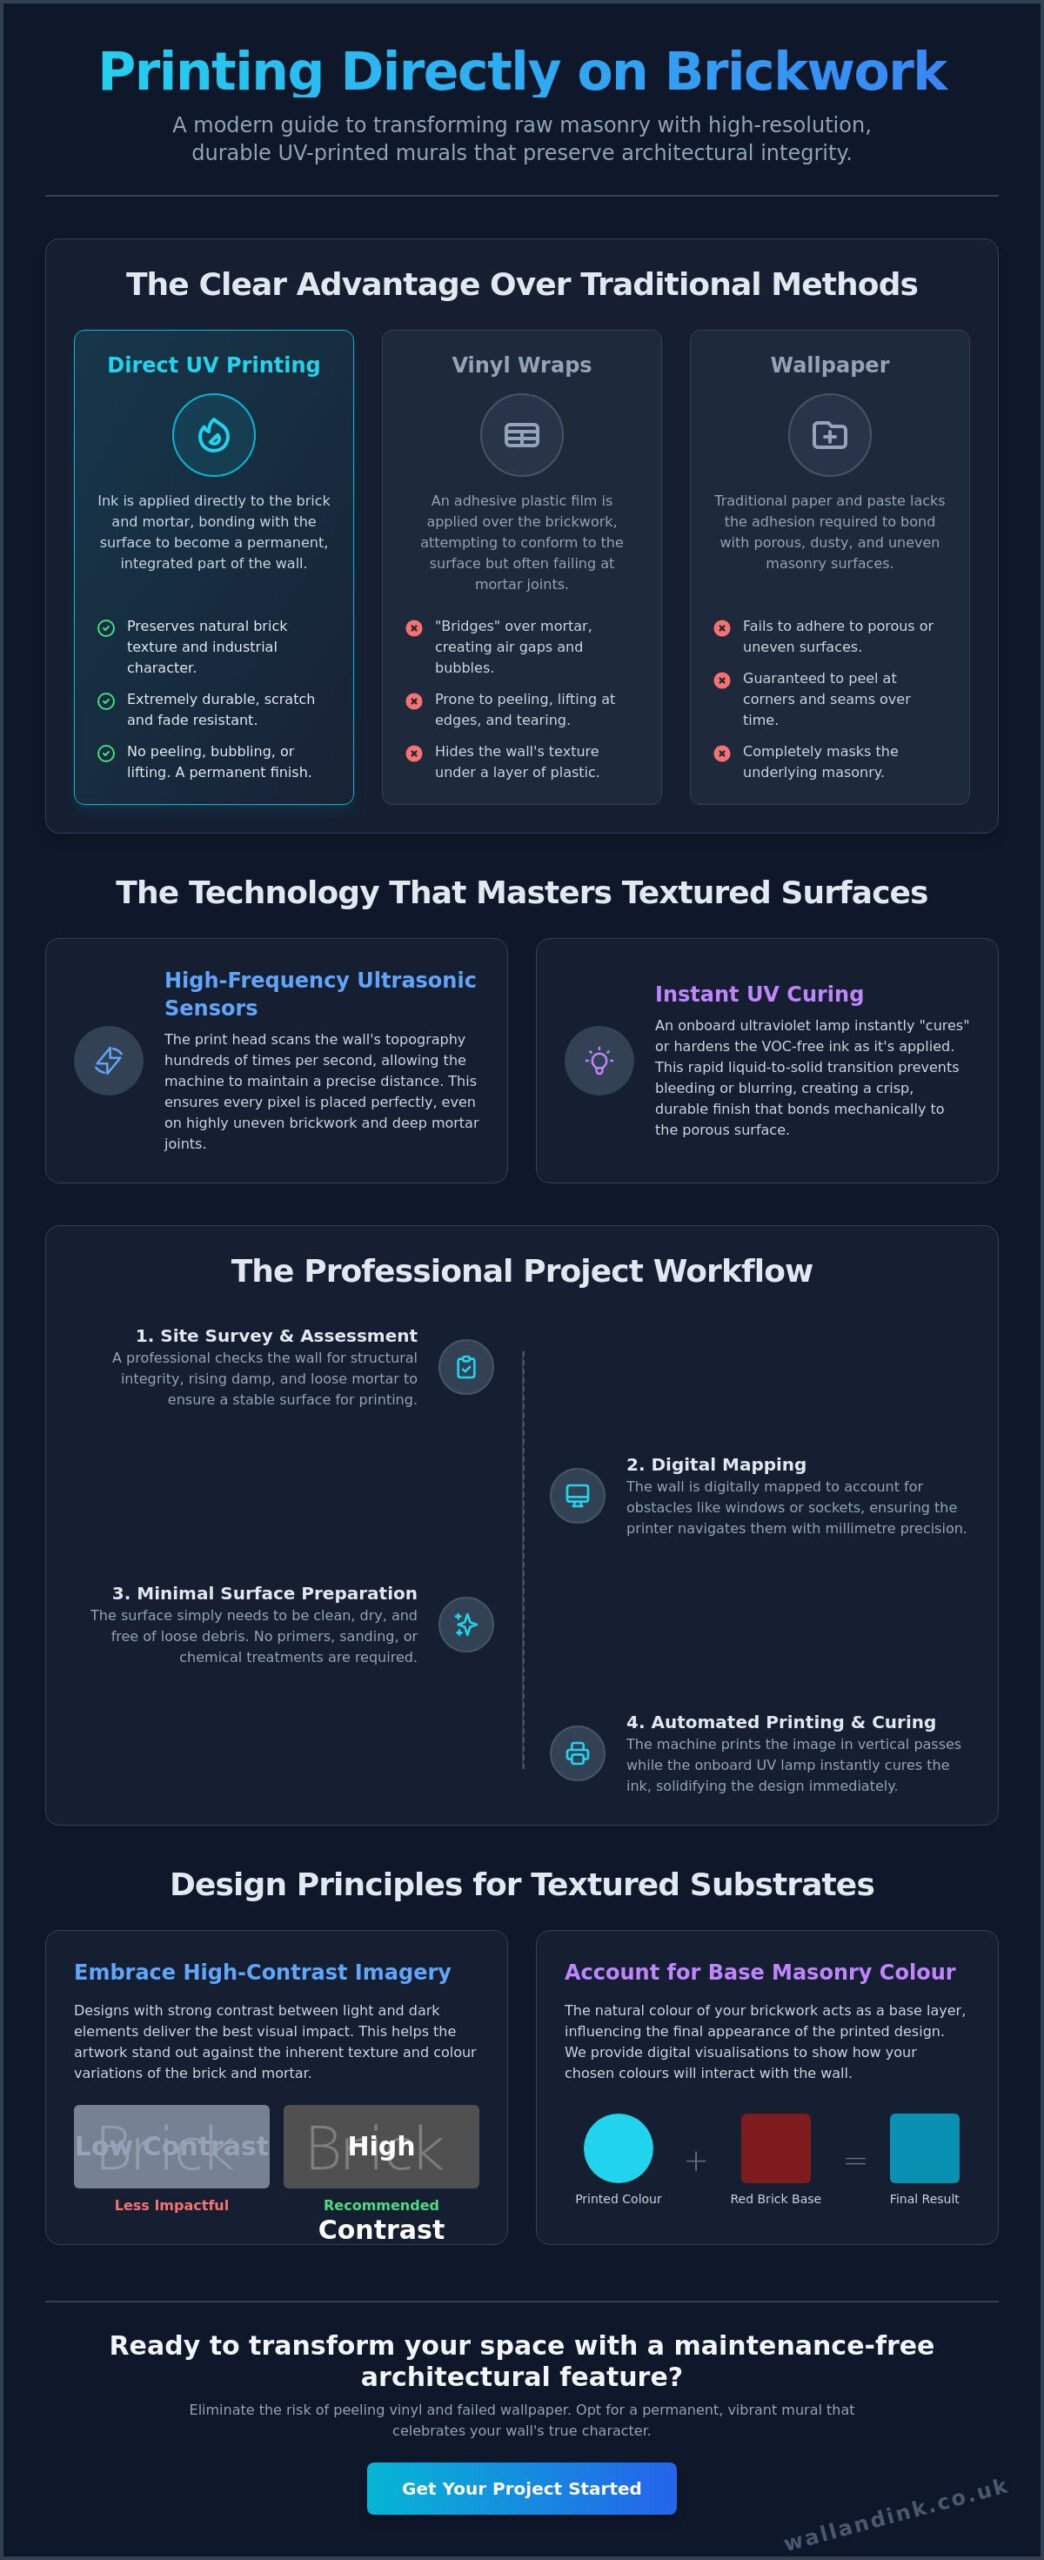
- Understand how direct-to-wall technology applies UV-curable ink straight onto masonry without the need for adhesive films or traditional wallpaper.
- Discover how advanced sensor technology masters uneven surfaces, allowing for precise printing directly on brickwork whilst maintaining a consistent image resolution.
- Learn why direct UV application outperforms vinyl wraps by preserving the natural industrial feel of your wall and providing superior resistance to scratching and fading.
- Master design principles for textured substrates, including how to account for base masonry colours and why high-contrast imagery delivers the best visual impact.
- Gain clarity on the practicalities of organising a project, from preparing your space to understanding the rapid speed and efficiency of the professional printing process.
Can You Print Directly on Brickwork?
The short answer is yes. Modern technology has moved beyond the limitations of hand-painting and adhesive films. Direct-to-wall printing is the specialised process of applying UV-curable ink directly onto masonry surfaces. Unlike traditional methods that rely on a secondary carrier medium, this approach involves no adhesive layers, no plastic films, and no risk of the graphic separating from the substrate. It allows high-resolution imagery to follow the exact contours of the brick, maintaining the tactile essence of the wall whilst delivering crisp, vibrant visuals.
Whilst The history of murals stretches back to ancient fresco techniques, the digital era has introduced a level of mechanical superiority that was previously impossible. This method is equally effective for interior feature walls in professional offices as it is for large-scale exterior building facades. Because the ink bonds with the surface rather than sitting on top of a sticker, the result is a durable, integrated finish that looks like part of the original architecture. When you choose printing directly on brickwork, you’re opting for a permanent architectural feature rather than a temporary overlay.
The Science of UV-Curable Inks on Masonry
The process relies on ultraviolet light to instantly “cure” or harden the ink as it makes contact with the brick. This rapid transition from liquid to solid prevents the ink from bleeding or blurring, even on vertical surfaces. Brick is naturally porous, which provides an ideal mechanical “key” for the ink to grip. This creates a bond that is significantly stronger than any adhesive. Additionally, these UV inks are VOC-free and eco-friendly; they’re a safe choice for schools, hospitals, and residential spaces where indoor air quality is a priority.
Why Traditional Methods Often Fail on Brick
Standard decorative solutions often struggle with the physical reality of masonry. Traditional wallpaper lacks the necessary adhesion to stay fixed to dusty or uneven surfaces, often peeling at the corners within months. Vinyl wraps present a different set of challenges. Some competitors suggest using conformable vinyl to mimic a stencil, but this often leads to “bridging” over mortar joints. These gaps trap air, creating bubbles that eventually lead to tears or edge-lifting. By printing directly on brickwork, you eliminate the peel risk entirely. There is no film to bridge the gaps; the ink simply coats the mortar and brick alike, preserving the industrial character of the building.
The Technical Process: How Wall Printers Master Textured Surfaces
Achieving a high-resolution finish on a rough substrate requires more than just high-quality ink; it demands mechanical superiority. Modern wall printers utilise high-frequency ultrasonic sensors to scan the wall’s topography hundreds of times per second. This real-time tracking allows the machine to maintain a precise distance from the brick, ensuring that every pixel is placed with absolute precision despite the uneven surface. The process of printing directly on brickwork begins with a detailed digital visualisation. This stage allows you to see how the design interacts with the architectural features of the wall, such as bond patterns and mortar colours, before any ink is applied.
The Technical Process of UV curing is what makes this speed and precision possible. As the print head moves in vertical passes, it deposits UV-curable ink that is instantly hardened by an onboard ultraviolet lamp. This ensures that the design doesn’t run or blur, even when applied to vertical masonry or heavily textured surfaces. Surface preparation is remarkably minimal; the wall simply needs to be clean, dry, and free of loose debris to ensure long-term stability. Unlike traditional methods, there’s no need for chemical primers or intensive sanding. For those looking to understand how this technology fits their specific space, exploring the versatility of direct-to-wall applications provides a clear starting point.
Step-by-Step Execution of a Brickwork Print
A professional installation starts with a comprehensive site survey. We check for signs of rising damp or loose mortar that might compromise the ink’s adhesion or the printer’s stability. Once the surface is cleared, we perform a digital mapping of the wall. This accounts for obstacles like windows, doors, or electrical sockets, allowing the software to skip these areas with millimetre precision. During the printing phase, the machine moves along a motorised rail system, building the image pixel by pixel. The sensors ensure the print head retracts and extends to follow the bricks’ natural depth, maintaining focus even on the most irregular surfaces.
Handling Mortar Joints and Deep Recesses
The physics of printing directly on brickwork relies on the “throw distance” of the print heads. This refers to the maximum distance the ink can travel from the nozzle whilst maintaining a sharp dot. Most industrial-grade wall printers can handle a depth variation of up to 10 to 15mm. However, deep-recessed pointing requires specific design considerations. If the mortar joints are particularly deep, we may adjust the design to avoid placing fine text or critical details in those recesses. The UV lamp plays a vital role here; by curing the ink instantly, it prevents the liquid from pooling in the mortar gaps, ensuring the image remains crisp across the entire texture of the wall.
Direct UV Printing vs Vinyl Wraps: Why Texture Matters
Choosing between a high-tech digital application and a traditional vinyl wrap is a decision between architectural integration and a superficial overlay. Whilst some competitors promote “highly conformable” vinyl as a solution for masonry, these plastic films inherently obscure the tactile character of the substrate. By printing directly on brickwork, the ink becomes a permanent part of the wall’s surface. There is no adhesive layer to fail and no plastic film to mask the natural variations of the brick. This method respects the material’s integrity whilst providing a level of detail that traditional wraps cannot match.
One of the most critical technical differences lies in breathability. Brick is a porous material that needs to manage moisture levels to prevent structural degradation. Vinyl wraps act as a non-permeable barrier, trapping moisture behind the film which can lead to damp issues or adhesive failure. Direct UV printing preserves the masonry’s natural ability to breathe. Because the ink is deposited in microscopic dots rather than a continuous sheet, it doesn’t seal the surface. This ensures the long-term health of the building whilst maintaining the vibrant quality of the artwork.
The Aesthetic Advantage of Direct Application
Direct printing allows the “spirit” of the brick to remain visible through the design. Unlike vinyl, which has a distinct border and often an unnatural gloss, UV inks provide a professional matte finish that mimics the look of a master-painted mural. There are no visible edges or seams to betray the illusion. The design appears to emerge from the texture itself, following every crevice and mortar line with mechanical precision. This results in a feature wall that feels intentional rather than an afterthought or a temporary sticker.
Longevity in Commercial and Industrial Environments
In high-traffic areas like retail centres or school corridors, durability is paramount. Vinyl is prone to “picking” at the edges and can be easily scratched or torn by passing equipment. In contrast, UV-cured ink is incredibly resilient to physical contact. You cannot “peel” a printed image because there is no edge to catch. For exterior applications, the resistance to British weather is equally impressive. Professional UV inks are formulated to withstand intense sunlight and heavy rain, offering a lifespan of 4 to 8 years indoors. When you consider that vinyl often requires replacement every 3 years due to fading or peeling, the cost-benefit of printing directly on brickwork becomes clear.
Maintenance requirements also differ significantly between the two methods:
- Cleaning: Printed brickwork can be gently wiped or dusted without risk of the graphic lifting. Vinyl requires specialised care to avoid snagging the edges.
- Repairs: If a brick is damaged, a specific area can often be re-printed to match. Damaged vinyl usually requires a full panel replacement to ensure colour consistency.
Best Practices for Designing Murals on Exposed Brick
Designing for masonry requires a shift in perspective. You aren’t printing on a flat white canvas; the base colour and texture of the brickwork are active participants in the final aesthetic. When printing directly on brickwork, the most successful designs account for the mortar grid as a structural element rather than a hurdle to overcome. High-contrast images perform significantly better on heavily textured surfaces because the natural shadows cast by the bricks can obscure subtle gradients. Technical precision starts with the file quality. Large-scale masonry projects require high-resolution assets of 300 DPI or higher to maintain professional clarity across the entire expanse of the wall.
Colour Theory: Printing on Red vs Grey Brick
The interaction between ink and substrate varies depending on the brick’s hue. For red or dark-toned bricks, we utilise white ink under-printing to act as a primer layer. This ensures that colours remain vibrant and “pop” against the darker background. Alternatively, you might choose to omit the white base layer to allow the brick colour to act as a mid-tone. This creates a vintage, weathered look where the art feels aged and integrated into the building’s history. It’s a strategic choice that depends on the desired atmosphere of the space. Be mindful that fine details or small text can easily be swallowed by deep mortar lines; keep critical typography large and bold to ensure legibility.
Digital Visualisation: Seeing the Result Before Printing
A digital mock-up is a non-negotiable step in the project lifecycle. This visualisation allows you to see how the natural topography and shadows of the masonry will interact with the design. We use these models to adjust the placement of key elements, ensuring that faces, logos, or intricate patterns don’t fall directly onto deep cracks or irregular mortar joints. This level of foresight eliminates the guesswork and ensures the final application meets industrial standards for precision and aesthetic impact. If you’re ready to see how your design translates to a textured surface, you can view our design visualisation process for brickwork to understand the preparation involved.
Effective design also considers the viewing distance. Murals in retail environments or office lobbies are often viewed from a few metres away, requiring higher detail than large-scale exterior graphics. By balancing the image resolution with the physical characteristics of the substrate, you ensure a maintenance-free result that enhances the architectural value of the property. Precision in the design phase is the foundation for a successful execution of printing directly on brickwork.
Organising Your Commercial or Residential Brick Print Project
Organising a project for printing directly on brickwork requires far less upheaval than traditional interior or exterior renovations. Because the technology is mobile and self-contained, the logistical requirements are straightforward. Most commercial and residential projects are completed within a single day, depending on the scale of the design. Modern wall printers typically operate at speeds of 2 to 6 square metres per hour, meaning even large-scale Commercial Wall Murals are executed with minimal disruption to your daily operations or home life.
Industrial standard pricing is typically structured per square metre. This approach ensures radical transparency, allowing you to understand the exact cost of your project based on the dimensions of the wall rather than vague estimates. This clarity is a hallmark of modern direct-to-wall services, distinguishing the process from traditional trades where hidden costs often emerge during installation. By focusing on a fixed metric, you can plan your budget with the same precision that we apply to our printing.
Site Preparation and Requirements
The preparation for a wall printing project is designed to be as non-intrusive as possible. Unlike wallpapering or painting, there’s no need for intensive sanding or chemical priming. The primary requirements include:
- Surface Cleanliness: The brick simply needs to be free of dust, cobwebs, and loose mortar. A quick vacuum or brush-down is usually the only preparation needed to ensure the ink bonds correctly.
- Spatial Clearance: We require a 1.5-metre “workspace” in front of the wall to accommodate the motorised rail system and the vertical movement of the printer.
- Level Foundation: The floor at the base of the wall must be relatively level to ensure the printer track remains stable throughout the run.
- Power Access: Access to a standard domestic or commercial power outlet is essential for the machinery and the UV curing lamps.
Next Steps: From Consultation to Completion
The journey from a blank wall to a vibrant mural begins with a simple site assessment. To provide an accurate quote, you’ll need to provide the dimensions of the wall and a clear photo of the brick texture. This allows the technical team to evaluate the mortar depth and any potential obstacles like sockets or windows. We then move into the digital visualisation phase discussed earlier to ensure the design sits perfectly on your specific masonry bond.
The installation itself is a “clean install” process. There are no messy adhesives, no toxic fumes, and no dust clouds. Because the UV ink cures instantly, the mural is touch-dry and durable the moment the machine completes its final pass. Once the project is finished, there’s no drying time or “off-gassing” period; you can return to using the space immediately. If you’re ready to transform your masonry, you can get a transparent quote for your brickwork project today.
Post-print care is equally simple. UV-cured images on interior walls have a verified durability of 4 to 8 years under normal conditions. To keep your mural pristine, occasional light dusting with a dry cloth is all that’s required. You don’t need specialised cleaners or protective coatings, as the ink is already industrially hardened against the elements. This makes printing directly on brickwork a truly maintenance-free solution for any feature wall.
Elevate Your Architectural Space with Direct UV Technology
You now understand how direct-to-wall printing eliminates the common failures of legacy methods like vinyl and wallpaper. By choosing to preserve the natural character of your masonry, you ensure a finish that is both aesthetically integrated and structurally sound. Printing directly on brickwork provides a level of detail and durability that traditional overlays simply cannot match.
Our specialised process utilises UV-curable inks designed for 10+ years of durability, delivering industrial-grade precision on any substrate. We maintain radical price transparency with standard rates per square metre, giving you total control over your project’s scope and budget. It’s time to move beyond temporary stickers and invest in a permanent architectural feature that respects the integrity of your building.
Request your bespoke wall printing quote and discover the impact of high-resolution design on raw masonry. Your feature wall is ready for a professional, maintenance-free upgrade.
Frequently Asked Questions
Can you print on painted brickwork as well as raw brick?
Yes, we can apply designs to painted brickwork as effectively as raw masonry. The UV-curable ink bonds with the paint layer, provided the existing coating is stable and not peeling. If the paint is in good condition, it often provides a consistent base for high-resolution graphics whilst maintaining the underlying tactile texture of the brick.
Is the ink used for printing on brickwork waterproof for exterior use?
Yes, the inks used for printing directly on brickwork are fully waterproof and weather-resistant. Once the ultraviolet light cures the ink, it becomes an industrially hardened layer that withstands heavy rain and intense UV exposure. This makes the process ideal for exterior wall printing projects on building facades across the UK.
How long does it take to print a large mural directly onto a brick wall?
Most commercial wall printers operate at a speed of 2 to 6 square metres per hour. For a standard feature wall of approximately 12 square metres, the printing phase typically lasts between two and six hours. Total site time includes a small window for machine calibration and digital mapping to ensure the design aligns perfectly with the specific masonry bond.
Does the wall need to be perfectly flat for the printer to work?
No, the wall doesn’t need to be flat. Our equipment utilises high-frequency ultrasonic sensors to track the wall’s topography in real-time. The print heads automatically adjust their position to maintain a consistent distance from the brick, allowing the ink to reach into mortar gaps and over irregular textures without any loss of resolution.
Can the print be removed from the brickwork if we change our branding?
UV printing is a permanent solution, but it can be covered if your branding requirements change. Because there is no adhesive film, you cannot simply peel the mural off like a sticker. Removal typically involves painting over the design with a masonry-grade primer and topcoat, or using professional abrasive cleaning methods for exterior surfaces.
Will the printing process create a lot of dust or noise in my office?
The process is exceptionally clean and quiet, making it suitable for active professional environments. The machine produces a low hum similar to a standard office printer and generates no dust or debris. Because the UV inks are VOC-free, there are no chemical fumes, allowing your team to continue working whilst the mural is installed.
What happens if the mortar is crumbling or the brick is damaged?
We recommend that any structural damage or crumbling mortar is repaired before the project begins. Loose debris can interfere with the mechanical precision of the print head and may cause the ink to flake off over time. A stable, clean substrate is the only technical requirement to ensure the long-term durability of the artwork.
Do I need to apply a sealant over the print once it is finished?
No, a sealant is generally not required for standard applications. The UV-curing process hardens the ink into a scratch-resistant finish that is designed to last 4 to 8 years indoors and withstand harsh exterior conditions. Whilst an optional clear coat can be applied in high-abrasion industrial areas, the standard print is already maintenance-free and industrially graded.